David has done a thorough and fine job of reporting on his play test here. If you do not know the system, you can learn more about it here.
The system uses a 250m hex and a 30 minute time scale. The system is called Vive l’Empereur! The game has basic, advanced rules and a graduated command system with 5 levels that you can choose from.
==>
– Playtest report (note use of playtest materials) By David Murray–
The Battle of Jena: Ruchel’s intuition
14th October 1806
Prologue
Historical considerations
This is a playtest battle report of the hypothetical scenario, Ruchels’ Intuition. In the days before the battle of Jena, Ruchel was in Weimar, while the rest of Hohenlohe’s army was around Jena. He had three options: stay in Weimar as per his orders and wait for Saxe-Weimar’s division to arrive, follow the main army, or join Hohenlohe. This scenario explores a more active role for Ruchel, an energetic general, who proposed his help to Hohenlohe and could have moved the day before the battle to Jena.
Game considerations
In this replay all the XVI optional rules and XVII command and control rules, up to level 4 are in play. The use of the command and control rules clearly demonstrates the differences between the two armies. In the historical battle scenario, there is only one Prussian commander on the field, Hohenlohe. Having all the Prussian forces under a single commander does have a few minor benefits, such as orders requiring no obedience checks and so having no delay. But the disadvantages far outweigh the positives, any unit in his army not within 6 hexes of Hohenlohe is out of command, and all in-command units need to follow the same tactical order, which severely restricts tactical options. This results in an unwieldy army that is difficult to coordinate on anything but a static defence or all-out attack. The addition of Ruchel and his corps is a welcome addition for it allows for some more creative tactical possibilities. Of course, Napoleon doesn’t have any of these problems, he can issue up to 3 orders a turn and although there might be a slight delay in orders becoming active this is no more than a minor issue when you consider the tactical flexibility his command structure gives as well as his ability to keep the entire army in command.
Hohenlohe’s deployment considerations
 The Prussians set up first. The setup instructions are quite restrictive and so there are only a few options of any significance. All the units of Hohenlohe’s will soon be out of command as he was at Krippendorf not expecting a major French attack. At 8am he will gain freedom of movement as he realises the game is afoot. The same is true of Ruchel’s forces, although they are in command, they may not move until 8am. All Prussian forces begin the battle with a default defence tactical order, with the units in and around Rodigen further penalised by having no freedom of movement until 9am, unless the French are kind enough to move within 2 hexes of them.
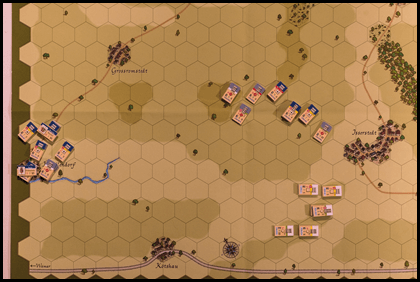
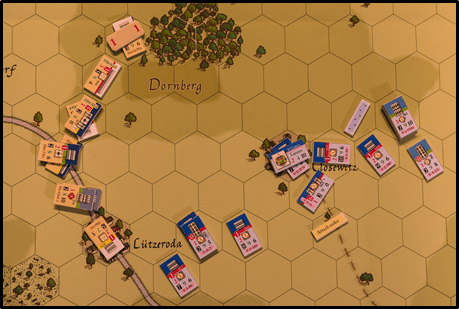
The first important decision is how to deploy Teunzien’s detachment. It begins the game defending a triangle made up of the villages of Lutzeroda, Closewitz and the Dornberg hill. Opposing them will be the powerful French corps of Lannes, a force not to be trifled with. The thick fog at the beginning of the battle will hinder Lannes advance and with careful placement the Prussians can be arranged in such a way that on the first turn the French may not make contact. However, the French can easily reach Closewitz, and so Teunzien will need to decide on how to defend the village or to abandon it entirely. In this refight only a small Saxon Grenadier unit was placed defending Closewitz, using the optional rules these will get a +2 morale bonus, giving them a morale of 11, so only a D result will drive them from the village. Lannes has a combat modifier of +2 which makes any attacks he personally coordinates very difficult to resist, so if he supports an early attack on Closewitz the likelihood is that it will fall quickly regardless of the calibre or numbers of defenders. The rest of the Prussians were deployed on a line between Lutzeroda and the Dornberg hill – the French will not be able to reach the line on their first turn. As for the Prussian cavalry, they were placed on the Prussian right, there they could cover the French approach on Lutzeroda.
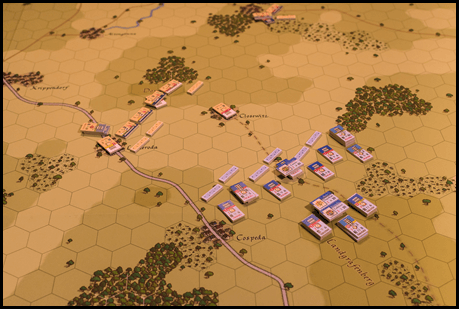
The scene at 6am; thick fog separated the two forces (note the limited number of Prussian and Saxon skirmishers as only their light infantry can deploy them).
Napoleon’s deployment considerations
French deployed second. Napoleon, Lefebvre and the Guard setup on the Landgrafenberg, so when the fog eventually lifts they will have a fine view of the battlefield. The Guard were issued a reserve order as the penalty for committing the Guard early in the battle is quite severe. Lannes’ Corps was deployed stretching from the village of Cospeda to the woods in the east, covering a front of nearly 2km. In studying his map Lannes calculated that even with the thick fog he could launch an assault on Closewitz within half an hour. Lannes would personally lead the 21st Light Infantry, 1st Artillery and 54th Line Infantry in moving forward to take the village, with such a strong force at his disposal the village should be cleared quickly. On the right the cavalry was placed, these would sweep forward if the Prussians tried to retreat, forcing them into square to await the arrival of the French guns.
Mirroring the historical opening moves, Napoleon wanted to push back the Prussians to make room for the arrival of the rest of the army and so issued the following order for Lannes:
-
Primary order: Tactic: attack. Objective: clear enemy out of Lutzeroda, Closewitz and the two hexes of the Dornberg hill. Conditions: none
-
Secondary order, if primary order succeeds: Tactic: attack. Objective: press and pursue enemy as far as Krippendorf, occupy Krippendorf if possible. Conditions: halt attack if corps becomes fatigued (fatigue 8+) or can’t sustain the attack, 50%+ units disorganized).
-
Secondary order, if primary fails: Tactic: defense. Objective: establish defensive line as close to a line stretching from Lutzeroda to the Dornberg hill. Conditions: none.
And so, the battle was joined…
Chapter One – Fighting in the fog (6am to 10am)
6:00 French turn
Thick fog hung around the battlefield as first light dawned. Lannes Corps moved forward, movement hindered by the thick fog. His orders were clear and his tactical attack order meant that at least half of his units must move towards the enemy and engage if possible, not a problem in this instance, as all his units rolled forward into the dense fog seeking the enemy.
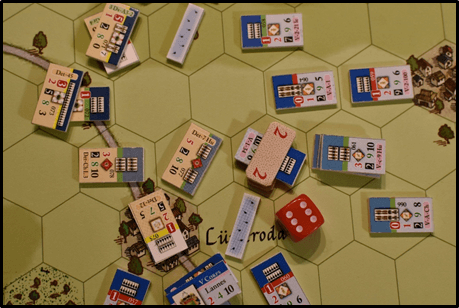
On Lannes left the 17th Light Infantry, 88th & 103rd Line Infantry and the 2nd Artillery advanced towards the Prussian position in and around Lutzeroda. Due to the thick fog they failed to make contact within the first half hour of the battle. In the centre, Lannes and the 21st Light Infantry supported by 1st artillery advanced on Closewitz. The artillery unlimbered directly in front of the village. To Lannes’ right, the powerful 54th Line Infantry (10 steps) moved up to support the assault on the village. Over on the right, the 100th line infantry with the cavalry and horse artillery advanced on the Dornberg hill.
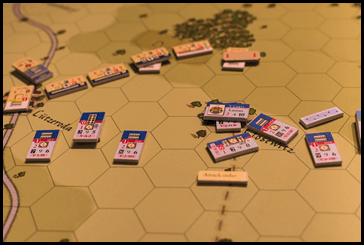 Saxon grenadiers, charged with defending Closewitz, fired at the French guns as they unlimbered, but their fire did little to slow the deployment of the guns. However, the stone walls of the village as well as the thick fog prevented the guns from having any noticeable impact on the grenadiers, in casualties or morale. Lannes not wishing to be held up by what appeared to be such a small Saxon force, launched the 21st light and 34th line infantry at the village. With Lannes personally directing the attack (using his +2 combat modifier), the Saxons were quickly expelled and retreated towards the woods behind the village. Lannes and the victorious 21st light infantry promptly occupied the now abandoned village.
By using so much movement and engaging in melee, Lannes’ Corps gained 2 fatigue points.
6:00 Prussian turn
All Prussian units begin the first turn in command but on subsequent turns they will be out of command, which will limit their movement options. Losing Closewitz on the opening French turn was not completely unexpected, although it was hoped that the grenadiers’ high morale would have kept them there for at least an hour (9 morale grenadier unit +2 for being in a village). The imperative question was should the Prussians hold their ground or retreat? Lannes’ Corps was a very robust fighting force and unless the Prussian shot very well their chances of standing for any time against them were slight. Being out of command next turn meant any movement had to be towards their commander, Hohenlohe, who was several kilometres away in Kapellendorf. The Prussians decided to pull back, pivoting on the village of Lutzeroda.
The movement caused Taunzien’s detachment to gain a fatigue point
12th Infantry continue to hold Lutzeroda, the cavalry behind the village also held position ready to counter-
I enjoyed the system when I first tried it (although not a fan of the Spanish campaign), but need to decide if I just want to stick with one Nappy system (Eagles from Hexasim) or not. Maybe if they hit on different battles…