On to the game! [NB: Usually Axis has initiative in mid-’41, but the Allies have it in this Scenario].
June I 1941: Allied Player Turn.
Weather: The Levant includes the Desert and North African West (NW) weather zones. The Roll for Temperature is 3 and Conditions 5. The charts translate that into Hot and Good weather everywhere, as well as calm seas.
Initial Phase
Supply: All Vichy forces are in General Supply per special rules. As explained above, Allied forces (air and ground) in Palestine are in General Supply via RSR from Egypt. Additionally, 1/3d an LP is spent in Haifa to put the 1st Australian Corps in Offensive Supply. In Iraq, the situation is a bit more complicated. ⅓ an LP is spent in Basra for General Supply. The RSR carries it to the first QM unit, which distributes it to the second QM. All Allied forces are within the 20-hex MSR of the 2d QM as follows:
1. Northern Force. Can trace a 20-hex QMSR as follows: along rail one hex west (1), across the Euphrates (3), ten desert hexes (each counts as 1.5, so 15), and then a final road hex (1).
Other ground forces also well within the 20-hex QMSR. The XXI1st Corps is adjacent to the QM; Hab force is 16 net hexes away, along roads and desert.

Spending ⅓ LP to provide general supply to the 12 SPs of ground forces is more efficient than breaking the LP down into 20 GSPs. By contrast, supplying air via GSPs is more efficient. The RAF forces in Iraq consist of 4 wings. They are a motley collection of mostly useless planes, and most are not worth precious supply. ⅓ an LP has been left in Habbaniya. It breaks down into 6 GSPs. GSPs may provide general supply within 3 hexes (15.E.1.b.iv). 2 are spent to fuel the Blenheim wing; 1 for the 0.5 wing of the Valentia transports (B/T types count double for supply). The other planes lack the range to help turn 1, and are left unsupplied (E-1, as they are not isolated, being able to trace to the ST in Basra). They can still fly missions, including transfer (15.I.3.a). 3 GSPs remain with the force.

Finally, ⅓ an LP is spent at the Basra Supply Terminal to put the XXIst Corps (see above, starts next to 2d QM) in Offensive Supply (15.S.2). GSPs also can provide Offensive Supply (15.T.2); and, as an option, the Allies could have provided Offensive Supply to ground units in the Initial Phase via GSPs (6.3.a.iii). However, it would be inefficient to break down an LP to provide offensive supply for the ground forces, which amount to 9 SPs. It is more efficient to supply the Corps HQ, as the Indians intend to operate together. Moreover, GSPs must be in the unit’s actual hex to provide offensive supply in the absence of an HQ (15.E.1.b). Naval forces are in supply, because the Haifa Naval Base contains a ST in General Supply (See 15.X.5.).
As supply has been addressed the next task in the initial phase is placement of reinforcements (here, 1/3d an LP is placed at Basra by the Allies; so 2/3ds an LP remain at each Haifa and Basra) and NIM spotting. This is code-breaking, etc. Vichy starts with a small navy (2 DDs in Tripoli). The Allies roll on the naval success table, modified by +1 for Ultra and +2 for being British in Europe. The modified roll of 5 fails (8 needed on that table for success).
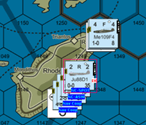
Next, air units are assigned to naval-cooperation and gunnery spotting. By rule, all air units with naval codes are assigned to naval coop. This includes here for the allies the two FAA unit that set-up in Haifa (Fulmar and Swordfish), Code A Wellingtons in Port Said, and Beaufighters at El Arish. The Allies assign no other units to naval coop. The Axis assign the Recon squadron in Tripoli and the two Luftwaffe Code S units in Rhodes, along with the Me110s and Ju88D recon planes. Tomahawk fighters in El Arish are assigned to Naval Gunnery spotting in anticipation of assisting naval bombardment support in the Bekaa Valley.


That completes the Initial Phase – on the the Movement Phase!
Movement Phase
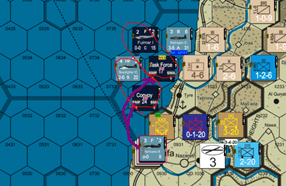
Allied Plan: Given the Vichy set-up, and objectives, the Allies will try to break the main Vichy force on the Litani River and Bekaa Valley the first turn. To that end, it is assumed the LayForce Commando unit has been pre-planned to launch a Raid on Aadloun (1034). (Note: Had Vichy not stationed an infantry regiment in Sidon, the Allies might have launched a Tactical Landing there to cut-off the Vichy retreat; see 9.K.b). Meanwhile, forces from Iraq will occupy key positions to cut-off northern forces after an assault on Aleppo.
Airbase Bombing
The Movement Phase begins with Airbase bombing, first by the Phasing Player and then the non-Phasing Player (6.3.b.ii.I.a/b). The Allies target the Vichy air force in Damascus. Maryland assault bombers fly from El Arish, joined by Hurricanes from Haifa:

The Hurricanes, if they bomb, have a OBF of 1 (all units fly normal range). In light of the threat, the Vichy fighter rises the meet the Hurricanes, which switch from a bombing mission to escort (8.F.1). They two fighter are automatically paired against one another. The Vichy Air Superiority force could try to bypass the escorts and bounce the bombers; but that tactic will fail on an R resultand the British escorts will fire @ +3 (11.C.4.b.i.2); thus, the Vichy fighters engage the escorts. Because both sides have one squadron, there is no DRM for fighter superiority. Rather, the sole DRM is ACEV. For the CW, it is +2; for Vichy, +1. This means the CW roll is +1 (the ACEV difference), and the Vichy roll net -1. The British fire first on the +1 column (attack of 3; defense of 2), with the +1 ACEV difference. The result is a modified 7, which is a “1” result and eliminates the Vichy fighter. Vichy, rolling on the “0” table (attack of 3; defense of 3), with the -1 ACEV difference rolls a modified 3. That achieves an “R” result, which has no impact on the escorting fighters. The Vichy squadron is placed in the EFT (eliminated over friendly territory) box.
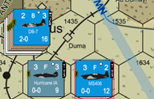
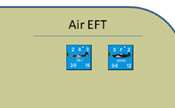
The Maryland bombers now get to bomb Damascus airfield. The hex contains 1 point of light AA and, because it is a Major City, 1 intrinsic AA point, for a total of 2. The DRM for AA fire is +1 for National Technical Means; the Type A give no other DRM. The Vichy flak gunners are sharp, because the result is a modified 10, which is an “R” result. That reduces the bombing strength of the Marylands by 25% (from 2 to 1.5). If this were a strategic mission, bombs would be dispersed; but airbase bombing is tactical. Next, the Marylands try to hit the airbase. It takes 3 OBFs to hit the airbase, and the flak has reduced the effectiveness to 1.5. So the bombers have a 50% chance of hitting (8.G.1). The roll on percentile dice is 36, which hits because it is less than 50. Damascus receives an airbase hit, and the Vichy bomber squadron there is eliminated (8.G.1.c; 1 ARP worth of planes eliminated per hit), also going to the EFT box.
The Allies have succeeded in gaining local air superiority. In retrospect, Vichy would have been better off not contesting the mission, as only 1 air unit would been hit by the bombing. But hindsight is 20/20. The Allied planes will return to base in the air return step (6.3.f).
The Axis decline airbase bombing missions. The only remaining force capable of doing so are the German Night Bombers based in Rhodes. They would need to fly extended range to reach any targets; they will be kept for other missions.
Naval Spotting.
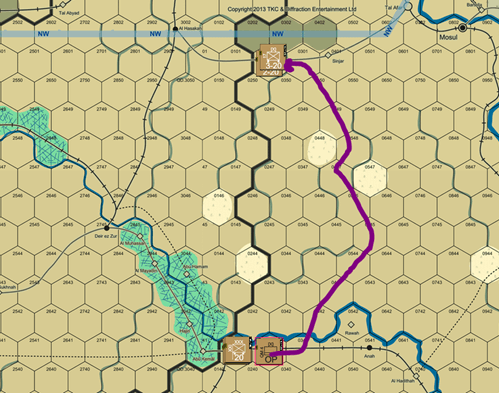
Vichy has a small naval force, and NIM spotting failed. So, the Allies could use some aerial spotting. The Type A (Anti-Sub) Wellingtons based at Port Said are a good choice for this. They must fly naval-coop missions (because they are naval coded), but are unlikely to actually hit any ships with bombers, as not Code S (and cannot assist with naval gunnery; wrong type). The Allies can either spot from base, using notional patrols from Port Said (8.K.4.c), or fly to a specific sea zone (9.I.10). The former mission cannot be intercepted, but can only search once per Naval Movement Segment (NMS). The latter, by contrast, allows one search per Natal Task Group (NTG) per Sea Zone (SZ) per NMS, including adjacent SZ (+1 to search attempts if only the current SZ). Because the Vichy fighters are now off the board, the Allies can fly a Rule 9.I.10 mission without needing escort. The Wellingtons conduct a Rule 9.I.10 mission to fly to the SZ containing Tyre. The hex is easily within range (Range -4 to center of SZ), and the Wellingtons could fly an extended mission if needed.
Vichy retains a naval spotting asset in Tripoli, the squadron of PO recon planes. Because the Allies have fighters in intercept range of the likely area of operations for the RN (the Beaufighters at El Arish), the PO planes remain at base, and will spot pursuant to Rule 8.K.4.c, flying notional patrols. Had they flown to a Sea Zone, they could have been bounced by the British Fighters, as a Rule 9.I.10 mission may be intercepted. German Ju88D1 planes at Rhodes, using extended range, also spot from base. Again, had they flown to a specific SZ, British fighters might have intercepted.

Allied Naval Movement
The covering force for the amphibious landing, reduced to 4 destroyers and Ajax (TF17), leaves Haifa and enters the adjacent SZ. Its mission will be to battle any naval interference from Vichy and provide naval fire in support of the anticipated inland attack. (Given the small distances naval forces will move, we will not worry about fuel (SMA) unless it becomes relevant; SMP represents time and SMA fuel in the system). The TF’s move has air cover from FAA Fulmars out of Haifa (8.K.4.f; roll of 4-10 made). Air cover is handy, because an “R” result won’t send them back (only elimination).
At the same time, Convoy 24, carrying Layforce and augmented with the remaining vessels – all dedicated to Combat Gunnery Support (CGS) (13.Q.1.b.ii; more effective Amphibious Gunnery Support not permitted, as the Allies are not launching an assault, but rather a raid) – moves out under air cover from Beaufighters based at El Arish (roll of 4-10 made). The range is so short here, the LCs are carrying Layforce (LCs have an SMA of 7, but have an SMA of 2 when carrying the force themselves (9.K.2.b)).
Both these moves take a mere 1 SMP (each group can move 14 per NMS). Each force only can spend up to 2/3s of its SMP allowance, because each will provide Combat Gunnery Support (CGS) can spend up to 2/3s (13.Q.b.ii.). The move of 1 SMP does not approach either limit. (Note: the LC spends more, 3 SMPs, 2 for the Raid; 9.K.4.e.ii.3.a.).
Both the German and Vichy search planes can attempt to spot both forces; and both are subject to coast watchers. The Ju88Ds enjoy a +2 DRM for ACEV; the Vichy spotters 1. Both naval group are spotted (rolls of 8 and 9 respectively; modified 8 needed).
At this point, the Luftwaffe strikes. Extended range (Ju88) and Long range (He111H) anti-shipping bombers out of Rhodes, without escort (out of range), seek to find the Allied Naval groups. The Luftwaffe has 3 squadrons. Randomly (simulating the limited intelligence of a two-player game) 1 is allocated to TF 17 and 2 are allocated to Convoy 24. But the air units need to locate their targets at sea (8.L.2; requires 6-10). The single squadron of Ju88A4s succeeds, and engages in ATAC with the Fulmars. The He111H wing, having found nothing, returns to Rhodes.

The LW has a +1 edge in ACEV over the FAA planes (+2 v +1). But the British get a +1 DRM for fighter superiority (11.C.2). Brits fire on the -1 column @ net zero DRM, achieving an “R” result, The LW, with a +1 on the +1 column, also achieve an R. Because the anti-shipping Ju88A4s were already flying at extended range, the 2 OBF was already reduced to 1; and the R result reduces it further to 0.75. TF17 then fires flak. Because CLAs were assigned to the landing force, TF17 only has 3 flak points. But DRMs are +1 for Type B, +2 for National Technical Means, and +1 for Naval Efficiency. The next roll is 11, another “R” result, and another 25% reduction. This leaves a 56% chance of a single strike, which is made with a roll of 17 on percentile dice. The Ju88s target the CL Ajax. DRMs are +1 for ACEV v. Naval Efficiency and +1 for code S. A 9 is rolled (needing an 8), and Ajax suffers a hit. The German planes will return to base.
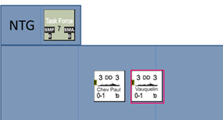
The Vichy destroyers (Chev Paul and Vanqueiln) based at Tripoli might like to try to intercept the Allied Convoy per Rule 13.S (Naval Interception). However, interception requires ships either at sea or at a Naval Base (13.S.2). Vichy lacks a Naval Base in the Levant. So no interception is possible.
With the amphibious force and the covering force off the Lebanese coast in position, an amphibious Raid is declared at 1034 for Layforce (the landing does not occur until the beginning of the ground movement phase, see Rule 9.K.4.e.2). Allied Naval Movement ends. Convoy 24 will provide CGS to the attack on 1034 by Layforce and across the Litani river, and TF17 will provide CGS, with gunnery spotting by the El Arish-based Tomahawk fighters, in the Bekaa valley (1134).
Axis Naval Movement
The Vichy destroyers decide they must try to interfere with the naval landing, odds be damned. Chev Paul and Vauquelin form a NTG in Tripoli, and head south.

The Allied Wellingtons can spot the force as soon as it enters the SZ off Tripoli. DRM is +2 for ACEV. The ships are not spotted and proceed to the same SZ as the landing force. Because they are spotting pursuant to Rule 9 from a SZ (and thus can spot when the enemy force enters a new SZ), the Wellingtons can spot again, and this time succeed with a roll of 7 (which becomes a 9 with the +2 DRM; 8 needed on naval success table to succeed in spotting).
As the phasing player has the advantage, before the Vichy force can declare naval combat, the CW declares an air strike with a swordfish squadron out of Haifa [Note: port bombing occurs after the naval movement segments, so the Swordfish cannot catch the ships at anchor in Tripoli harbor before they sail]. Attacking ships at sea is not without risk, because if the Allies roll a 1 for the location at sea roll (8.L.2), the Swordfish may strike Allied ships in the same SZ instead! Fortunately, the Allies roll an 8 (6-10 needed), and the Swordfish find the Vichy destroyers:

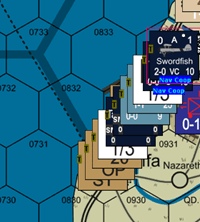
The Swordfish have 3 torpedo factors (8.L.3) yielding 3 potential strikes. The French have no effective AA. NEM is the same for both forces, so no DRMs. One strike hits Chev Paul (8 rolled, and needed) causing 1 hit (a 7 is rolled for the effect of the strike; and divided by 5, rounded down, 1 hit). As this is an automatic critical hit (13.K.1.c), that table is consulted and 2 more hits are achieved. That is sufficient to sink DD Chev Paul, which could take 2 hits with its protection value of 3.
Vanqueiln decides to press on and declares transit combat (13.A) against the two spotted CW NTGs. No one is evading (13.B/C). Each round of transit combat takes 1 SMA, increasing the British expenditure to 2 and the French to 3. The first round opens at long range (13.E.1.a); only the British cruisers can fire. The British divisions are all Cruisers in one division; DDs in another; and landing group in a third. With one hit, Ajax has lost 1/3 of her gunnery (now 7; 70% of which are long range); but she still fires at the French, along with CLA Phoebe (gunnery of 6, 70% are long range). They combine their fire of 9, from which the protection value (3) of the Vichy Ships is subtracted, yielding an attack @ 6 -1 DRM (for two ships firing on a single target). A 7 is rolled achieving a hit on Vanqueiln. Neither side disengages.
In round two, for which another SMA is spent, the British cruisers and landing force wish to stay long range, and the French seek to close to short range. The British DDs also elect to stay at long range, as otherwise the range automatically would be closed to short-range (a mutually-compatible range change), allowing the Vichy DDs to fire at any targets (13.G.1.d; 13.E.1.d)). Vanqueiln‘s speed of 9 is seven greater than the slowest British ship (the LC), so the range is easily closed (roll is +7, needing an 8; see 13.G.1.c). However, the Vichy gunnery fire is now a mere 1.5 (1 hit halves the gunnery; the DD can only take 2 hits). A roll of 1 misses the Landing Craft carrying Layforce (minimum fire is on 1 table). The British breathe a sigh of relief. Vanqueiln is then easily dispatched by a single hit from the British Cruisers (same shot as before).
So much for the Vichy Navy. But it had a shot of interfering with the — as we shall see important — Layforce landing. The alternative would have been to sortie in the Pursuit Phase, when British naval gunnery would have been reduced 80% for providing AGS and NGS (See 13.Q). In the bookkeeping department: Both British TFs now have spent 3 SMAs (the only force affected by this potentially is the LCs, which have a total of 8 SMA (2×4) before they run out of fuel).
NEXT GROUND MOVEMENT