well i hope you enjoyed this deeper examination of tsww using THE singapore module like i did. there is a lot to this system. below is the final part six. prior parts may be found at these links: ONE, two,three,four,five
March II 1942 – Allied
Initial Phase
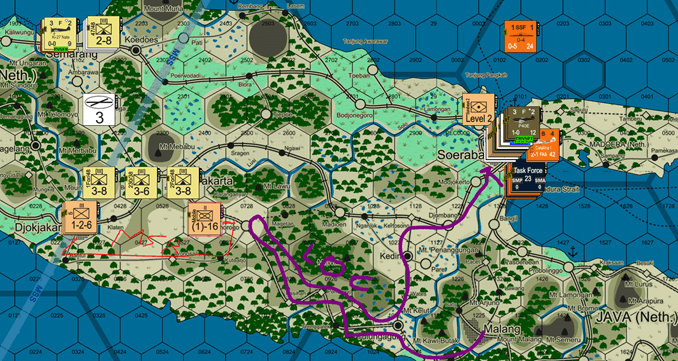
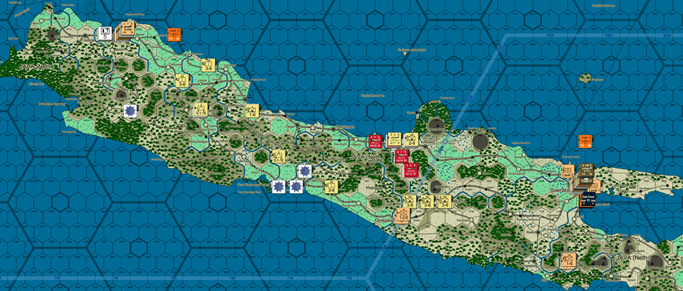
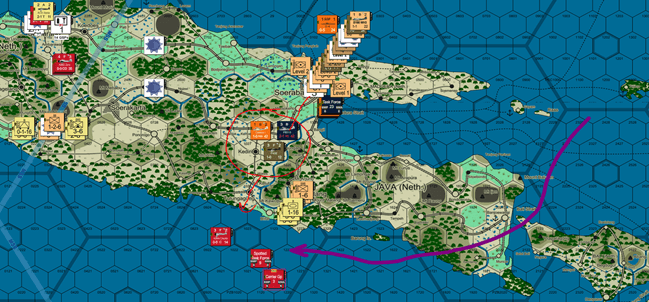
Supply: Japan’s bisection of the Island complicates the Allied supply picture (Allies still control 4 major cities). Batavia no longer functions as a supply source, as it is no longer connected via rail to other major cities. Units there will eventually need to spend GSPs (no need now; they just go E-1. The LP is broken down into 20 GSPs to keep the air flying (2 needed for the 1 bomber and 2 fighter squadrons); 18 GSP left Malang and Soerabaja are still connected and thus comprise a supply source. So units within 6 MSP of the LOC are in supply. The LOC moves by rail from Malang and then up to 10 road hexes and then to Soerabaja ST. The LOC thus goes to Ponorogo (LOC must loop-back; so 5 road hexes up and back; purple below). From there, units within 6 MSR are in supply. Djokjakarta is within this range (red below) along the higher quality road, so units in E Java are in general supply:
R&R: Allies get some replacements from air lost over friendly territory: Two squadrons of Dutch Fighters and one of bombers return. All go to Soerabaja, to deter further airbase attacks [the strategic fighter balance is now somewhat restored].
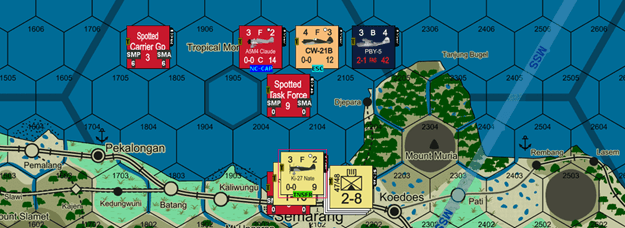
NIM spotting. Allies succeed. The Convoy in, and the Carriers and TF off, Semarang are all spotted.
Naval Coop: Dutch B166 bombers (spotting), PBYs, Catalinas, A-24s, two fighter group for Allies. Petes (spotting), Carrier fighters, and one Betty squadron (the code v only) for Japanese. Claudes on the Carrier declare CAP. Allies keep the Float Planes for bombing missions rather than spotting ….
Movement Phase
Airbase attacks. Alles decline. The Japanese, facing 2 or 3 fighter squadrons at each Allied airbase [Batavia or Soerabaja], do as well. Japan may invoke more flexible carrier air later in turn. B166s dedicated to spotting.
Allied NMS. Allies want to bomb the Japanese ships unloading supplies in port, but port bombing occurs after
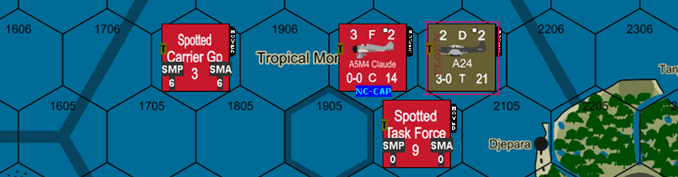
naval movement, unless launched by carrier air (because port bombing is operational bombing and not a naval coop mission). The Allies’ chance to sink the supply convoy was on its run in. So, the Allies seek to bomb the cruiser force covering the unloading Semarang Convoy (Japanese TF9: CA, CL, 4xDD). Allies send all they can: Code S Catalinas and PBYs, as well as A-24s with Dutch Fighter Escorts. Only the PBYs and one squadron of CW-21Bs finds the target, which could interception from Ryujo‘s CAP:
The Claudes cannot try to bypass the Dutch (almost sure return) and have a good chance of suffering an R result; so they maintain station, and let the PBY-5s target TF9. 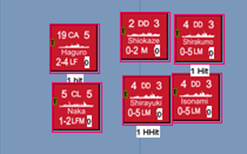
The Americans brave the 4 factors of AA (+2), but a 2 result misses. The PBYs target Haguro with both strikes (weather reduced 10% but percentile dice rounded up). The US has a +1 code S; the NEM/ACEV are the same (1 each). A 2 misses but an 8 hits, putting a second hit on Haguro. But the Japanese fleet is not sufficiently attrited to risk sending the remaining US destroyers.
Japanese NMS. The Allied A-24s can fly in a second NMS in a player turn, and the Allies elect to send them now (with no escort). They find Haguro, but this time the Claudes intercept:
Despite a 1 ACEV disadvantage, the Claudes achieve an R (on a 5, Japan gets fighter advantage mod) (and are returned with a 2). This means only .25 of 4.5 factors get through (less 10% for weather): 1 strike, but at +3 (+1 ACEV/NEM difference; and +2 for Type D). A 7 finishes off Haguro. Give a medal to these fly boys! Allies have sunk 3 CAs, 1 CL and 1 DD.
In naval movement, the Japanese convoy finishes unloading the 2/3ds LP (remaining 7 SMPs) and returns to Bandjermasin with the Carrier CVL (Kates abstain from a raid; too many Allied fighters). No Allies assets can interfere. The force that bombarded Batavia last turn replenishes at Balikpapan, to which the remnants of the covering cruiser force returns.
Other movement: 2 engineering IIs augment the fort in Batavia from Level 1 to Level 2 (5 MPs each). The mech II and a regiment pull back to Malang, to at least force the Japanese to divert force there. Lots of rail broken. Allies send remaining bomber strength to Semarang to bomb the port. The B-17s and odds/sods launch an operational bombing mission escorted by P40-Es; Nates intercept:

Once again, Japanese see no point in bypassing escorts (US would fire +3; return a certainty). Nates and P40s tangle. The Nates are shot down. Semarang was just taken, so we’re playing no flak there yet (but we rolled and no impact). 2.9 bombing factors are delivered (note: strategic bombing would have been subject to the accuracy chart, which is only 20% for the B-17s and 30% for others). 4 are needed for a hit, so percentile dice are rolled: a 68 hits (72 or less). Semarang’s port takes a hit, reducing capacity 2 SPs. But far more will be needed to shut it down (it has a capacity of 23 as a large port). The Japanese Army Sonias then transfers to Semarang from Sumatra.
There is no combat or reaction.
Pursuit Phase: Allied and Japanese navies stay in port (the latter replenishing). Japanese naval air transfer to Java (to get closer to action, though eats supply). End of Turn:
April I 1942 – Axis
Weather rolls are 9 and 6. Good and Hot weather in both zones.
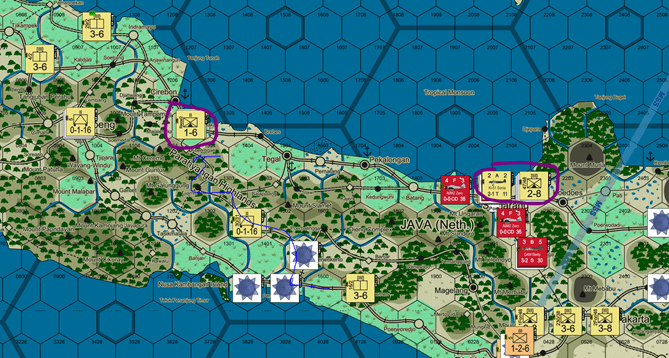
Supply: As noted above, Japan has captured sufficient rail marshalling yards (RMYs) to establish a Rail Supply Route (RSR) on Java. See Rule 15.F.4.f. Under Rule 15.E.1.a.ii, an “RSR traced up to 20 hexes along high volumes lines or 10 hexes along low volume to forces directly to provide General Supply.” Also, units and airbases that can trace a variable MSR to the RSR can be placed in general supply (a.iii). Japanese GSP source are circled below. They are on rail lines. All units can trace an MSR to rail lines that can trace back to the GSPs within 10 low or 20 high volume hexes. The 16/2 regiment is the farthest, but can trace along 9 Japanese-controlled rail hexes to the supply dump south of Cirebon:
For the ground units, Japan must spend 10 GSPs. For the air, 6 GSPs are spent. Although Japan has LPs on the island, without a supply terminal, it cannot use LPs to supply units as is typical in the overseas system. In short, supply is less efficient. For example, instead of spending ⅓ LP to provide general supply to ground units (6.667 GSPs), Japan spent 10.
The supply network is even less efficient for Offensive Supply. Units must be with or adjacent or GSPs or adjacent or stacked with a Corps HQ (and the RSR can distribute GSPs to the Corps HQ). With the railroad being used for RSR, so cannot be used to rail supplies. Only the units stacked with or adjacent to supplies (around Cibreon and Semarang) are placed in offensive supply (2 GSPs), and a number are spent on the Corps HQ (stacked with the central mountain regiment in lower right). Japan still has plenty of supply 2.33 LPs on the island. The issues is getting it the the right places; only 1 Corps HQ means the Western operations will lack full punch – the 2 light infantry in the East are not next to GSPs and will not be next to a Corps HQ (with better planning, GSPs could have been landed on the Coast via Naval Transport during the Allied player Turn, and then spent for Offensive Supply this turn. Logistics requires planning!).
There are no reinforcements or replacements – though the CA force that provided the opening AGS is now ready for action again. NIM spotting succeeds, so should the Allies leave port, they will be spotted. Allies place level bombers, PBYs, Catalinas, and 2 fighter groups on naval patrol; Japan Petes and the Carrier air.
Airbase attacks. Japan decides it is time to end the pesky A-24 threat and send a big mission to bomb Soerabaja (all 3 Betty wings, 2 shown here). Dutch fighters scramble. Both sides attack @ +1 column with DRM. Dutch fighters are downed with no zero loss. 9 points of AA fire (+2). Rolls of 5 and 6 = no effect. 8 OBFs = 3 airbase hits (with last one requiring a percentile roll). Soerabaja capacity is now only 4 wings. The strikes flips the Catalinas and kills the A-24 squadron and Dutch naval spotters (Japan breathes sigh of relief). Allies decline airbase bombing.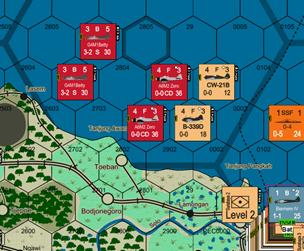
Naval Spotting. Petes are searching form their seaplane base. Allied naval spotter was eliminated.
Movement Phase
Japanese NMS: The replenished CVL and bombardment forces set sail. One group heads to Batavia, consisting entirely of destroyer. They are detected by Coastwatchers, and a Dutch Sub sets to attack. Before it can, Japan can counter-spot, which it does on a 9.
ASW for Japan is 6, so no DRM. Just +2 for relative NEM. A 4 becomes a 6, which is F*. That means the already reduced Dutch sub is eliminated before it can attack. Allies decline a naval-air strike. The Japanese task force will provide gunnery support, so stays. Cruisers later join (a CA and CL).
The Carrier with CAP and Cruiser group move 10 SZs (still far short of 2/3s of SMPs, which is 21 for these fast TFs) and off Malag. The Cruisers will provide long-range gunnery support (can support with heavy guns one hex inland). The Cruiser force, but not the Carrier, is spotted by coast-watchers. PBYs and Catalinas escorted by P-40s make an appearance from Soerabaja. Only the P-40s and PBYs fine the mission the Claudes intercept:
The P-40s shoot down the Claudes (roll of 6 on +1 table at +1 ACEV). Flak is thick 9 with +2 DRM. R achieved, reducing the strike to 1.5, which percentile dice make 2 strikes with +1 for Code S (ACEV even). Both miss.
Allied NMS. Ships stay in port for fear of long lances.
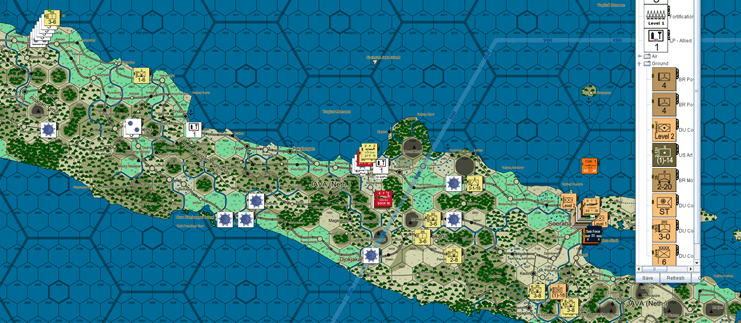
Movement (shown above): Japan moves into position to assault Batavia, Djokjakarta, and Malang. Time is running out. Many units use operational movement. Dutch and Brits lack EZOIs to slow them down.
Combat
CAS: Japan flies Sonias (Code T) to Djokjakarta with a Nate escort. No Allied fighters can intercede. Oscars escort Lilly fames and Sallys to Batavia. Hurricanes and B339 still based there intercept. Dutch fighters are shot down. Bombers make it through. Flak misses all. Allies fly level bombers to Malang, where the Japanese are not.
Combats:
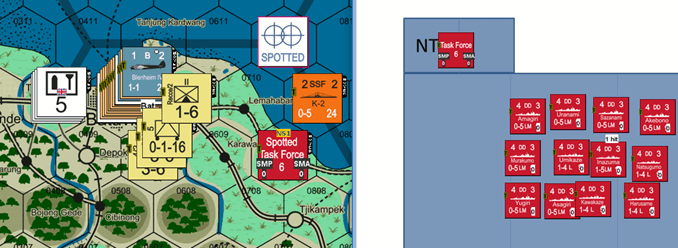
1 Batavia: 8.6 factors defend, including from organic AA. Japan attacks with 6 x (.75 CEV – the infantry regiments are only in general supply not offensive supply) x (.75 city) x (1 hex terrain) + 1 (2 CEV, one unit has Offensive Supply) (0.75 terrain) for 4.8. Air adds 2.25 more. Naval (CD can’t hurt the Japanese ships) add 8 more. So 16 (-3 for fort and city). 2:1 (-3/-4 if CD additional (JB determining)) Not a great attack, but Japan has a few more cards to play. First, it now has threatre fighter superiority (6 to 3 squadrons); it also has more bombers providing CAS (fighters was even; each side had 2 squadrons). And +1 for concentric attack. So 2:1 straight up. Japan rolls for and get surprise (9), so +2 (or +1). DH.
Allied maneuver units include 2 engineer IIs, a regiment, and 2 AA II battalions. Rest do not count against stacking and thus are not considered (but note, would be considered in combat results that consider total size of forces, so a risky attack for Japan). Dutch III and one engineer eliminated. Batavia taken. Hurricanes escape.
2. Djokjakarta. Japan has one regiment in offensive supply here (adds 3). Rest of units, only in General Supply (and thus CVE of 0.75 rather than 2 – a big difference) add 3.36. Defenders have 2.5. Air makes it 8.3 : 2.5 or 4:1 (net +2 – concentric and all 3 air bonuses v. city is -2). A 9 is a DE.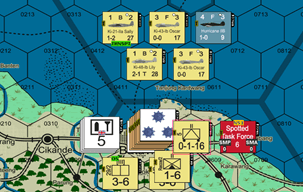
3. Malang. Dutch defense is 2.75 (including air). Here, Japan commits its HQ / Offensive Supply (stacked with attacking infantry). So attack is is 6 x (2 CEV) (0.75; major city) (infantry) + 1 x (1.25) (terrain) x 0.75 (CV for tank, not adjacent t0 Corps HQ) x (0.75) (city) (armor) = 9.7. But the bombardment adds another 5.5 (long range guns only /6 for floatplanes). Japan gets percentile dice and the attack becomes 6:1. DRM is -2 city -1 river -1 hills -1 bombers +1 theatre air superiority. + 1 concentric (tanks moved to a different position than shown above). 6:1 -3 (surprise pushed far enough). Result is DH. Regiment eliminated; Mech II retreats. Japan advances.
All of Java now is in Japanese hands except Soerabaja.
There is no useful Allied reaction.
Pursuit. Japanese ships return to Port. Kates bomb Soerabaja airfield on the way home, eliminating Dutch Transports. Allies do not dare sail. Japanese creep Toward Soerabaja [contents of town in stack viewer].
***
At this point the game is suspended. The Allies are down to around 7 defense factors in Soerabaja (including help from organic AA/positional AA). Japanese naval bombardment and (finally won) air superiority will carry the day the next turn. Japan’s attack April II will be at least 4:1 +1/0 (-4 or -3 city/fort/CD; +3 Air +1 concentric), with at least a 90% chance of success. For fun we rolled it, and a DR took Soerabaja.
Allies drew substantial blood in the form of 3 CAs, 1 CL and 1 DD sunk. Of course, the Allies lost 2 CAs, 6 CLs, and numerous DDs themselves. Losses in the air about even until near the end.
Allied air power, and logistics challenges for Japan, makes this a far tougher scenario on Japan than first meets the eye. Some surprise rolls were needed to ensure the major cities fell on schedule.
We hope this learning module was instructive!
This is very in depth! Also very interesting. Not your average “boring” operational system by any means. Through this series of blog entries I just learned of the *beyond* massive TSWW series (note: you should include a short blurb directing readers who stumble upon the entries info on what TSWW is!). A bit rich for my blood, but it is certainly very intriguing!!! 😮
Good point. I may not have mentioned it in 1st post