
Above we can see the general setup areas of both forces for the Campaign game for Rising Eagles. I’ve reported before on the system, the game play etc. So in this one since it should all be reported post fact, I’m hoping to dial in on the tactics being used by both sides. Sharing how things evolve and trying to guess what my opponent will do. Perhaps we can get inside his OODA loop!!
I’ll be playing the Coalition and as such will need to bring my A game to have much of a chance here. My opponent is someone who played a little NBS [Nappy Brigade System] way back. he appears thoughtful and even maybe crafty.. Possibly conservative in game play which we need to find out, I also think he might lean on history to drive his choices, but that remains to be seen. Im taking the Coalition so I can see if they can do much, as I suspect they cant really. This will give me a chance to try some fun stuff and let the new guy to the system have the best chance of winning. The French are better placed, have better command and better morale and more tactical flexibility. So the Coalition must make the most of the early game and pray for early turn endings!

When we place orders we choose a red dot within range of the formation leader or overall leadership.
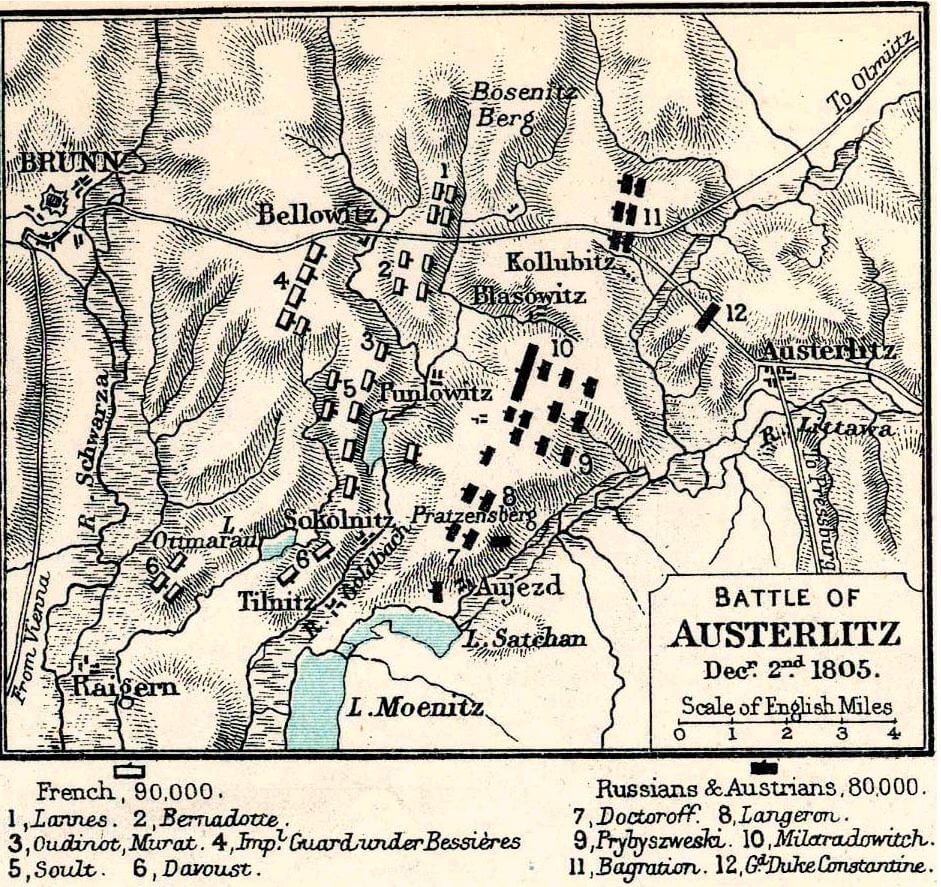
With the Left Wing we will use Kienmayer’s Advanced Guard and we are going to bum rush the forces of Davout and attempt to establish ourselves across the river and invest Telnitz while pressing onto the cross roads. 1st Column led by Dokhtrov will support that attack by taking on the Sokolnitz Castle.
Langeron’s 2nd Column will move to hold Pratze and support either 1st or 3rd Column as required. 3rd Column will make a push for Kobelnitz once we see where the French are headed. With a view to moving further up the road if we can or holding at the river line if Napoleon masses there.
While Kollowrath’s 4th Column has orders to advance on Santon, they will not they will tarry around Blaziowitz and delay Lannes if he makes the hard right turn that he could do, or if Napoleon pushes other Corps that way.
Lichtenstein’s 5th Column will hold in place until such time as the Russian Guard arrives. Then it will be up to Bagration and his Right Wing to hold the Goldbach Heights on the right. Once we consolidate 5Col & RG we can assess where to go and what to do. Which is ideally when we will use our one time “change all orders’ scenario rule.

Our dummies on the right wing will show a push to the far edge of the map, in a flanking move. While we send the RG up toward Goldbach and stay hidden as much as possible. Meanwhile in the center real forces will push quickly to expose dummies so we reveal intent of the enemy ASAP., ideally forcing him to reveal at an inopportune time.
Both sides start with 9 victory locations, and some auto victory opportunities. I intend to make a quick push on the left for flags there. While keeping what we own in the center and delaying on the right. Our goal is to bleed the French, and instill at least a bit of fear so that they commit the Guard early! Where the Guard is not, is where my Cav and Russian Guard will ideally strike!
Images are not visible to me.
i checked on 2 different browser.. what are you on?
Love this game….. love these games !