The system for AMFS is going to be familiar for all of those folks that have played any of the Blind Sword series of games or Devils to Pay.
This system is called Black Swan.
Lets make a note to come back to that notion of a Black Swan later on.
The primary difference in AMFS is in how you activate units and the rules around that exercise, I would say they are the most significant departures. Much of the rest of the game barring a few niggles around Arty, and movement are the same, as is combat in the main. If you recall when I get the time to sit down and do these things I use 9 or 10 elements to assess my impressions in a consistent way and hopefully bring you a little more insight than just my regular playthroughs. Not a review really, just impressions at the moment based upon some modest game play experience with the title.
TL:DR – Impressive, immersive and engaging. Not complex for modestly seasoned military history gamers, not a beginner’s game by any means, but if you are a fan of ACW history you will desire this on your shelf. Do not buy if you cannot handle being immersed in chaos like a ‘real’ commander. Stunning production values, only let down by the ‘font issue’, plays like Blind Swords system writ large.
Decision Space:
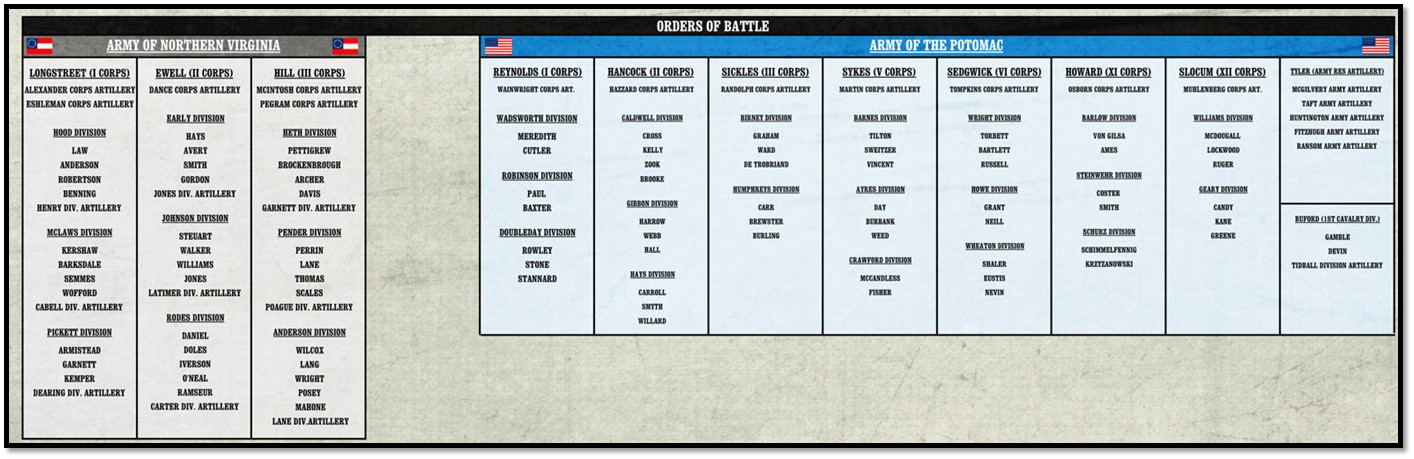
Your primary activities are going to be coordinating the various Divisions and the Brigades of those Divisions to secure objectives and destroy enemy units. The primary challenge is adjusting your game plan and unit usage to the flow of what is given to you as part of the order receipt/acceptance/execution that the activation system imposes upon you. As with Great Battle of the ACW, Line of Battle and older systems from Essig & Perry the game command level relies on some level of orders execution. In the Black Swan system it is abstracted via activation cards for Corps commanders.
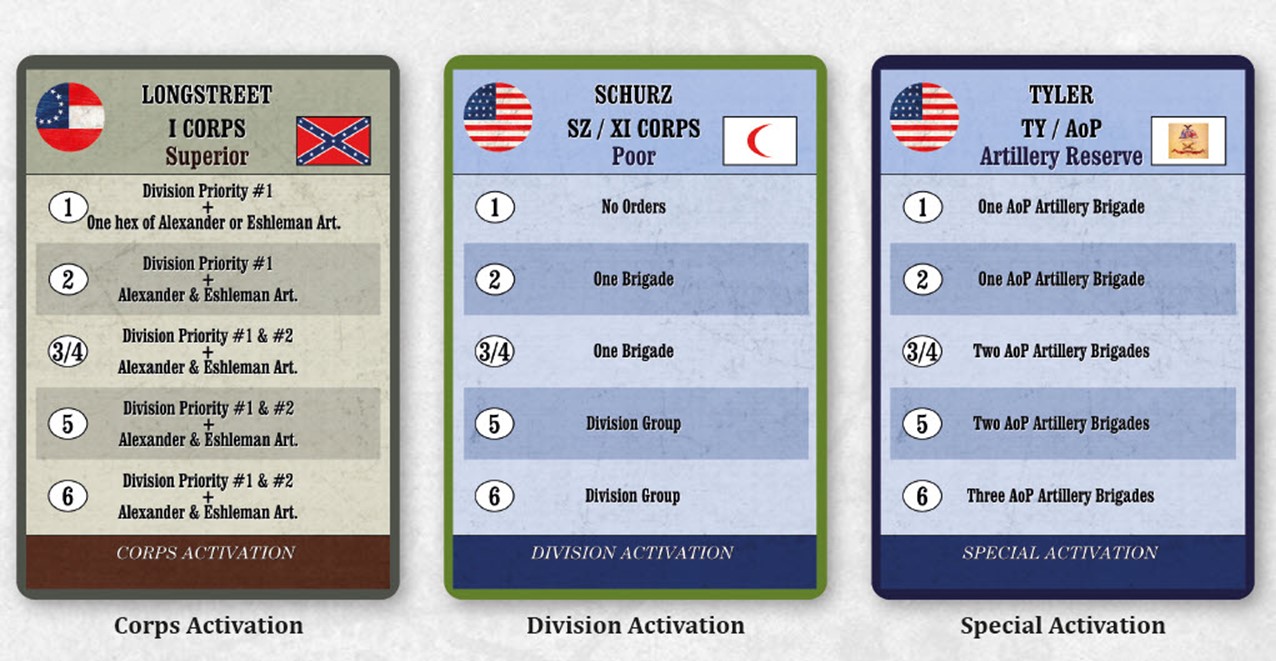
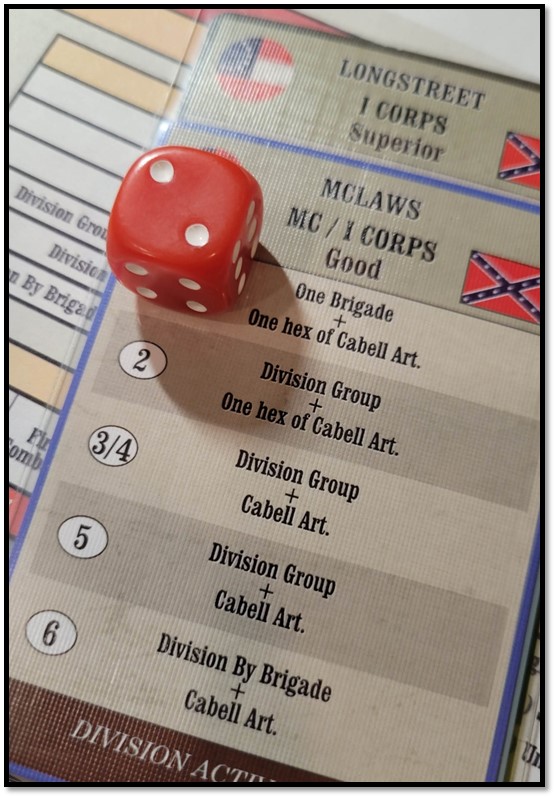
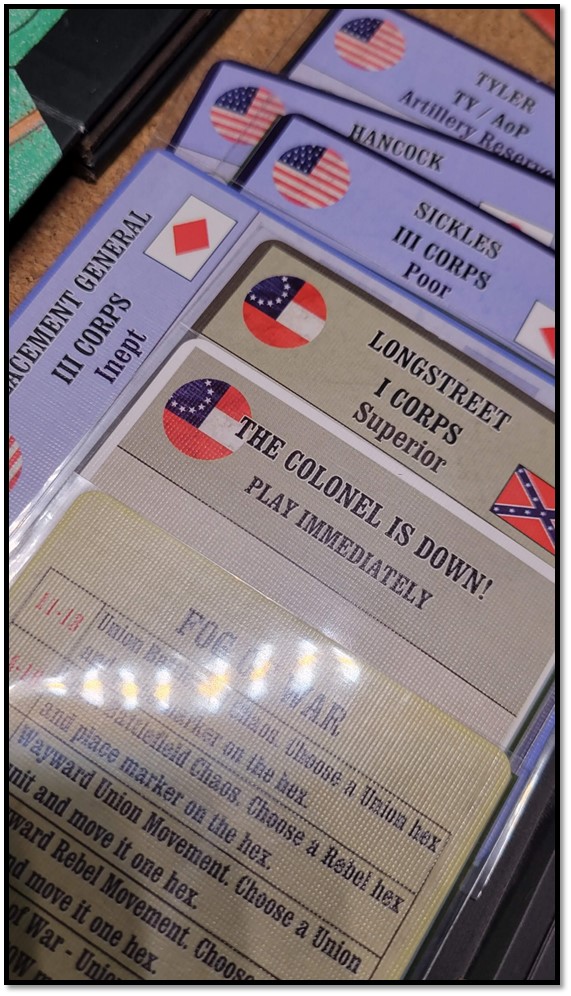
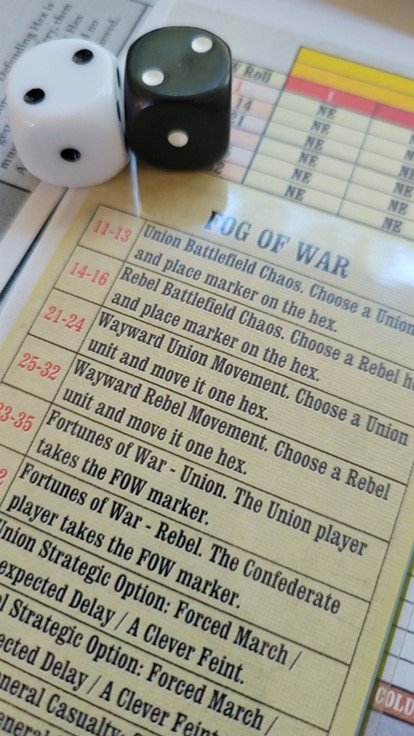
The players allocate priorities to divisional activation per Corps on the map on a chart with a Divisional card, where Priority #1 will get to do its thing, Priority 2 might [subject to leader quality] and Priority three most likely not. Note below the quality of the various Corps leaders and the actions they can execute when their Corps card is drawn. From Poor to Superior really tells the tale. In my game I’m playing at the moment, I chose to activate a #2 Priority Division with a rating of Poor. Then rolled a one… No order. Nothing gets to activate! [Note to self don’t roll a one].
The players then build a hand of cards from the random events pile, set aside one or more for ‘extra Arty barrages’ , a phase in the game play. Scenario specifics may call for certain leader cards such as Lee Commander In Chief card to be set aside and used first, to recreate historical specifics. The Corps activations and Events cards are shuffled together and then drawn.
Phew ok, So draw a card [Union draws on odd turns, Confederates on even, a nice historical note is attached to this you can read in the rules online, that facilitates the ‘intelligence networks, captured orders etc.’]. If the card is a Corps card, then we roll a die once, possibly twice and then set to moving the activated units, which as you can see from the above two example cards may be one or more divisions or just a Brigade. There may also be further restrictions as to the ‘type of orders’ that may be given to a set of units.
This is a long winded way to say that there are two levels of chance to activating a particular Division[s] or Brigades. The first level is the draw from X number of Cards and then the die roll[s] for the drawn Division/Brigade.
This takes me back to the notion of the Regimental series from The Gamers and command restrictions via Orders and orders acceptance rolls, and ‘moving those orders’ to and from Leaders. Similarly in Great Battles of ACW from GMT the activation chits per formation based on Leader quality and the Corps inherent efficiency that is a combination of chance and quality. Line of Battle streamlines the process significantly from the Regimental Series but keeps the flavour of written orders with just a simple roll to send, roll to receive and execute, plus leader quality, command radius etc etc. It replaces the basic chit pull idea in essence from Blind Swords. Still that LOB system has a lot of words dedicated to explaining how all those aspect work together and it can be a bit to chew on. Black Swan at this scale of battle nicely abstracts all of this into a manageable format.
Any cursory reading of a given battle will yield outliers and exceptions and curious results that have proponents and detractors of one general or another, railing against unclear orders, over enthusiasm of execution or recalcitrance of execution, and a thousand other reasons for delays, missed opportunities or stunning turn arounds.
Capturing this essence of the American Civil War and in fact any pseudo linear ‘classical era’ battle is always a challenge without the over bearing word salads of special exceptions. Being able to move your units in a time sensitive manner is the heart of any system with command and control/Orders systems.
These systems literally are just placing a time based delay in your desire to move X to Y or Attack A with B. So does Black Swan then refer to the double jeopardy or dual chance aspect of the Command system? The fateful draw followed by the impact of the die roll. Probably not quiet a true Black Swan event but cool anyway.
The approach taken here is neither better nor worse than any other detailed level of grand tactical combat. What I do like is that we are relieved of the CIC’s role to some extent, as that is really you adapting to the circumstances on the battlefield as they arise. Randolph’s men wont move, ok what can I do? Barksdale attacked by himself ? Ok.
How do I take advantage of that given only one other brigade is supporting his flank? This all happens based upon the combined percentage chance of the number of cards in the deck and a 1d6 roll. I’ll let you math whiz’s work out the combined percentage chance of a specific card being drawn from a deck of say 10 and the additive chance of the ‘best result’ in 1d6 chances. It is lovely to see EACH leader’s card with different combinations of good/average/bad results, tuned to the battle and the General no doubt.
Role:
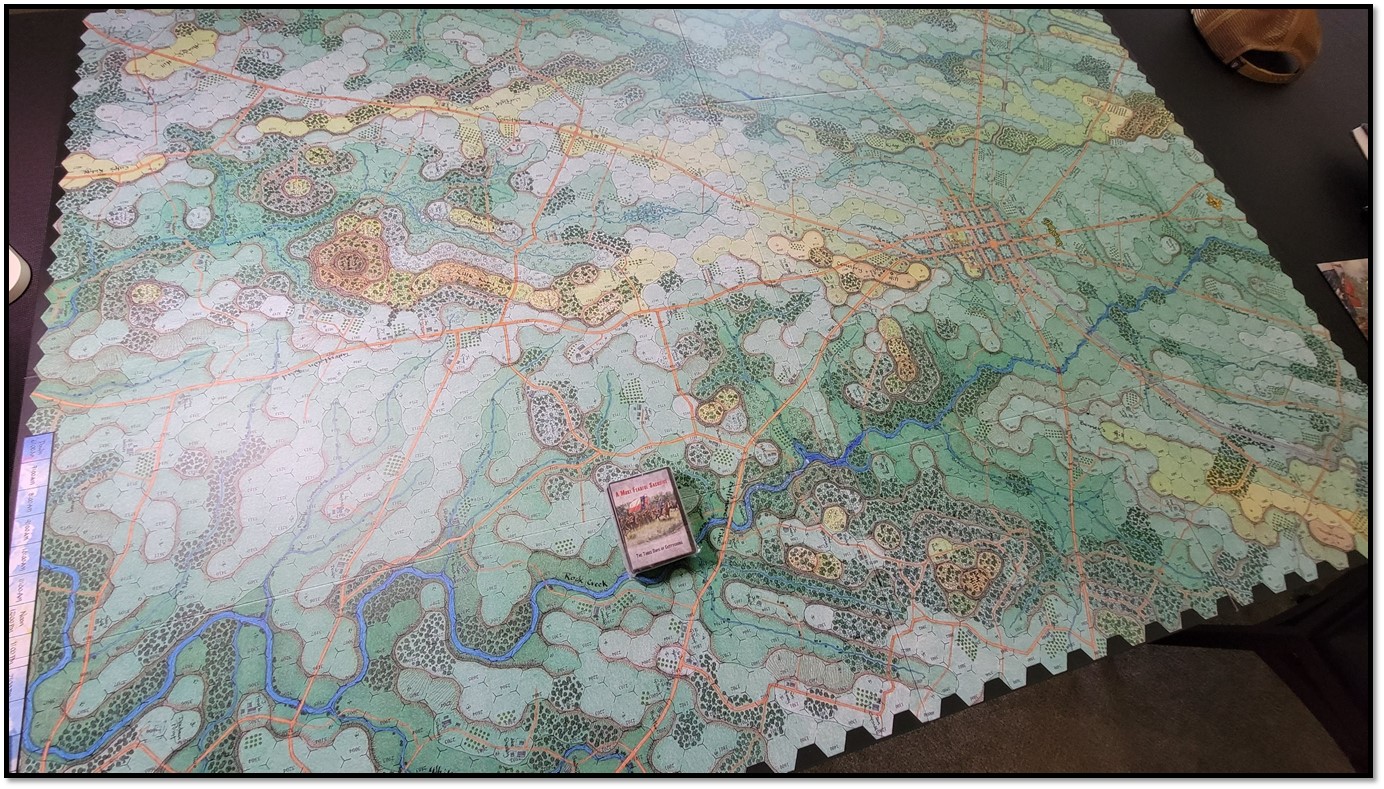
Well then what role do you fill? To my mind we are the Corps/Divisional commanders, moving groups of 1SP=100 men in Brigade sized lots across 200 yard hexes in turns lasting an hour. Normally I would fret over such a disparate Time to Terrain scale, but in this case, given that units may well execute multiple actions in a turn the system does not require the 20 minute interval so often used in Grand Tactical systems. This system and Hexasim’s Rising Eagles series show us how time can be flexible inside a given period of a turn. There are some unknowns with Rising Eagles as to when a turn shall end, that sharpen the urgency, here we have a deck of cards and the timing of which card comes next adding a similar level of tension.
Intelligence:
I mentioned earlier that each side takes turns drawing cards. Often then the opposing sides event card will be seen, even if it’s a hold card, providing a level of insight into the hand of the opponent. Otherwise, I believe hidden data is very limited. Which makes it fine for solo play as does the random aspect of drawing the activations for both sides, no ‘hard plan’ will favour one side or the other, making solo viable.
Player Objectives:
There are a lot of scenarios here 12+. All of them typically have a geographic and kill step VP allocation. Simple as that. Across the vast expanse of the entire Gettysburg field this makes for some interesting play and evolving strategies that are driven by VP’s to reflect this historical objectives of both sides, ’nuff said.
OOB:
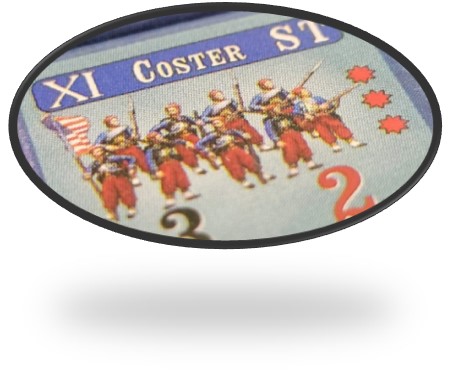
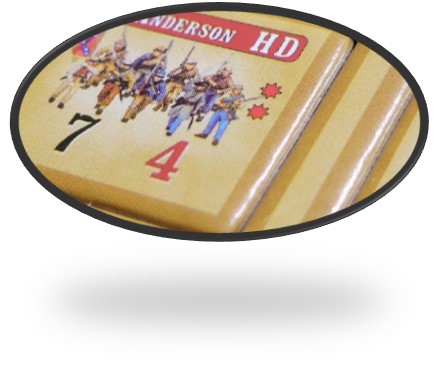
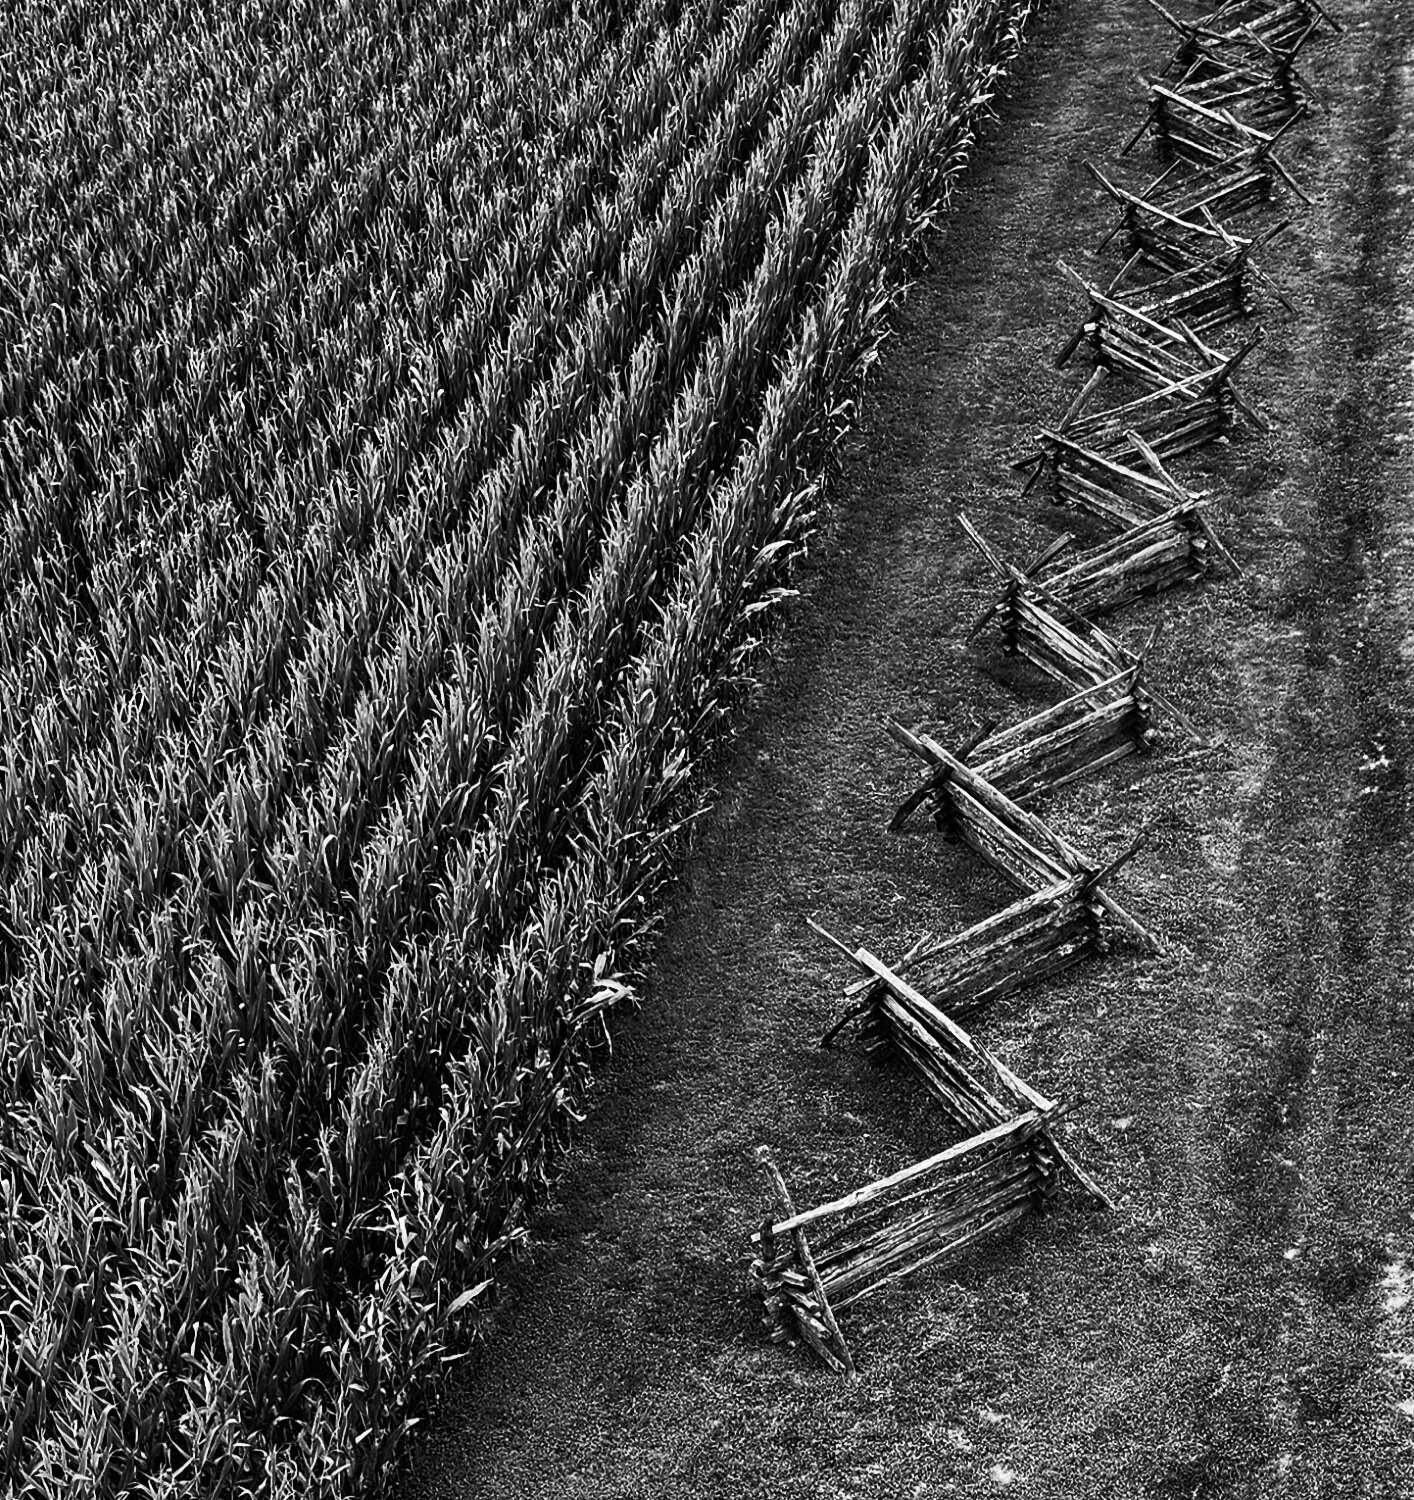
Luttmann has years of prior research, prior games and a plethora of books and resources to draw up accurate OOB. Suffice to say its excellent at its chosen scale. What’s more important is the counter art by Brigade which has unique attributes that are specific to some of the brigades. He calls them Easter eggs, I call it being steeped in history. Counter colors reflect nicely on the map, in keeping with accurate historical flavour butternut is the chosen colour for the Rebels and Navy blue for the Army of the North.
Conflict, Combat and Resolution:
Once again if you have played the Blind Swords system you will fit right in. A typical Brigade activation goes something like this:
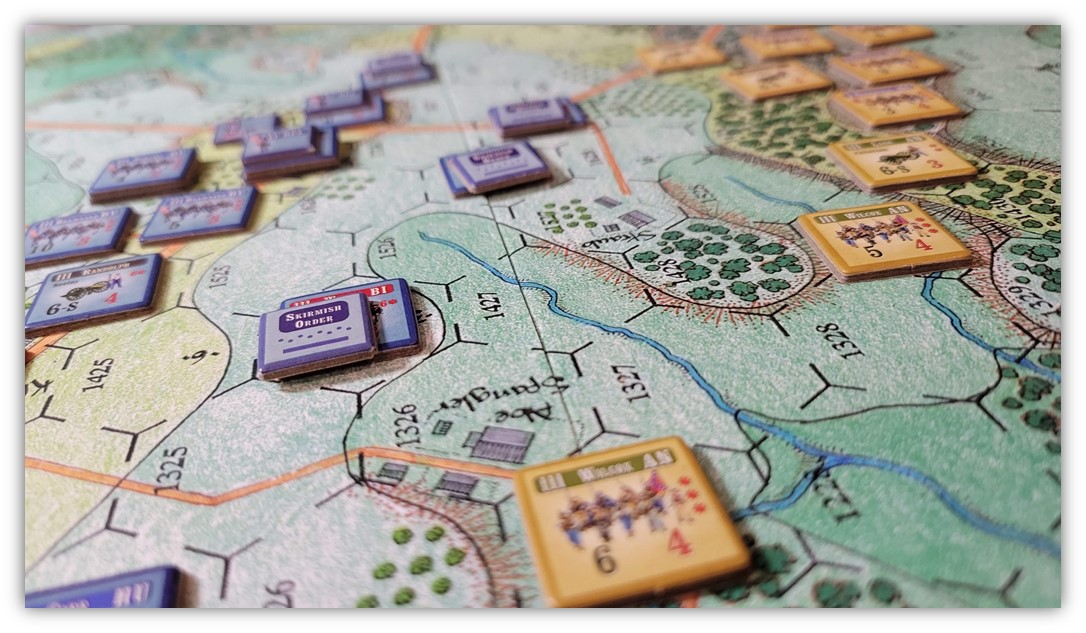
There are Orders that a formation selects to use – Move [Manoeuvre] , Attack, Defend, and Rally each with its own movement rate and capabilities.
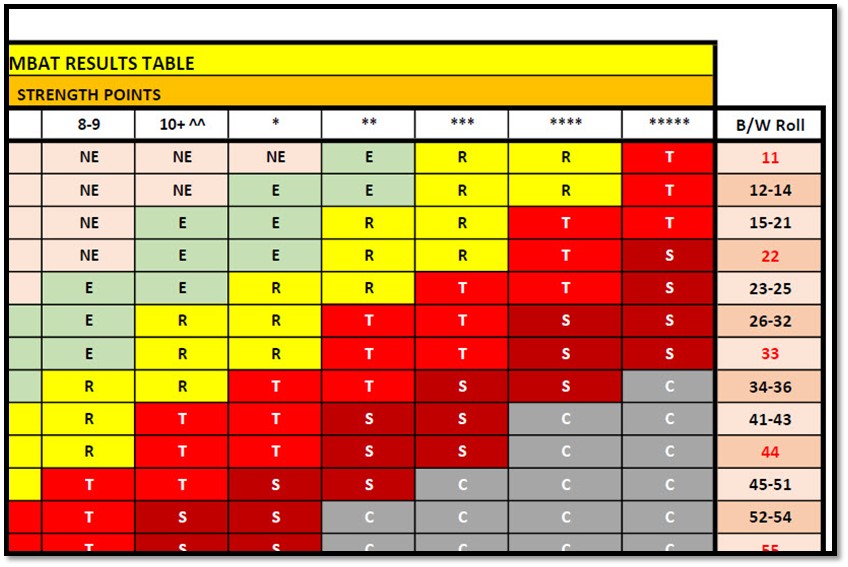
Units fire if in range using the above table.
Units move.
Units ending up adjacent to enemy units [engaged in game speak] are put upon with defensive fire, using the above table.
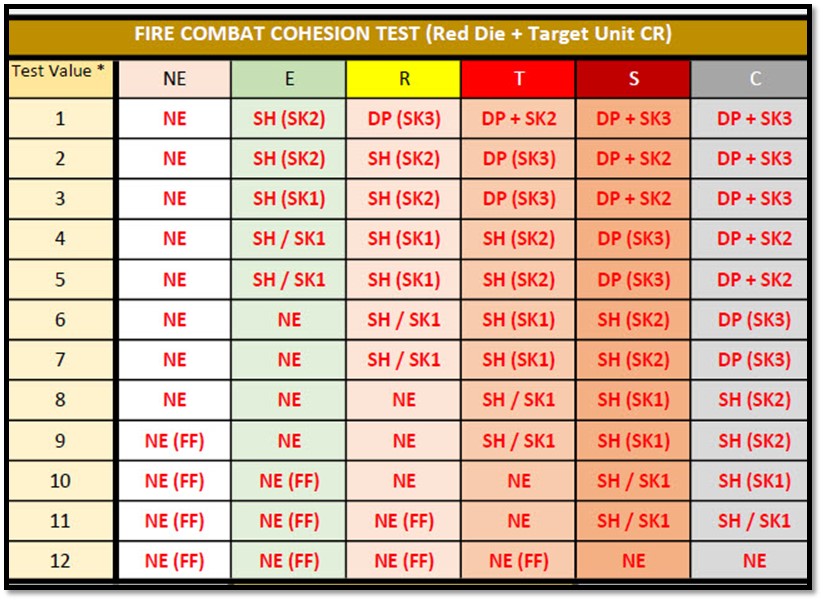
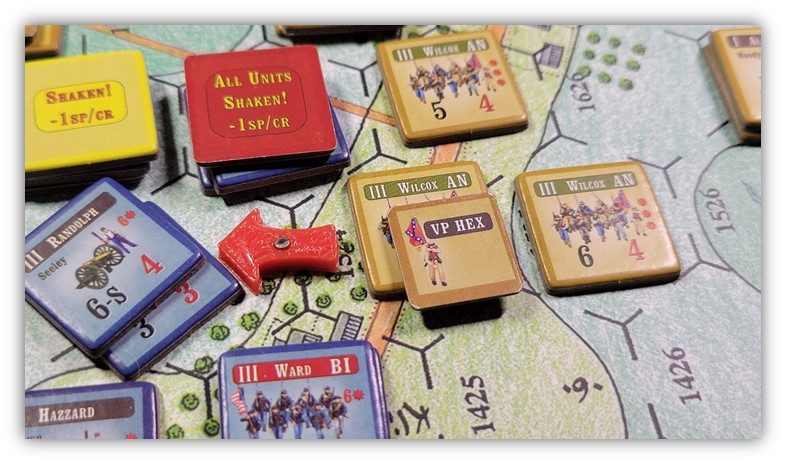
When firing the 2d6 11-66 colored die roll yields a ‘Letter’ result, representing the degree of difficulty the attack has put your men under, this is cross referenced against the Cohesion test table above and we take the result of a 1d6 [red] and the morale/cohesion value of the unit being shot to bits and see the final combat result. So 3d6 are thrown and boom there is your result +/- column shifts for all the usual things you might expect.
Units can be shaken, or shaken and skedaddled [retreated x hexes] or even if the result is bad enough reduced to battleworn side [DP], there are also results that allow a choice of taking the shaken result or retreating. Double shaken results reduce of course!
Clean, simple, dare I say elegant [ I know its over used, simple implies basic, this is not that. This resolution against combat factors on a decile2d6 spread with a variable cohesion impact is smart and accurate historically] The only system that I like more for combat resolution is Line Of Battle, in particular their assault experience.
AMFS Assaults are handled differently than Fire combats, both sides resolve on the Fire table to identify a [NE/E/R/T/S/C] result and they are then compared against each other on the Assault CRT by cross referencing Attacker and Defender result. Depending upon the Cohesion test result generated Easy, Routine, Tough etc Close Fights, may occur, Break Tests may happen or even Panic tests. A units position relative to others in its Brigade, its terrain and its inherent Cohesion is key to survivability. A successful assault will generally allow advance into teh vacated hex.
Logistics:
Ammo limits in this module are not really relevant as resupply is deemed to happen over night [note I have not played night turns yet], but rally, fatigue recovery and some re organization functions happen then, in two ‘night turns’.
Historical Narrative:
How close will this tie itself to the actual battle? This will really depend upon how you play and how the cards fall out. So far discrete scenarios are playing out historically, and in fact if you look at the library of battles from the series in Blind Swords – Long Street Attacks and Devils to Pay are two scenarios represented in AMFS also and they play true to history. Is suspect that as with many Grand tacticals it will either come down to a gamey tweak to beat history OR some great runs of dice!…or you might just be The Greatest Wargamer Ever!
It would appear that what WILL happen, is that you shall experience the frustration and glory of having events work against you and for you. Good enough. There is even a scenario where you get all the forces, and just have it even with if I recall correctly the ability to tweak arrival times and locations of reinforcements [ but dont quote me on that one].
General Narrative:
A vested interest in the well being of your forces develops from the very first phase when Cannonballs start pounding the lines. Trust me. It hurts in a visceral way. The game plays quickly enough to allow you to soak up a bit of ‘lore’ and enjoy what is going on. Given that I am early stages with the system, I cant speak yet to the full grandeur of the campaign game across multiple days, but I sure can see that having several Corps all trying to execute a plan will build a wonderful tapestry.
Replayability:
Probably does not need mentioning, with chit pull and card draw these elements lend themselves to replay. Even the selection of ‘special event’ cards helps are you choosing the two best ones for this turn? As well as a dozen scenarios to boot. You can sell all your Blind Swords games focussed on Gettysburg and just play this one monster big box.
Play Time:
Varies. What does take time for me as a novice player is set up. Who belongs where. There are color bands for Divisions, but unique ones per division would be nice.
I find searching out who belongs to whom a challenge as I am not well versed at all in the respective Corps and which Division belongs to each one or its overall commander. There is a nice chart that helps, but I find myself hunting for units on the sprue. – Pack up will be critical, I need to look online for the best way to store this beastie. I suspect most ‘real scenarios’ will take a few hours to play, there are much, much shorter ones. Each turn of the full campaign with two people who know the game should play smoothly but will take an hour a turn potentially or more. Team play is potentially well supported, as folks could manage a Corps each for example.
Components:
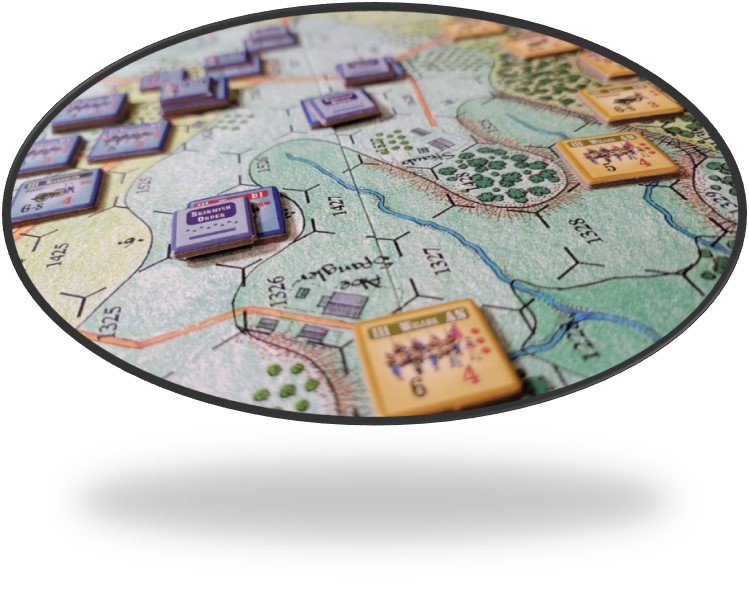
Ridiculous. Counter art, pre rounded units, beautiful palette that look great on the map. This map is classic Rick Barber. So, you either love it or hate it. Its bold in color choices, rich shades of green in almost a pastel style, and a vibrant yellow for the high ground. An 1800s fountain pen font which is almost unreadable [really, thanks for that..:)] delineation of slopes, steep slopes etc is well done. What lets the map down is the Terrain chart. Mine just was hard to read and the color shades were harder to discern as they differed from the map. Why we cant have a TEC charts with a ‘blow up’ version of the hex versus a ‘actual’ or in this case reduces size one is beyond me.
Lots of discourse about font sizes on charts, so I wont labor the point. FPG knows and reissued charts for download and the upcoming 2nd edition will have better charts and all FAQ style stuff in it also. Yes there will be an upgrade kit for V1 stick in the muds like me
Bonus AAR consideration Crossing the Line of Predestination:
Before we get to what I usually do which is sum up some game play and call it good, I wanted to explore one of the themes or ideas that popped up. As I had previously mentioned there is more than a little chaos in war, and in most ACW battle for sure. You can just look at the forums on ANY battle that is well documented and you get 100’s of ‘well what if’ comments, or ‘yes but at 5:01PM Burnside said this and what he meant was…’ type of thing. The thin line between being rail roaded into a historical set of choices and have carte blanche can only be address by rigorous play testing and spit balling ideas to see what sticks. I chatted with Hermann about this. Because along with the compounding chances routine of card draw then dice throw[s] for activation, once you are contending with other ‘random’ events that can be generated. The first time, I was caught of guard and thought – ahh, cool. But then my funky dice started rolling a few too many doubles on Assaults or Fire combats. All of a sudden I was thinking hang on a second who is playing whom here? Results of a combat or a situation were now being determined by a table, no my awesome die rolling skills .
Good news is often these events do not apply, and the table is simple to read and provides some incremental flavour to the game experience. As long as you don’t roll doubles a lot! But that’s a minor point, it just compounds on top of the whole activation exercise. I suspect there is an element in my DNA like a lot of gamers where we came at new games from the ‘old days’ where we had Gods Eye view and ultimate control [remember rummaging thru Stalingrad stacks looking for best odds…? God I hated that game], so I’ll put this out there. If you want that level of control, don’t buy this game, in fact avoid chit pull games, and games with card draws too for that matter. Go play chess.
This from my limited play is all about making do with the sh!t sandwich you have been given, turning the sour lemons into tart lemonade, the crappy weighted dice and cruddy card draws, yeah deal with it and lets hope for better.
Contingencies, you better have them. Prevailing with what you got, and making the best of a raw deal, be ready for it.
Now you are a commander, now you are in the hot seat, that perfect move is FUBAR.
What can you do to defeat the enemy anyway, now that only 1 brigade moved instead of the entire Division? The playtest team, and designer deserve credit for finetuning this and driving enough chaos, without it being too much, and dragging you by a choker chain to a conclusion that they or the system wants.
Hmm. Sounds a lot like my personal circumstances at the moment, but that’s another story likely not to be told.
Action:
I set up Scenario #6 Stand to it and give them hell. The scenario centers on McLaw’s and Anderson’s Divisions assaulting the Union line around the Peach Orchard and along the Emmitsburg road. Four turns starting at 5pm.
As far as action goes, after a first clunky turn the pace picked up, actions became obvious [despite me inserting Picketts’ card] , we managed to ‘fix’ that as his activation amounted toa few shots fired to no effect. If you see an image of Picketts’ card in any shots for the AAR, please don’t freak out, I caught it.
We are clocking over 3k words, probably time to stop. So look for a Game Play AAR from me shortly in a new post.
Thanks so much, Kev! Wonderful article.