The battle for the java seas is part 3 of a six part detailed exploration of the tsww
[the second world war- diffraction games]
system. shared with permission from a a training doc created by a chap who desires ANONYMITY. you can see part one , two at links.
A. Per Rule 13.B (Pre Combat Stage),the first activity during transmit combat is to determine fuel status if of the opposing fleets. The Allies, having just set sail, have plenty of fuel. The Japanese start with 1/8th of 4-turn SMA limit expended, and have spent more for various activities this NMS, depending on the ship (ASW, movement, search mode).
1. Mogami Class (CAs Mogami, Mikuma, Suzuya, Kumano). SMA 27. 14 considered spent prior turn; 15 spent turn to date, between moving, ASW, and search mode. Plenty of gas left, as 4xSMA to get back to port.
2. Myoko Class (CAs Haguro, Nachi). SMA 27. 14 last turn; 9 this turn. Same.
3. Fubuki Class (DDs Ushio, Sazanami, Shikinami, Uranami). SMA 17. 9 last turn; 14 this turn for those in green; 9 this turn for others. All ok.
4. Akatsuki Class (DDs Inazuma). SMA 31. 16 last turn; 9 this turn.
5. Kamikaze Class (DD Asakaze). SMA 12. 6 last turn; 9 this turn — still plenty of gas for 4 NMS.
6. Shiratsuyu Class (DD Yakakaze). SMA 13. 6 last turn; 9 this turn — same.
The reality is that everyone has plenty of fuel for combat an continued operations.
B. Next the Allies can try to evade (13.C). Because the strategy of engaging the Japanese forces in detail failed, the Allies will try to evade (note: Allies could have engaged their own NMS before Japanese forces jointed up; just a note; but then the fleet would be exposed to short-range air attack; hence the choice to engage closer to Java). The slowest speed in both forces is compared. For Japan, that is the damaged Mogami (7); for the Allies, it is the British CLs (also 7). The British add 1 for weather and the net difference in NEM (here none – using the Western Allied NEM of 1 as dominant force, same as Japan). So the British need a 7 (modified to 8) to evade . . . The roll is a 3, and evasion fails.
Japan then declares a Night Combat (see 13.R). This occurs only on a roll of 1-3. A 4 is rolled, so the battle will be fought during the daylight. Range will commence at short range, as weather is poor (see 13.E.1.a).
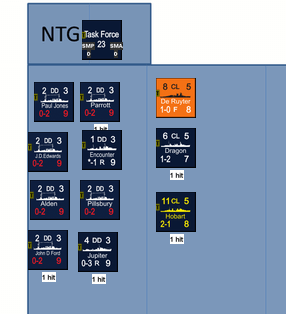
C. Next (see 13.F Combat Preparation) each side organizes its forces into Divisions. Here, Japan has 2 divisions — the CAs and the DDs. The Allies group their forces into 5 divisions. Cruisers with a speed > 7; the 2 CLs with speed 7; and the DDs; with Dutch CLs (2) and DDs (2) in their own Divisions. (The Allies divide the cruisers to cover, potentially, the withdrawal of the faster forces with the slower force; see 13.F.1.h; but no disengagement is possible before round 1; that is the purpose of the Evasion mechanism; the Dutch NEM is -1, so keep them separate).
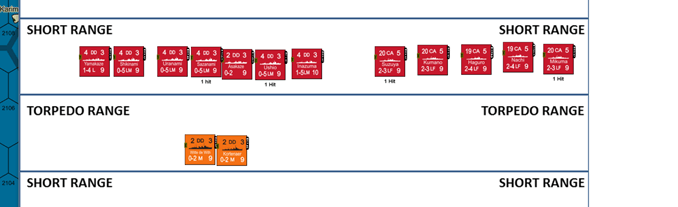
D. Round 1 then commences (13.A.1.a.i). Aa weather is poor, gunnery is short-range, as noted. Each ship targets another ship; if multiple ships fire on the same target, there is a -1 to the roll; same if ships split their fire (and these effects are cumulative). See generally 13.J. The protection (armor) value is subtracted from gunnery value to determine the column on which to roll. At short range, all factors fire, and can hit targets at all ranges. Gunnery is simultaneous. But we’ll have the Japanese fire first:
Cruisers: Japanese CAs target Allied Cruisers; they each have a +1 for float planes (which uses an SMA; 13.P.1.c).
Mogami and Mikuma target Houston. Momagi has 2 hits (and with 5 protection rating, could take 3 before sinking). So her gunnery is reduced by 2/3s, rounding to 6. Mikuma still fires at 20. So the total fire is 26. From the fire total, Houston’s protection value of 5 will be subtracted. So the Japanese fire with 16 and 10. This produces a shot @ 16 – 5 (11+ column) and 10 – 5 (5-6 column). Note that this optimizes the use of Mogami’s much reduced fire-power (otherwise firing on 1 column against Houston). The roll is -1 for weather and -1 for multiple firing units and +1 for float planes (NEM the same). Rolls are 2 (net 1) on 11+ and 7 (net 6) on the on 5-6 column. This produces 2 hits, sinking Houston.
Suzuya and Haguro target Exeter. Japan could inflict an “auto hit” by firing 1 CA at one target; but that effectively wastes some firepower (as the remainder won’t hit with the -1 for weather). So 2 CAs target Exeter with 40 factors, with -1 for multiple firing units. This is 2 shots at 9 (-1 net) with 28 factors [14 – 5, protective value of Exeter, in each case]; and 1 shot @ 7 with the remaining 12 (-1). The dice are with Japan. Rolls of 6, 7, 7 all results in hits. The 3 hits sink Exeter.
Kumano and Nachi target Perth, also protection value 5. It is the same 3 shots (each net -1 as before). The dice produce 2 hits with rolls of 1 (miss), 7 (hit) and 7 (hit).
Hugura targets Java. Here, the NEM difference is a net +2 for Japan, and thus the DRM net +2. Given the +2, Japan can divide factors differently. 10 (6 column) and 9 (4 column). The rolls are 8 (hit) and 7 (hit). 2 hits.
Ushio and Sazanami target Jupiter. 8 (2x — DDs targeting escorts double fire) = 16 factors. Best allocation is 10 ( less 3 protection) for 7(-2); and 6 (less 3) for 3 (-2). Rolls are 7 (hit) and 3 (miss).
Shikinami and Uranami target Parrott (same shot). A 6 hits; a 3 misses.
Inazuma, Asakaze target Alden. This is 12-3 = 9 column (-2). Miss with a 1.
Yakakaze targets Ford. 8-3 = 5(-1). A 10 hits (but only critical if on the 11+ column).
The Allies fire back; as with the Allied forces, all Japanese CAs have armor/protection of 5 and DDs 3:
Houston had one hit before combat (so fire down to 11). She combines with Danae to fire at Mogami. 17-5 = 12 (-2). A 7 on the 11+ sinks Mogami. [The 1 won’t hit at -2].
Exeter and Dragon fire at Mikuma. It is the same shot (here, 11 factors), and produces a hit on a 6 (Exeter has radar; if firing alone would have had +1, but Allies want the auto-hit).
Perth and Hobart fire at Suzuya. They have 22 factors. Best shots are 14 (-5) for a 9 (-2) and 8 (-5) for a 5 (-2). 1 hit is scored.
Java and De Ruyter fire on Kumano. They have 16 between them, so on the 11 column. But DRM is -2 for NEM and -1 for weather +1 floatplanes. A good roll nets a hit.
The Allied DDs are nowhere as good as their Japanese counterparts (all fire of 1 or 2. save Jupiter):
Dutch DDs fire @ 8 (-3) = 5(-3) at Yamakaze. A 6 (modified to 3) misses.
Jupiter fires @ Ushio. 8(-3) = 5 ( -1 weather; +1 radar). A 10 hits. [not critical unless on 11+ column]
Alden/Parrott fire at Uranami. 5(-3). Ford/Jones fire at Inazuma (same). Pillsbury/Electra at Sazanami. 1 hit on Sazanami. [Single DD shots would all miss with the mandatory -1 for weather; these shots need an 8].
Edwards/Encounter can’t hit anyone, separately, so they combine (3 doubles to 6, less 3 to the 3 column). The -1 weather, and -1 for combining, is partially offset by Encounter’s radar (+1). But they miss with a 7 (modified to 6) on the 3 column (-1).
After hits are applied, before torpedo combat, the forces are as follows (DDs should be short range):

The Japanese then unleash their long lance torpedoes (see 13.K.1.d, able to engage from short range). Japanese DDs have 23 strikes
and the CAs 13 strikes
Allocations (before rolling) and results below:
1. Java (3); net DRM +1. Rolls of 9, 9, and 8 produce 3 strikes. 22/3 = 7 hits, Java is sunk.
2. De Reuyter (4); +1:. 4, 1, 4, 4. No hits.
3. Hobart (4) (DRM -1 for this and all following). All miss.
4. Dragon (4). All miss (hard to get net 8 with -1 DRM).
5. Danae (4). 1 hit. Damage of 3; sinks.
6. Perth (2). Misses.
7. Jupiter (2). Misses.
8. Edwards (2). Misses.
9. Jones (2). Misses.
10. Electra (2). One hit; sinks with 3 damage.
11. Encounter (1). Misses.
12. Alden (2). Misses.
13. Pillsbury (1). Misses.
14. Parrott (1). Misses.
15. Ford (2). Misses.
A lot of those misses were with 8s; weather makes a huge difference. After torpedoes are unleashed:
The Allies consider sticking around, since only the Japanese CAs have torpedoes left; but they endeavor to live to fight another day. The Allies accordingly attempt to disengage (see 13.A.b.i), but after range determination (13.A.1.a.iv/b). The Dutch DDs will seek to cover the Allied withdrawal (see below) and move to Torpedo range. The Japanese DDs, with no more torpedoes, stay at short range. The Japanese CAs remain at short range, as do the Allied Cruisers and U.S. DDs — you must be at short range to disengage. Which is next.
Disengagement is a risky maneuver. Each Division can seek to disengage separately, with the slowest speed in the disengaging division compared to slowest speed for Japan (currently an 8). The Allies can improve the odds of disengaging by allocating a screening force (see 13.H.1.a.iii) — a perfect roll for the 2 Dutch Destroyer division. They provide a +3 DRM for disengagement, and will close to torpedo range; but must stick around 2 rounds. The Dutch accept the mission. The rest of the Allied force attempts to disengage. The rolls are as follow:
British CL (Speed of 7, so -1 compared to Japan’s speed of 8; +1 weather; +3 screen; so net +3 and need 8): F* result on a modified 7, which means they disengage, but may be fired upon by long-range guns (13.H.b.i).
2 Australian CLs (speed of 6; Perth as 2 hits; so DRM is +2). Also a 4, modified to 6. Also F* result.
Dutch CL (speed 6 (a -2 DRM); but -2 NEM modifier; so net DRM -1). A 10 succeeds.
Allied DDs. Same speed as Japan; same NEM; +1 for weather. They successfully disengage on an 8.
The fleeing Allied Cruiser force (1 and 2 above), having just failed to attain an “S,” are then set upon by long-range fire from the Japanese cruisers, which fire 14 for Kumano; 13 for Nachi/Hugaro, and 9.3 for the damaged 2 (70% of fire is heavy). Perth, with two hits, is the first target. Nachi and Mikuma target her with 22; 16 produce a 11 (-2) shot, which hits with a 6. Perth sinks. Kumano targets Hobart with with 9 (-1), and hits with a 9. Hugaro and Suzuya attack Dragon with 22; 16 factors create an 11 (-2) shot which hits, and the other shot (on 1-2) column misses. Dismal day for the Allies. Particularly because the Japanese move again next NMS, and can provoke transmit combat again, disengaging was very risky.
Round 2 fire then commences (note: each round requires expending an SMA; and use of float planes cost the Japanese CAs an additional SMA for the combat). Gunnery occurs before torpedo combat. Having used their long-range guns to fire at the fleeing light cruisers, the Japanese have only their light guns available (remaining strength of the cruisers). They will try to make short work of the Dutch DDs. Remaining factors to fire are 6 for all the cruisers save the damaged ones, which fire at 4. Kumano and Nachi and a DD fire at Java @ 11+ column, with +2 for NEM, +1 float planes, -1 weather, -2 multiple ships (net 0). A modified 4 hits. Hugaro and Mikuma and another DD fire on the other Dutch CL with 10 (becomes 5) and same DRM. A 10 causes 2 hits and sinks her. The Dutch for their part focus on Ushio. They fire on 5 (8-3) with a -3 DRM. A lucky 10 sinks her.
The action moves to torpedo combat. Only the CAs have torpedoes left, and they will save them. The Dutch DD, with 1 hit left, has to stick around having covered with ill-fated disengagement.
Round 3. The Dutch DD is auto-kill on the 11+ table (no DRM) and hits nothing back.
Japan wins the battle of the Java Sea. At the cost of CA Mogami and DD Ushio, and other forces nicked up, Japan has sunk 5 Allied cruisers and 3 Destroyers. Japan also gets to move next, potentially provoking further naval combat next turn.
Units are returned to their respective TFs. The disengaged force cannot be attacked against this NMS.
House keeping: The Japanese CAs used 4 SMA (1 extra for floatplanes) and the DDs 3 SMA. DDs have used all their torpedoes.
The Japanese TF then moves 1 Sea Zone north, to cover the convoy as it approaches in case the ravaged remnants of ABDA naval command seek to intercept. 13 SMPs have been expended by the ships in TF5 that started in the West. Meanwhile, the Eastern Convoy sails in a bit of a circle (stalls while battle is taking place) and then enters the SZ with TF5 on its 13th SMP (remember, all moves are supposed to be simultaneous). Allied land-based spotters find her. However, the final Allied air asset — the Dutch Do24Ts in Tjilatjap — cannot reach the Convoy until it joins the protective air cover of the Zeros also covering TF5, which the Convoy intends to join. So the Allies roll to attack just as the Convoy enters TF5’s Sea Zone …. Alas, a 5 means the Allies fail to find the ships at sea . . . . The Convoy, having taken a few of the escorting CAs, moves a final 14th SMP and stops for the turn:
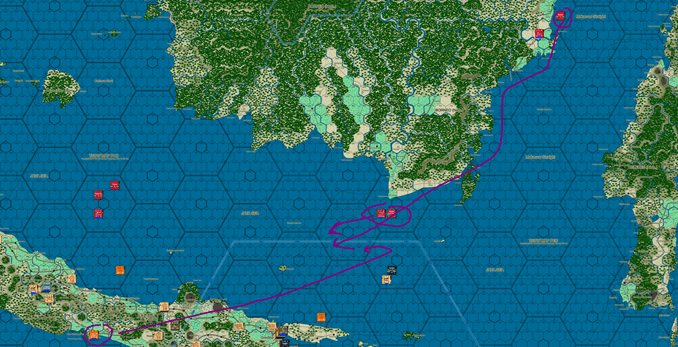
Meanwhile, two CAs are dispatched back to the Eastern force, to cover its approach next turn (which takes more fuel; but the fast Japanese CAs have 21 SMPs, and thus can do so this turn). The CLV Chiyoda moves closer to the action as well. LCs from the Western TF move to join the Eastern TF (spending 9 SMA).
At the end of turn, air units return to base and TFs flip unspotted. Positions end of Allied Feb II turn:
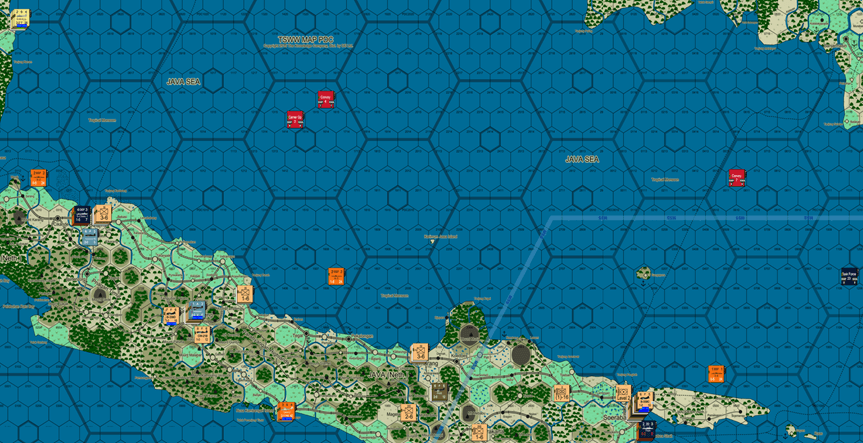
What’s left of the Allied force at sea:
Next March 1942 Turn