– A Game Replay of Yaquinto’s C.V. –
by Tom Hanover
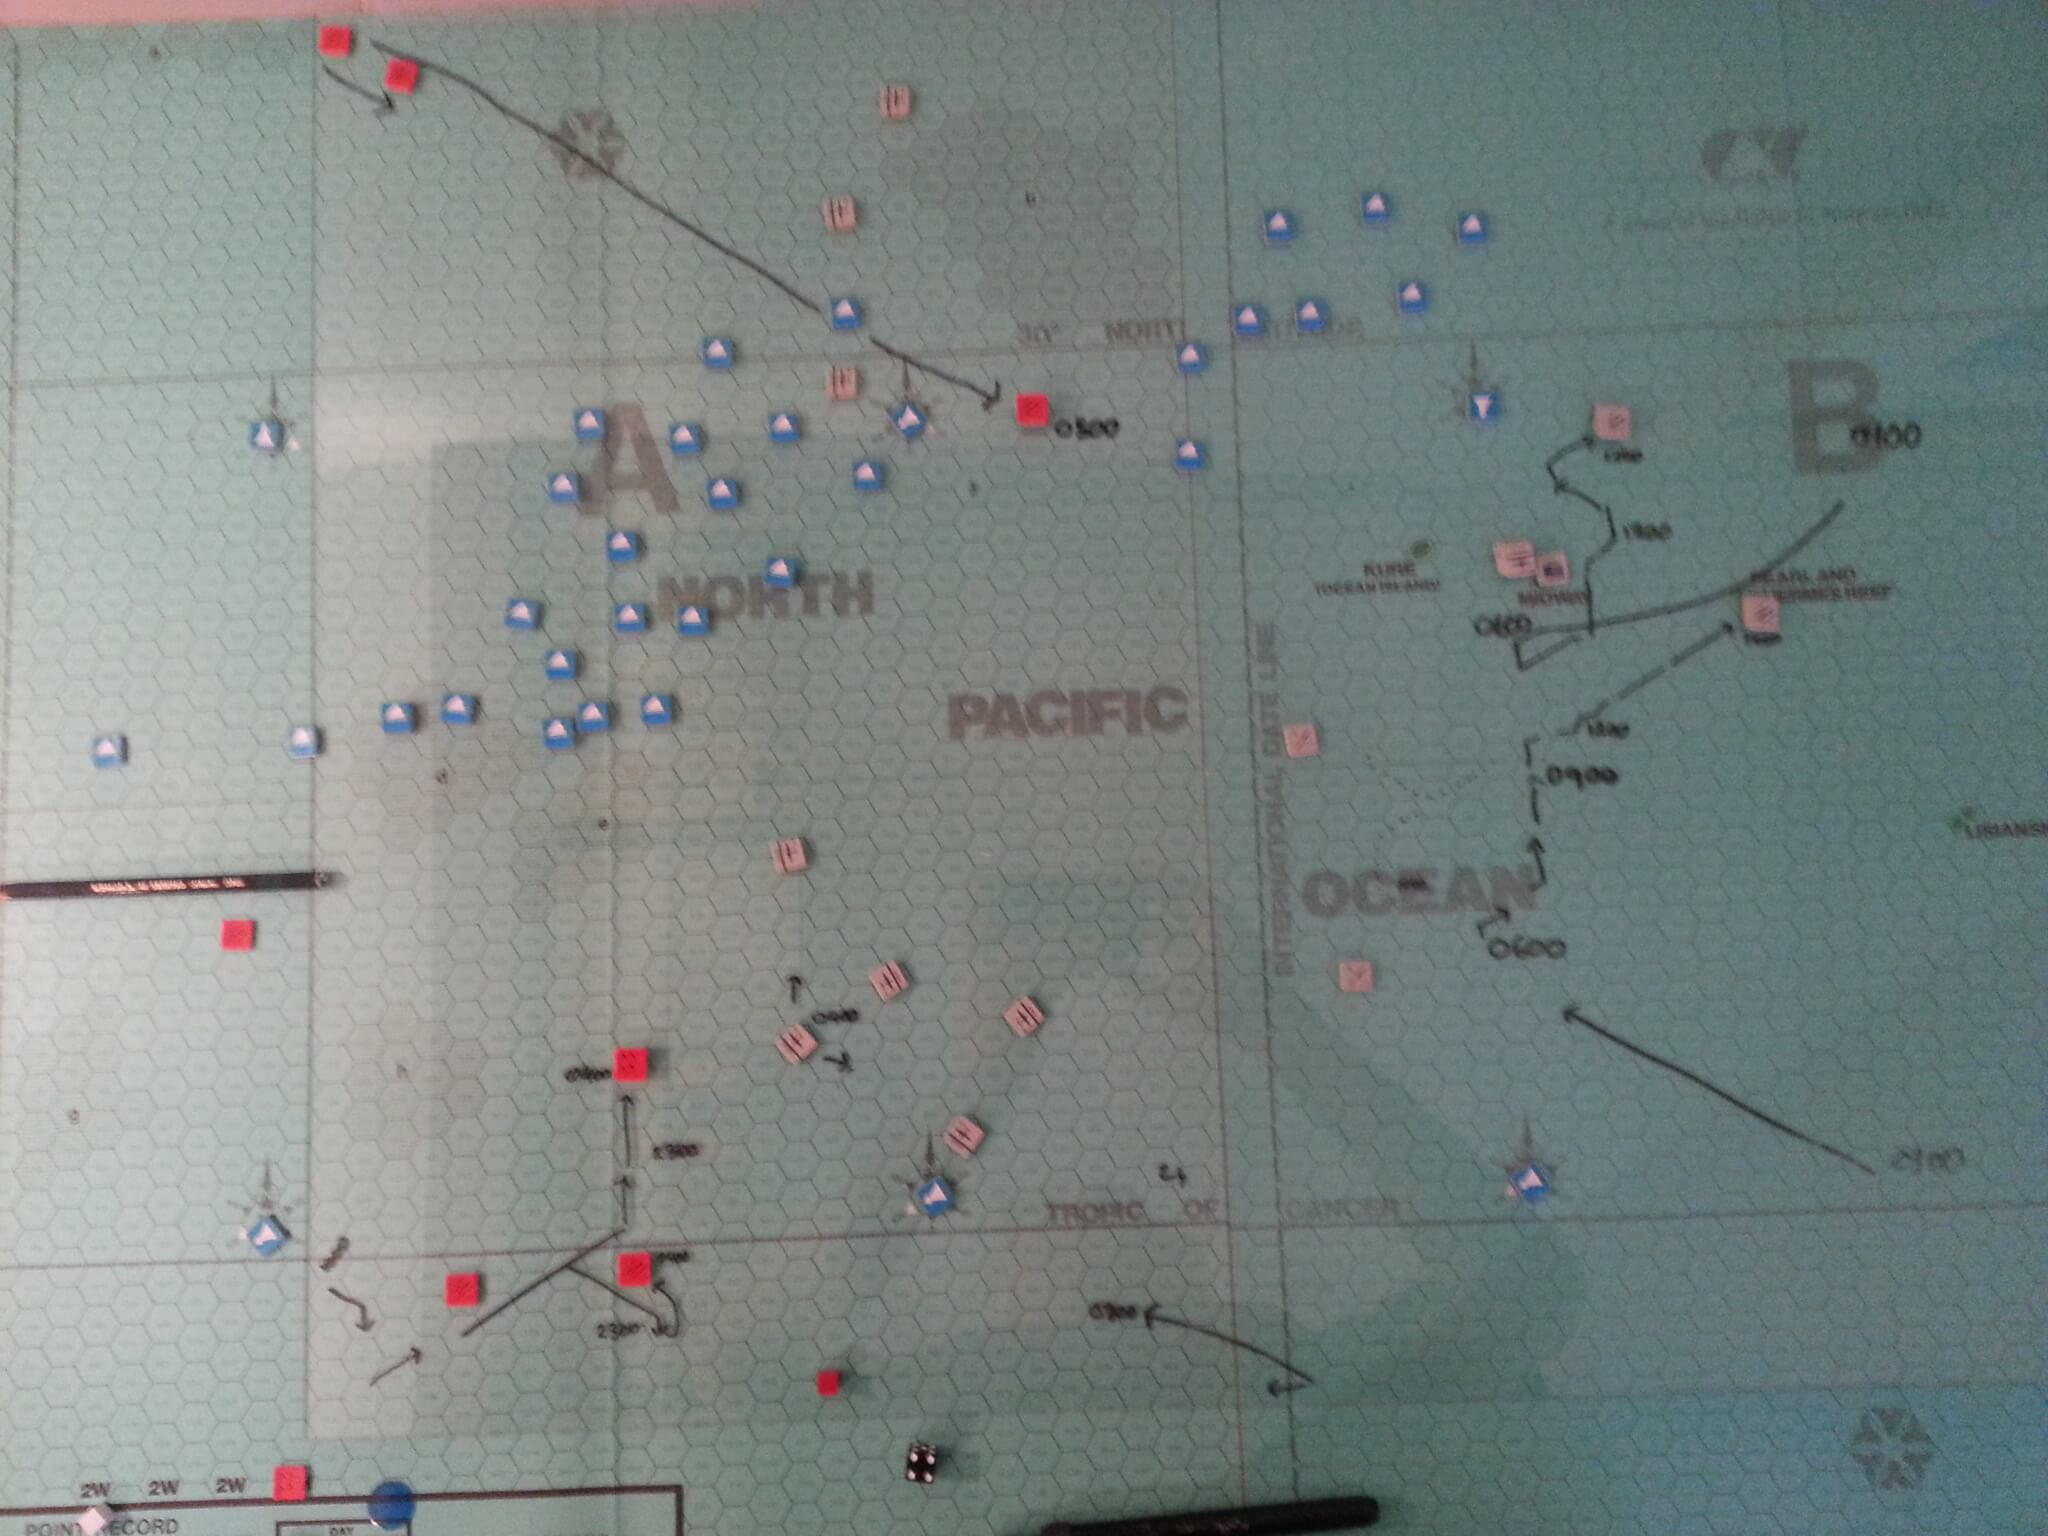
The following account is based on a GM’ed postal game of Yaquinto’s C.V. played out between Frederick Kraus (CA) and Tom Becker (MI) over a three year period (1990-93). C.V. covers the 1942 Pacific carrier battle at Midway using the FLATTOP system. This refereed game featured hidden movement for ships and planes, conditional orders for surface combat and pre-plotted courses for most search planes and air strikes. Both sides randomly received additional forces based on what was available historically, so neither player could be absolutely sure what he was up against. The resulting battle is written as if the events actually occurred.
THE COMMANDERS
Although the Pacific Fleet Admiral Chester Nimitz originally wanted William. F. “Bull” Halsey to command the American forces at Midway, Halsey was taken ill in late May and Nimitz instead chose Rear Admiral Frederick Kraus as his replacement. A relative unknown in American naval circles, Kraus was a “black-shoe” admiral, first commanding destroyers, then a cruiser division during the mid-to-late 1930s. Despite his lack of experience with naval aviation, Kraus had an aggressive combative leadership style and a bulldog’s tenacity. Just the qualities Nimitz felt were most needed in the upcoming battle.
The Japanese were also bringing in a new commander. Vice Admiral Chuichi Nagumo, worn down from the successful but grueling Pearl Harbor and Indian Ocean campaigns, was given sick leave. His replacement was Rear Admiral Kenichi Tomo, another “black-shoe” type with no prior experience in carrier warfare but possessing an aggressive fighting spirit, excellent judgement and an abiding confidence in his veteran officers and pilots.
OPENING PLANS
Rear Admiral Kraus, aided by American code-breaking efforts, had a clear idea of what forces the IJN would throw in against Midway and where and when they would likely arrive. He chose to place CV YORKTOWN 300nm NE of Midway, hoping to lure the Japanese carriers eastward while, far to the south, CVs HORNET and ENTERPRISE struck at the unprotected IJN transports, wrecking any chance for a successful invasion. Also available to Kraus were five older and slower battleships which he started 400nm SSE of Midway. They would steam NW so as to arrive off Midway around midnight, ready to intercept any surviving enemy transports or Japanese surface ships attempting to bombard the atoll.
The IJN meanwhile, alerted by its own intelligence sources to expect two American carriers in the Midway area, had altered its original plans. The Aleutians operation, a diversionary effort, was cancelled and the converted carrier JUNYO and light carrier RYUJO were hurried southward to assist Rear Admiral Tomo’s First Mobile Striking Force (CVs AKAGI, KAGA, SORYU and HIRYU plus CVL ZUIHO). Tomo planned to deal with the American carriers first, then proceed with the invasion of Midway.
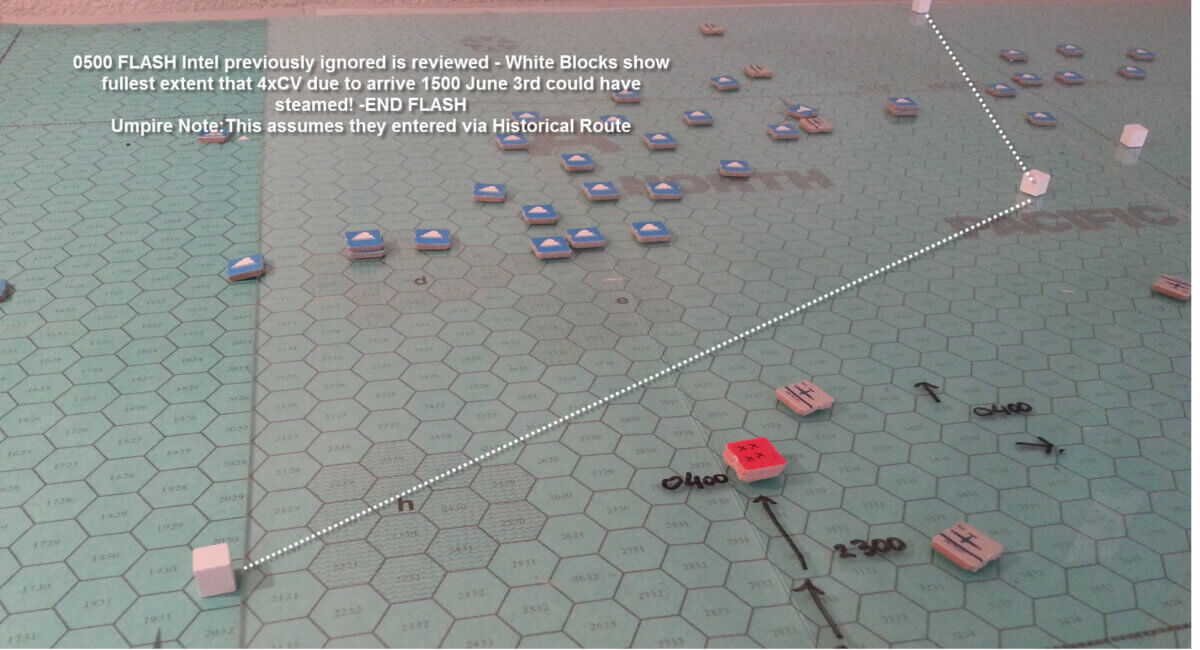
Up until midnight, June 3rd, the IJN forces heading towards Midway were exactly where the American commander expected them to be. However, in the early morning hours of June 4th, Rear Admiral Tomo swung his carriers SW, away from Midway, thereby leaving the American carrier YORKTOWN far from where the first day’s action would likely take place and inadvertently pitting Tomo’s five carriers directly against HORNET and ENTERPRISE racing up from the south.
THE FIRST DAY (June 4th)
0215- USN submarine GRAYLING radios in the first sighting of Rear Admiral Tomo’s First Mobile Striking Force, confirming American expectations of where it would likely appear.
0546- A Catalina flyingboat, on a routine search patrol out of Midway, sights three of Tomo’s carriers, 440nm west of Midway and nearly 360nm NNW of the USN carriers, well beyond range of the American carrier planes. Minutes later, a second Catalina reports the position of the Japanese transport force, 480nm WSW of Midway.
0645- The Japanese draw first blood when the submarine NAUTILUS is attacked and sunk by a Jake floatplane operating from the seaplane cruiser CHIKUMA.
0749- Waiting impatiently on the bridge of ENTERPRISE for his ships to steam within striking distance of the Japanese carriers, Admiral Kraus begins casting about for closer targets. Search planes from Midway have located an IJN seaplane tender to the southwest and a cruiser force to the north. Kraus gives the order for HORNET and ENTERPRISE to launch full strikes against both targets.
0843- Col. Walter Sweeney leads a flight of nine B-17s out of Midway in making a high-altitude bombing attack on the Japanese transports. But before they can deliver their bombs, they are jumped by 33 Zeros providing air cover and decimated. No hits are scored on the transports and all nine B-17s are shot down.
0905- A floatplane, operating from seaplane tender KAMIKAWA, radios Admiral Tomo it has sighted “several ships” (actually HORNET and her escorts). Without awaiting clarification of the sighting, Admiral Tomo makes what seems like a reckless gamble to his startled subordinates. He orders his carriers to launch a powerful strike of 90 Val dive-bombers, escorted by 24 Zeros to attack an uncertain target nearly 380nm south of his position, a range that leaves little margin for navigational error.
Though his fellow officers liken this to a “toss of the dice”, the thinking behind it is sound. Tomo reasons that any US ships in the area will likely be accompanied by a carrier. And by launching immediately at extreme
range, he will insure the safety of his own carriers by hitting the enemy hard first, from a position the shorter- ranged American carrier planes cannot reach.
0959- The air strike from ENTERPRISE finds and attacks heavy cruiser MOGAMI, hitting her with one torpedo and four bombs, starting fires and leaving her dead in the water.
1024- HORNET’s strike group attacks the seaplane tender KAMIKAWA, sinking it with three bomb hits and also damaging an escorting destroyer.
1052- ENTERPRISE is sighted by a long-range Mavis flyingboat.
1114- Following the launch of his dive-bombers, Admiral Tomo had ordered 78 Kate torpedo-planes brought up on the flight decks of his five carriers, ready to respond to just such a sighting. Despite a lack of Zeros to send along as escorts, Tomo does not hesitate in giving the order to launch.
1142- Displaying the kind of precision bombing they’d demonstrated against the British in the Indian Ocean campaign, Tomo’s Val dive-bomber pilots send seven bombs crashing through HORNET’s flight deck. Uncontrolled fires
break out in the hangar deck below, wrecking 18 Dauntless dive-bombers and 3 Devastator torpedo-planes stowed there. Soon all engine power is lost and Captain Mitscher is forced to request destroyer assistance to help fight the fires and remove wounded personnel.
1309- The “abandon ship” order is given on HORNET.
1434- Light carrier ZUIHO is dive-bombed by 9 Dauntlesses launched from ENTERPRISE. No hits are scored.
1438- Overcoming a navigation error that nearly caused him to miss sighting ENTERPRISE, Lt. Cmdr Joichi Tomonaga leads his 78 Kate torpedo-bombers in against the big carrier. Defending Wildcat fighters and ship’s AA fire knock down 24 of his planes but enough get through to score seven torpedo hits. Within 11 minutes ENTERPRISE capsizes and sinks, taking 800 crewmen and 36 aircraft still aboard down with her.
1447- CVL ZUIHO is again attacked, this time by 6 Devastator torpedo-planes, previously launched by ENTERPRISE. One torpedo strikes ZUIHO’s port side but fails to explode.
1530- With fires spreading throughout the ship, efforts to salvage HORNET are halted and all remaining personnel are removed to waiting destroyers.
1552- 18 B-17s out of Midway make a high-altitude bombing attack on the IJN carriers AKAGI and SORYU. Half of the bombers are shot down by Zeros on combat air patrol (CAP), the survivors fail to score any hits.
1627- HORNET sinks.
1740- Having spent most of the day steaming eastwards at top speed, just to get within range of the main action, YORKTOWN finally joins the battle with a late-afternoon air strike against Tomo’s carriers. 36 Dauntless divebombers and 12 Devastator torpedo-bombers begin making their attack runs on AKAGI and SORYU. Each ship suffers only one bomb hit but, since they both have a small number of armed and fueled planes on deck, the damage inflicted is doubled in effect. SORYU is reduced to half speed.
1834- A Japanese search plane narrowly misses sighting the approaching American battleships.
1908- Taken under tow after having successfully put out her fires hours earlier, IJN heavy cruiser MOGAMI is struck by a submarine torpedo fired by USS TRIGGER. Slow flooding will eventually sink her in the early morning hours of the following day.
2155- Virtually the entire Japanese battle fleet, 54 vessels of all types, rendezvouses and reorganizes 160nm west of Midway in preparation for the imminent amphibious assault. Unknown to Admiral Tomo, however, the American battleships are about to make their presence felt.
2350- On the battleship TENNESSEE, cruising 100nm SW of Midway, radar detects surface contacts only 20nm NW of its position. Rear Admiral Norman Scott, commanding the five battleships of TF 4.0, has orders to await the arrival of the former ENTERPRISE escort group. But waiting means the IJN forces may slip by and reach Midway ahead of him. So, disregarding his instructions, Scott instead orders a new course plotted to intercept the enemy task force.
ASSESSMENT
At this point in the battle the American commander, Admiral Kraus, had much cause to be discouraged. Two of his three carriers were resting on the ocean bottom, along with 2/3 of his carrier air strength. He had exacted a measure of revenge by moderately damaging two of Tomo’s carriers plus sinking a cruiser and a seaplane tender, but this wasn’t enough to halt the seemingly inexorable progress of Tomo’s forces towards Midway. Not one to shrink from long odds when the stakes were high though, Kraus elected to fight on with whatever means he had at his disposal; he still had YORKTOWN, he had the planes based at Midway and he had five old battlewagons spoiling for a fight.
Admiral Tomo, for his part, had good reason to feel satisfied with the day’s work. He was convinced his pilots had sunk the only two American carriers present at Midway. His own ships had suffered relatively little damage, having beaten off several weak and disjointed air attacks from both Midway and the American carriers. All that seemingly remained for him to do was neutralize the Midway airfield and shepherd the invasion forces to their destination.
![]()
![]()
THE SECOND DAY (June 5th)
0033- Forty-five minutes after making radar contact, the American battleships open fire on the nearest of three separate Japanese battlegroups, one of which is screening Tomo’s carriers. The Japanese forces consist of 5 battleships, (including superbattleship YAMATO), 7 heavy cruisers and 18 destroyers, though only part of this force is initially engaged.
Soon the Americans are getting their first hard lessons in the superiority of Japanese night-fighting techniques and the destructive power of the Long Lance torpedo. Two USN battleships, MARYLAND and COLORADO, are crippled by gunnery and torpedo hits and left dead in the water. The other three, MISSISSIPPI, TENNESSEE and IDAHO are badly damaged. Six destroyers are also sunk.
The Japanese forces suffer too, however. Battleships YAMATO, KONGO and HARUNA are heavily damaged, the latter two reduced to half their normal speed; heavy cruiser CHOKAI is sunk and MAYA is crippled as well.
Several other ships have minor damage inflicted on them.
0110- Admiral Tomo sends his carriers and a strong escort force of five heavy cruisers north, away from the surface action still raging. He also sends YAMATO, KONGO and HARUNA limping westward to avoid incurring any
further damage. Tomo leaves behind a battlegroup under the command of Vice Admiral Kondo, consisting of battleships KIRISHIMA and HIEI, plus heavy cruiser TAKAO and four destroyers, with orders to “finish off” the American task force.
Unknown to Admiral Tomo, though, Rear Admiral Scott’s forces have been reinforced by the arrival of three heavy cruisers, a light cruiser and six destroyers. In the ensuing fight, KIRISHIMA is crippled and HIEI severely damaged; TAKAO takes three torpedoes and two destroyers are also hit. The USN battleship MISSISSIPPI is reduced to a burning hulk while IDAHO takes further hits, reducing her speed.
0225- Alarmed by the rough handling of Kondo’s surface group, Admiral Tomo orders the damaged battleships YAMATO, HARUNA and KONGO to reverse course and assist Kondo’s forces. In the darkness, they run into two pursuing American battleships, TENNESSEE and IDAHO. A lucky hit from TENNESSEE’s guns pierces HARUNA’s deck armor and touches off her forward powder magazine, blowing her up in spectacular fashion. HIEI is pounded with 14-inch shells and left burning and adrift.
The Americans pay a heavy price for this success as YAMATO rips apart TENNESSEE with 18-inch shellfire, killing Rear Admiral Scott and sinking his flagship. YAMATO and KONGO then concentrate their fire on IDAHO, sinking her as well.
0337- Admiral Kraus sends several of his light cruisers and destroyers NE, away from the main battle area due to low ammunition stocks and lack of torpedoes. At nearly the same time, Admiral Tomo detaches five heavy cruisers and four destroyers from his carriers and sends them south to sink the crippled American battleships. Both groups blunder into each other and a one-sided battle ensues.
The American ships make smoke and turn away SE, trying to outrun their Japanese pursuers. The IJN ships manage to sink light cruiser DETROIT and put a torpedo into the bow of RALEIGH. This marks the final surface action of the night as both sides forces are now badly scattered and low on shells and torpedoes.
0415- While the surface action is winding down, Admiral Tomo readies his first air strike against Midway. Boldly sailing his five carriers to within 50nm of the atoll, Tomo puts a mixed force of 150 Zeros, Kates and Vals aloft to bomb Midway’s airfield at dawn. He launches a secondary strike of 18 Vals and 18 Kates to sink the crippled American battleships 80nm SW of Midway.
0430- The Americans too, are engaged in launching large numbers of planes in the early morning hours: 66 fighters and bombers from YORKTOWN and another 69 land-based bombers from Midway. Midway’s radar easily detects the enemy planes massing to the north, pinpointing the location of the IJN carriers for the USN pilots.
0526- Admiral Tomo’s strike arrives over Midway and begins bombing the airfield, AA and shore batteries and other installations, scoring numerous hits. After surveying the damage his planes have caused, however, flight leader Jochi Murata radios Tomo, “There is need for a second attack.”
Meantime a motley collection of aircraft from Midway, including B-17s, Dauntless dive-bombers, Avenger torpedo-planes and twin-engined B-26 Marauders, finds and attacks Tomo’s carriers. Twenty-four of them are shot down by Zeros and AA fire while the rest manage only a single hit on KAGA.
0537- 36 Vals and Kates attack the three crippled American battleships 80nm SSW of Midway. COLORADO and MARYLAND are quickly sunk; MISSISSIPPI is hit also but remains precariously afloat.
Off Midway, a dozen Japanese destroyers and three light cruisers commence a pre-invasion bombardment, concentrating on knocking out the airfield.
0609- Fifteen IJN transports anchor off Midway’s outer reef and begin disembarking troops of the Ichiki Detachment into their landing craft.
0617- MISSISSIPPI sinks. Survivors are picked up by nearby American destroyers.
0620- YORKTOWN’s strike group attacks the Japanese carrier HIRYU, hitting her amidships with a torpedo and a 1000-lb. bomb aft of the bridge. Rapid counter-flooding keeps the ship on an even keel while repair parties are dispatched to plank over the holed fight deck.
At the same time, Admiral Tomo’s second strike against Midway further craters the airfield, though no American planes are caught on the ground. The ships escorting the invasion fleet continue their shelling, silencing the few remaining shore batteries and AA guns and temporarily rendering the airfield unserviceable.
0632- The first wave of Japanese landing troops, 650 strong and led by tough Col. Kiyonao Ichiki, storm ashore on Sand Island and attempt to gain a foothold. Although naval shelling and aerial bombardment have sufficed to wreck Midway’s airfield, the Marine defenders have been left untouched and they now rise up to deliver a withering hail of fire into the Japanese troops struggling to wade ashore. Nearly 400 of the enemy are killed or
wounded in the first half hour of fighting and Col. Ichiki is left with just 250 men clinging to positions in and around Batteries “C” and “D”.
0649- 30 Zeros conduct a fighter sweep over Midway, eliminating all 9 Buffalo fighters on CAP.
0715- The naval bombardment of Midway ends as the Japanese destroyers and light cruisers have run out of HE shells. Now the cost of the previous night’s surface clashes is keenly felt by the Japanese invaders, for there are no heavy ships available to lend the weight of their firepower in keeping the heads of the defenders down. Many of the IJN battleships and heavy cruisers are either sunk, too badly damaged or lacking sufficient ammunition.
0825- The Japanese continue landing troops at the rate of about 600 men per hour but most are slaughtered at water’s edge. Col. Ichiki radios invasion flagship NAGARA, “Imperative we get close air and naval gunfire support. We cannot move forward until enemy counter-fire is suppressed.” Even as this message is sent out, Admiral Tomo is readying another strike against Midway.
0912- Crippled IJN battleship KIRISHIMA (under tow by YAMATO) is struck by two torpedoes from submarine TAMBOR and sinks 24 minutes later. Shortly afterwards, TAMBOR is located, depth-charged and sunk by Japanese destroyers.
Midway launches a small strike of 9 Dauntlesses, 3 Avengers, 3 B-26’s and 3 ancient Vindicator dive-bombers to attack the IJN transports. No hits are scored but 6 planes are lost to enemy AA fire.
Japanese troops on Sand Island continue taking heavy casualties. 850 of them are left holding a precarious toehold.
1032- 55 Kates and Vals roar in over Midway and begin making level and dive-bombing runs against American 0troop positions on Sand and Eastern Islands; Col. Ichiki’s hard-pressed invasion troops finally get some much-needed air support. The effect is immediately evident as casualties are cut dramatically for the next follow-up wave. Ichiki can now count 1,200 men ashore; still only half the number of American defenders but if the Japanese can maintain this rate of build-up, they will eventually overwhelm the Marine garrison through sheer weight of numbers.
Midway airfield remains operational but no American fighters are available to defend it and most of the AA batteries are knocked out.
* Note: at this point in the game, Mike Ward replaced Tom Becker as IJN commander.
1110- 100nm WSW of Midway, an American task force of 3 heavy cruisers and 5 destroyers comes across the crippled battleship HIEI and heavy cruiser MAYA. HIEI is already sinking from two previous submarine torpedo hits so cruisers NORTHAMPTON, PORTLAND and VINCENNES concentrate their fire on MAYA, quickly putting her beneath the waves.
A second Japanese carrier strike, made up of 15 Vals and 33 Kates, hits Midway again, targeting American troop positions on Sand Island. The invasion forces are rapidly gaining numerical parity with the Marine defenders.
1127- Admiral Tomo, finally beginning to suspect the presence of a third American carrier but preoccupied with the ongoing invasion, orders 2 seaplane cruisers and 8 destroyers detached from First Mobile Air Fleet (virtually stripping it of surface escorts) and sends them towards Midway to provide naval gunfire support. He also radios the damaged battleships YAMATO and KONGO, ordering them to change course for Midway. These vessels,
laboring at half their normal speed, are the only heavy-hitting capital ships Tomo has left to effectively bombard the atoll with. Despite the risk of losing them to an American air strike, Tomo feels driven to make the invasion succeed using whatever means available.
1208- On the American side, Admiral Kraus has already launched a strike from YORKTOWN, aimed at sinking the very battleships Tomo is sending to Midway, while over the atoll itself, 15 B-17s manage to put two 500-lb. bombs into one of the anchored IJN transports, setting it ablaze. A second strike made up of 6 Dauntlesses, 3 Vindicators and 3 B-26 Marauders tries to equal that effort but 30 Zeros on a fighter sweep shoot them all down before they can make their attacks.
1245- Two IJN heavy cruisers, TONE and CHIKUMA, plus 8 destroyers arrive off Midway and begin their bombardment. Over head, 18 Val dive-bombers from the converted carrier JUNYO and light carrier HOSHO add to the din as they plunge down from 12,000 ft to drop their bombs on the Marine positions. Col. Ichiki’s men now outnumber the defenders for the first time.
1320- Squarely facing the possibility of losing Midway and with it, the battle, Admiral Kraus makes a desperate bid to retrieve the situation. First, he dispatches heavy cruisers VINCENNES, PORTLAND and NORTHAMPTON along with five destroyers towards Midway to directly attack the Japanese transports and disrupt the landing operation. Then he strips his flagship YORKTOWN of her escorts (heavy cruiser ASTORIA and six destroyers) and sends them north to intercept and sink a retreating pair of damaged IJN cruisers.
What Kraus does not know is that the “retreating” cruisers are actually steaming NW to rendezvous with carriers
JUNYO and HOSHO, escorted by two powerful battleships and six destroyers. A daunting prospect for the small American task force to take on.
1337- The Marines on Midway endure two separate air attacks by Japanese carrier planes and continued bombardment from the ten enemy cruisers and destroyers circling the tiny atoll. Col. Ichiki can now count 2,600 men safely ashore while the Americans are down to 1,500 combatants. Provided the Japanese can keep up continuous air strikes against the Marine positions, they should eventually prevail despite appalling losses. But the strain is beginning to tell on the carrier pilots as the day wears on.
1405- With most of his transports unloaded, Rear Admiral Tanaka signals Tomo that he is sending eleven of them north, out of harm’s way. Three are left behind with troops still on board. Shortly afterward, a strike from YORKTOWN (27 Dauntless dive-bombers) arrives and quickly sinks two of the remaining transports.
1439- A Catalina search plane sights IJN carriers JUNYO and HOSHO, just 100nm NNE of Yorktown. Admiral Kraus orders his cruiser task force to reverse course when he learns the enemy carriers are accompanied by two battleships.
1446- The second American cruiser group reaches Midway and immediately engages the Japanese bombardment force. Despite being outnumbered, the Americans give as good as they get, badly damaging IJN cruisers CHIKUMA and TONE while losing one destroyer sunk and suffering torpedo damage to heavy cruiser VINCENNES, slowing her to half speed.
1458- Unable to sustain their air and naval bombardment of Midway, Japanese troop casualties again begin to mount. Ominously so, for there are no more reinforcements available to make up further losses. Realizing the invasion is becoming a doomed effort, Admiral Tomo reluctantly orders his carrier planes armed with anti-ship ordnance to deal with the American surface ships rather than HE bombs for land targets.
1522- IJN battleships YAMATO and KONGO arrive off Midway and commence bombarding Sand Island, using up their few remaining HE shells.
YORKTOWN recovers her 27 Dauntlesses from the transport strike. She remains undetected as the Japanese have failed to make any systematic reconnaissance effort this day.
1638- Admiral Kraus again orders TF 5.0 (CA ASTORIA and five destroyers) northward, this time to pursue a retreating IJN task force composed of two damaged heavy cruisers, two destroyers and a seaplane tender. A surface battle is sure to ensue as the American ships overtake the slower Japanese vessels.
Around Midway, YAMATO and KONGO begin withdrawing NW, leaving the 1,700 remaining Japanese Marines to a forlorn fate. Admiral Tomo, meanwhile, is overseeing the launch of 60 Kate torpedo-planes and 18 Zero fighters from the decks of his carriers. Their target is an American cruiser force, 40nm SE of Midway.
On board JUNYO, Rear Admiral Kakuta belatedly launches a late-afternoon search effort using Val dive-bombers. He is quickly rewarded when one of them sights YORKTOWN just 140nm SSW of his own two carriers.
1733- Admiral Tomo’s first strike against the retreating American cruisers, a flight of 9 Vals, scores one bomb hit on VINCENNES that smashes through her amidships, wrecks two boilers, starts several fires and slews the ship to a halt.
JUNYO’s and HOSHO’s small torpedo-plane strike finds YORKTOWN but fails to score a hit.
Farther north, the American heavy cruiser ASTORIA and her six destroyer escorts intercept their intended target, torpedoing and sinking seaplane tender KIMAKAWA, crippling heavy cruiser TAKAO with a pair of torpedoes and sinking two destroyers with gunfire; all for the loss of destroyer HAMMANN. Heavy cruiser NACHI, accompanied by a smoke-laying destroyer, manages to limp away unscathed.
1803- The last hour before nightfall. Rear Admiral Kakuta on JUNYO and Admiral Kraus on YORKTOWN launch simultaneous strikes against each other’s carriers (now only 100nm apart).
1847- Kakuta’s strike of 6 Kates and 3 Vals arrives first but manages only a single torpedo hit on YORKTOWN. Kraus’ 21 Dauntlesses find Kakuta’s two carriers and make their dive-bombing runs unopposed; they plummet down on JUNYO, putting three 1000-lb. bombs through her flight deck in quick succession. A tremendous explosion suddenly rocks the big carrier as one of the bombs touches off her main ordnance stowage magazine.
An adjutant to Rear Admiral Kakuta later described the event:
“In a single instant, the entire aft end of the ship disappeared in a boiling cloud of smoke and flame. All of us on the bridge were violently thrown to the deck; already we could feel JUNYO settling rapidly by the stern. Rear Admiral Kakuta had both his legs broken by the force of the explosion and we moved to take him off the bridge but he angrily waved us off and ordered us to leave him behind. Reluctantly we scrambled down a ladder to the ruined flight deck and made our way to the bow.”
1855- As Kraus’ pilots are putting an end to JUNYO, Tomo’s are giving the American cruisers 80nm SE of Midway a rough handling too. VINCENNES is hit by two more bombs and starts sinking; PORTLAND takes one bomb and four torpedoes and sinks only minutes later; finally, NORTHAMPTON is hit with three torpedoes but timely counter-flooding saves the ship.
The last ship to be sunk this day is crippled IJN heavy cruiser TAKAO by 8-inch gunfire from ASTORIA.
2115- Admiral Tomo, now convinced that at least one and possibly several American carriers are in the vicinity, orders
a general withdrawal. The invasion has failed and his forces are in disarray. During the night, the Japanese fleet slowly steams NW, putting as much distance between it and Midway as possible.
2345- On Midway, nearing midnight, Colonel Ichiki leads a final banzai charge, losing 800 of the 1,150 men remaining in his command. With all hope of victory gone, he wraps himself in a regimental flag and commits seppuku. Those surviving the charge, most of whom are wounded, are captured shortly after dawn the next day as Colonel Shannon’s Marines mop up isolated pockets of resistance.
![]()
CONCLUSION
After a near-disastrous start on the first day, the American player, Fred Kraus, ended the second with a narrow victory over his Japanese opponent, Tom Becker. With persistence of effort and aided by his opponent’s mistakes, Fred was able to recover from his own early missteps and stave off what seemed an inevitable defeat.
Fred’s initial plan, splitting his three carriers into two widely separated groups, was risky in that he was already heavily outnumbered by Tom’s eight carriers. It left each group weakened and liable to being overwhelmed early. Fred was counting on Tom finding YORKTOWN first and moving eastward to attack it, thereby leaving the transports vulnerable to strikes by HORNET and ENTERPRISE far to the south.
When this failed to happen, Fred should have concentrated on engaging either the approaching Japanese carriers or the transports. Instead, he launched strikes against targets of much lesser importance, underestimating both the range at which the Japanese could retaliate and the time it would take to recover and rearm his own planes (remember that both players were inexperienced with the game).
Tom Becker, on the other hand, played a flawless first day. He initially moved his carriers away from Midway, giving his reconnaissance planes time to fan out and putting his carriers in a central position to meet an American threat from NE or SE. When he did find two of the US carriers, he immediately launched powerful air strikes against them, taking full advantage of his planes’ longer range. He also kept adequate numbers of fighters over his transports, protecting them from the few American planes that attacked them.
On the second day of battle, the timely arrival of Fred’s battleships off Midway helped thwart any chance of a successful Japanese invasion. Though all five were eventually lost, they effectively deprived the IJN of their big-gun ships by engaging them in a lengthy (and costly) surface duel. This left the Japanese invaders bereft of heavy fire support just when they needed it most, struggling at water’s edge to gain a foothold on the atoll.
The need for this support was not at first evident to Tom, who instead concentrated on knocking out Midway’s airfield with his carrier planes and surface forces. But the game’s invasion mechanics and combat tables are such that, unless the Japanese player suppresses the American ground units with air strikes or naval bombardment from the very outset of the landing, he will suffer crippling troop losses.
Tom also fell victim to complacency. Convinced he’d sunk the only two American carriers present the day before, he felt it unnecessary to send out carrier-based recon flights on the second day, relying instead on the few land-based aircraft he had available. This allowed him to devote all his carrier bombers against Midway but also deprived him of vital intelligence on the enemy’s strength and whereabouts, a pivotal omission that seriously compromised his chances of winning the battle.
When Mike Ward took over the IJN forces at 1100hrs, he strove hard to make the invasion succeed but, when it became apparent it was a losing effort, he rightfully turned his attention back to the American navy, hoping to sink enough ships to make up for American possession of Midway at game’s end. But it was too late. By the time he found the third American carrier, YORKTOWN, Mike’s fleet carriers were too distant to strike at it before nightfall; only JUNYO and HOSHO were nearby and their small air groups were incapable of inflicting fatal damage. This, coupled with Fred’s dramatic sinking of JUNYO, tipped the game in the American player’s favor.
I wish to thank all three players for an excellent and memorable contest. Despite being new to the game, they grappled admirably well with the complexities of the system and waged a battle whose outcome hung in the balance to the very last turn.
| C.V. LOSSES | ||||
| Aircraft |
IJN |
USN |
||
| FIGHTERS |
51 |
72 |
||
| DIVE-BOMBERS |
30 |
108 |
||
| TORPEDO-BOMBERS |
33 |
48 |
||
| MEDIUM BOMBERS |
3 |
3 |
||
| HEAVY BOMBERS |
– |
21 |
||
| FLYINGBOATS |
3 |
3 |
||
| FLOATPLANES |
33 |
– |
||
| Totals: |
153 |
255 |
||
| Ships |
IJN |
USN |
||
|
sunk |
dmgd |
sunk |
dmgd |
|
| CARRIERS |
1 |
4 |
2 |
1 |
| LIGHT CARRIERS |
– |
– |
– |
– |
| BATTLESHIPS |
3 |
2 |
5 |
– |
| CRUISERS |
4 |
4 |
2 |
4 |
| LIGHT CRUISERS |
– |
1 |
1 |
2 |
| DESTROYERS |
3 |
2 |
10 |
4 |
| SEAPLANE TENDERS |
2 |
– |
– |
– |
| TRANSPORTS |
3 |
– |
– |
– |
| SUBMARINES |
– |
– |
3 |
– |
| Totals: |
16 |
13 |
23 |
11 |
| Troops |
IJN |
USN |
||
| ( Midway ) |
4,550 |
2,500 |
||