Continuing the series.
In Side By Side No. 1 the two games could not have been less alike — SPI’s Borodino and GDW’s Attack in the Ardennes, a hex-and-CRT Napoleonic battle and a point-to-point operational Bulge built on a Civil War combat chassis. Different periods, different publishers, different design cultures. The fun was in the gap, the differences.
This time the experiment runs the other way. Two SPI titles, both designed inside the same house, both using the well develoed KURSK Game System, both reviewed by our departed mapandcounters blogger Joe Beard across the same week of 2009. What does it tell us when one design lineage is asked to model two very different campaigns — a mechanized breakout across hundreds of miles of Western European countryside in 1944, and a winter encirclement battle on the steppes of southern Russia in November 1942? The shared chassis isolates the variables. What had to change about the system to handle each campaign, and what stayed the same, exposes what the KURSK design family is actually doing under the hood.
Two Campaigns, One System: SPI’s Breakout & Pursuit and SPI’s Turning Point: The Battle of Stalingrad
A comparative analysis of two SPI titles built on the same KURSK Game System chassis, covering two very different theatres of operational warfare.
1. Why these two
These two games are chosen because, on the face of it, they should be nearly identical. Both are SPI titles from the early 1970s. Both come out of the John Young / Jim Dunnigan design house and both use the KURSK Game System — the operational-level division-and-corps chassis that SPI rolled out across roughly a dozen East Front and Western Front titles through the decade. Both ship as accordion-fold magazine rules with a folio map. Both model fluid mechanized warfare with the same fundamentally bloodless CRT, the same supply framework as a constraint, the same scenario architecture (one historical setup plus a fistful of variants). Both were reviewed in 2009 by the same writer working through the SPI catalogue with a deep familiarity for the system’s tendencies.
And yet they don’t play the same. Breakout & Pursuit is fundamentally an Allied problem: the player drives a logistically constrained army group across France against a withdrawing enemy who cannot be allowed to escape across the Seine. Turning Point is fundamentally a Soviet problem: the player launches a partially prepared offensive at the flanks of an exposed Axis force and races to close a pocket around 6th Army before the German mechanized reserves can execute break in and out. The two games inherit the same vocabulary and then deploy it to ask opposite questions of very different armies. That is what makes the comparison interesting.
What this side-by-side hopes to expose, more than anything else, is that the KURSK chassis is not neutral. It has opinions. Supply is everything in both cases, and almost identically structured. The CRT punishes head-on assault and rewards encirclement. ZOCs are onerous and impose traceable supply. Air power is of course abstracted. Time is measured in days, distance in tens of kilometres. Whether the chassis is asked to handle the Normandy breakout or the Stalingrad encirclement, those opinions don’t change. What changes is which side has to live with which opinion, and which idiosyncratic local rule (Allied truck units and the Naval Supply Mulberry in B&P; Hitler Insanity and mobile depot units in Turning Point) bends the chassis to fit the historical campaign.
This report runs the same parallel structure as Series No. 1. First the two historical campaigns, with enough operational context that the game design choices are visible as such and not arbitrary system constants. Then the games themselves: shared chassis spec, where each one diverges, what the divergences are trying to capture. Then the design contrasts; namely combat resolution, supply, movement, time scale, scenarios — under section headings that map directly onto Series No. 1 for cross-reference. As with Series No. 1, this article will be in two parts. Commanders and any relevant synthesis comes in Part 2.
2. Operation Cobra and the breakout from Normandy, July–September 1944 historical context
2.1 The campaign
By the end of the third week of July 1944, the Allied bridgehead in Normandy was a disappointment to almost everyone who had planned the invasion. Some say due to Monty’s poor planning and execution around Caen, others the dogged determined German defense. D+48 — 24 July 1944 found the Allied armies still penned into a lodgement that the Overlord planners had expected to occupy by D+5. Some 122,000 Allied casualties had been absorbed inside that lodgement: most of them in the dense bocage country south of the British–Canadian sector at Caen, where Montgomery’s 2nd Army had spent six weeks taking ground in measured kilometres against the bulk of the German armoured reserve, and the American 1st Army under Bradley had ground south of Carentan toward Saint-Lô through hedgerow infantry combat that made every farm a fortified position. The Wehrmacht in the West was bleeding more than it could replace, but it was still in line.
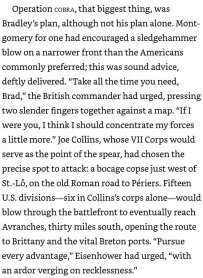
Operation Cobra — Bradley’s plan for breakout — was less a manoeuvre than an act of extreme violence applied to a single sector. On 25 July the heaviest tactical air bombardment of the war to that date fell on a narrow rectangle west of Saint-Lô, where the Panzer Lehr Division was holding the seam between LXXXIV Corps and II Para Corps. Eight thousand tons of bombs from VIII Bomber Command and IX Tactical Air Command — including a friendly-fire incident that killed Lieutenant General Lesley McNair in his observation post — fundamentally destroyed Panzer Lehr as a combat formation. Through the gap Bradley fed VII Corps (Joe Collins) on a narrow front, then VIII Corps (Troy Middleton) on the right, then armour (2nd and 3rd Armored Divisions) into the gap that infantry had opened. Within five days the Americans were through Avranches and into Brittany. Within ten days Patton’s newly activated 3rd Army was fanning south, east, and west simultaneously, with eight divisions driving down corridors that the Wehrmacht no longer had the strength to close.
Hitler’s response — Operation Lüttich, the Mortain counter-attack of 7 August — was the moment the campaign tipped from breakout to pursuit. Field Marshal Günther von Kluge, commanding Army Group B, was ordered to drive four panzer divisions west toward Avranches to cut the American supply line at its narrowest point. The attack ran into Ultra-warned American positions on the Mortain ridge, took heavy losses from the 30th Infantry Division’s anti-tank screen and from rocket-firing Typhoons, and stalled within forty-eight hours. With those four divisions stuck in the Mortain salient, Bradley and Montgomery had the opportunity to close the Falaise pocket from the south (XV Corps, Haislip) and the north (Canadian 1st Army). The pocket closed on 21 August. Roughly 60,000 German troops were lost inside it, including most of what was left of the German mechanized capability in the West. Kluge, accused of complicity in the 20 July plot and relieved of command, took cyanide on 19 August on the road back to Germany. Walter Model took the army group with orders to hold the Seine; the Seine line never formed. The Allies were across the Seine by the end of August, into Paris on the 25th, and at the approaches to the German West Wall by mid-September. The campaign that the planners had expected to take twelve months had run from Saint-Lô to the Reich in seven weeks.
2.2 What Breakout & Pursuit is asking the player
Joe’s mapandcounters review is direct on the design question. The game opens on 25 July with Bradley’s 1st Army poised to launch Cobra, and ends on 20 August — the historical closing of the Falaise pocket — for the standard Historical Breakout scenario. Eleven scenarios in total are offered, of which eight are hypothetical variants permitting free deployment and alternative orders of battle. The game runs nine turns from the Cobra start to Falaise; longer scenarios extend to the Seine and beyond, with an instant-Allied-win condition triggered when supplied Allied units breach the Rhine.
Source: Guns at Last Light, Atkinson
The question the design seems to put to the Allied player is fundamentally one of logistics, not of combat. As the post observes: “coping with supply problems is the single biggest challenge that the Allied player faces in this game.” Allied units are supplied at four hexes from a supply source, unsupplied at five to eight, isolated beyond eight. The Mulberry naval supply unit at the coast keeps British and Canadian units fed if they stay close to the beach. The Americans, driving inland, depend on Cherbourg, Bayeux, Supply Pipeline units, and a thin handful of Truck counters a Red Ball Express abstraction, that have to shuttle between supply heads and the front. Run too far east without trucks and the spearhead loses combat power before the encirclement closes. Lose a truck unit to a German mechanized raid in the rear and an entire army’s tempo collapses.
The question put to the German player is opposite and roughly as cruel [can a wargame design be cruel? Go play CSS then report back! 😉]. The fighting retreat must be conducted under conditions Kluge actually faced: too few mechanized units to fight a campaign of manoeuvre, too many infantry units that cannot escape on foot, a coastal fortress garrison net (the Channel ports, Brest) that the rules treat as always-in-supply and worth as many victory points as Paris, and the obligation to withdraw east toward the Seine before the Allies envelope the army wholesale. Joe is blunt about the German leg infantry: “forget about the German infantry; they are going nowhere. Some of the eastern-most leg units may make it across the Seine, but none of them are going to be around long enough to defend any farther East. Besides, they couldn’t walk to Germany in nine turns.” Here I think there is a departure from history, much of the German foot troops had some form of transport, but it was Allied Air Supremacy that drove the delays. The Delay marker units the German receives on turns two, three, and four — Joe’s “priceless little beauties” — are the only tool the design gives the Wehrmacht to slow the Allied advance long enough for the surviving mechanized formations to slip across the Seine.
That is the historical question made into a game: not whether the Allies can win the campaign they will, but rather wheter they can destroy Army Group B before it escapes east. And conversely, not whether Kluge can win! He cannot per se. But how much of his armour can be extracted to fight on the German frontier later in the year. My reading treats this exact contingency: the Falaise pocket was historically incomplete (the eastern jaw closed late), and the Mortain attack diverted German armour into a salient where it could be enveloped only because the diversion existed. The game permits both contingencies. The hypothetical scenarios expressly invite the player to refight the campaign with alternative German orders of battle and alternative reinforcement schedules. Everybody loves the historiographical what if questions, and what the Western Front 1944 literature has been arguing for sixty years.
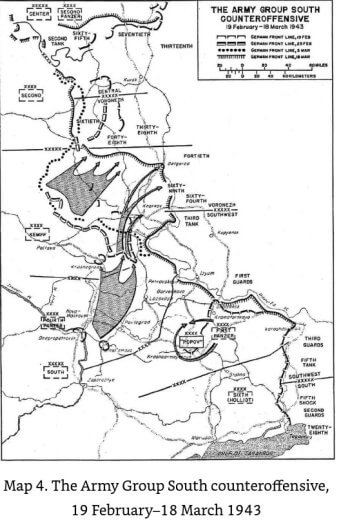
3. Operation Uranus and the Stalingrad encirclement, November 1942 – February 1943 historical context
3.1 The campaign
By mid-November 1942 the German summer offensive in southern Russia — Case Blue, opened on 28 June — had reached the operational point of no return. Paulus’s 6th Army was inside Stalingrad, fighting a positional infantry-and-rubble battle in the city block by block since mid-September. Hoth’s 4th Panzer Army held the southern shoulder of the salient. The flanks of the German thrust were screened by allied formations: the Romanian 3rd Army on the upper Don north and west of Stalingrad; the Italian 8th Army and Hungarian 2nd Army on the long Don bend further upstream; the Romanian 4th Army on the southern flank below the city. These formations were thin, under-equipped, lacked significant armoured anti-tank capability, and were extended along frontages that doctrine in any other Wehrmacht command would not have accepted if fully manned and equiped. They held the line because the Germans had no one else to put there.
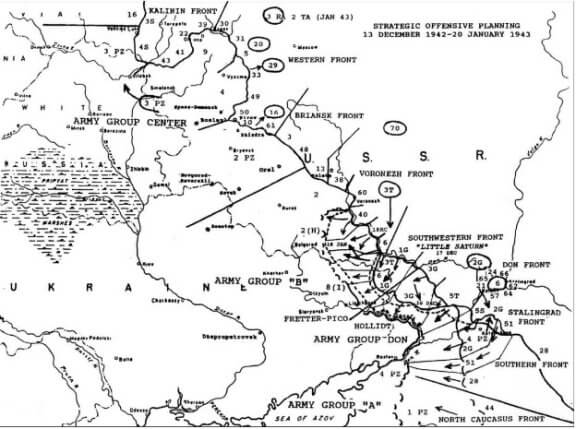
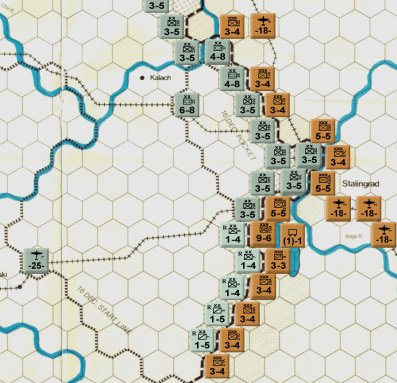
Soviet planning for the counter-stroke — Marshal Georgi Zhukov’s twin operations Uranus (south) and Mars (north) — had begun in September. Mars was directed against Army Group Centre’s exposed Rzhev salient, Uranus against the Stalingrad salient. The two were originally to be simultaneous and roughly co-equal in weight; Soviet historiography since Glantz has restored Mars to its proper status as the larger of the two operations by initial force commitment, and has documented its catastrophic failure under Manstein’s eventual Operation Winter Storm relief attempt’s mirror image at Rzhev. Zhukov chose to commit Uranus before its preparations were complete, on 19 November, with a narrow-front double envelopment striking the Romanian 3rd Army in the north and the Romanian 4th Army in the south. Within four days the two pincers met at Kalach on the Don, sealing roughly 300,000 Axis troops: most of 6th Army, parts of 4th Panzer, Romanian and Croatian formations inside the pocket.
Source: After Stalingrad: The Red Army’s Winter Offensive, Glantz. STAVKA plan
What followed across December and January was the unsuccessful relief and the destruction of the pocket. Erich von Manstein, brought south to form Army Group Don and ordered to relieve Paulus, launched Operation Winter Storm on 12 December with Hoth’s LVII Panzer Corps driving north-east from Kotelnikovo toward the southern face of the pocket. The relief force came within 48 km of 6th Army’s outer perimeter at the Myshkova River on 19 December. Then Soviet Operation Little Saturn, launched 16 December against the Italian 8th Army and Romanian remnants on the middle Don broke open the upper-Don sector and threatened Manstein’s flank and rear, forcing the relief to be called off. Hitler’s refusal to permit Paulus a breakout to meet the relief the famous “hold the fortress Stalingrad” order sealed 6th Army’s fate; Göring’s promise that the Luftwaffe could supply the pocket by air at 500 tons per day never approached the 300-ton minimum the pocket required, and most days delivered well under 100 tons. The pocket reduced through January under Operation Ring; Paulus surrendered the southern pocket on 31 January, the northern pocket on 2 February 1943. The Soviets took roughly 91,000 prisoners.
3.2 What Turning Point is asking the player
Joe’s review of Turning Point is, like his Breakout & Pursuit piece, organized around the question of what the design has chosen to model. The game offers sixteen scenarios significantly more than B&P — but Joe recommends starting with the November Historical Scenario, which opens with the Soviets poised to launch Uranus and runs seven game turns. The Russian objective is to break the Axis allied formations on the flanks, complete the encirclement of 6th Army, and resist the German mobile counter that the design assumes will be attempted.
The Soviet design problem in the game is very close to the operational problem Zhukov faced: the encirclement cordon is thin, the offensive’s prepared mechanized strength is small (“the Red Army has only ten mechanized units available when this scenario begins”), and the mobile depot units that follow the spearhead can only supply units within four hexes — and the spearheads, by the second turn, are well beyond the static rail supply trace. The Soviet player wins by maintaining the encirclement long enough to grind 6th Army down and by tearing further breaches in the Axis line; loses by allowing 6th Army’s mechanized component to break out, or by failing to hold ground against the late-arriving German reinforcements that begin appearing on turn five.
Source: After Stalingrad, Glantz
The German design problem is the inverse, and is shaped cleverly by the optional Hitler Insanity Rule, a signature Dunnigan design for effect rule that changes the game play a lot. Under that rule all Axis units in German fortified hexes around Stalingrad cannot move or attack on the first game turn. Paulus’s army is frozen in place until turn two. This is the rule that makes the encirclement model the actual encirclement: Hitler’s hold-the-fortress order, expressed as a one-turn paralysis on the Wehrmacht’s best units. With the Insanity rule the German player begins the game with one supplied mobile unit inside the pocket and six units outside it, and must choose between two doctrines to relieve Stalingrad: form a supply chain through the Russian cordon during the initial movement phase (allowing trapped armour to squeeze out during mechanized movement) or batter through screening units with low-odds air-supported attacks. “Both options have advantages and disadvantages,” Joe writes, “but whichever one the Axis player chooses, that choice will probably determine the course and outcome of the game.” That is the design at its Dunnigan’s best. Learn the lesson, and then try again. Manstein had the same choice in December 1942 and chose the latter, and it didn’t work, and the game lets you find out whether the former choice he didn’t take could have been successful.
The Stalingrad — Victory on the Volga history and Osprey Campaign 184 both make the operational point the design is encoding: the relief operation failed not for want of mechanical power on the southern flank but because the supply linkage to the encircled force could not be reopened. The game’s mobile depot units, the asymmetric supply ranges, the rule that Axis units are never isolated but can be unsuppliedare all expressions of an operational reality where 6th Army didn’t die from combat losses primarily, it died from running out of fuel, food, and ammunition with twenty divisions of mechanized hope visible on the southern horizon. Glantz’s later work on the Soviet side, particularly the Resurrection of Deep Operations Zhukov paper, frames Uranus as the operational debut of the Soviet deep operations doctrine that would mature through Bagration in 1944. Turning Point captures the early version of that doctrine: thin pincers, hasty preparation, an offensive launched ahead of schedule by a commander who saw a fleeting opportunity and seized it. The game asks whether that same offensive, played differently, can be made tighter or looser than Zhukov actually managed.
4. The two games — design specifications
The two titles share most of their architectural DNA or perhaps skeleton. Both are SPI products from the early 1970s, from the KURSK Game System derivatives, even using the same accordion-fold rules leaflet, one 22-inch-wide folio map, one counter sheet (one and a bit, in B&P’s case). Standard fir the game to the counter and print budget model. Both are operational-level, running over a consumable small number of game turns covering a campaign window of weeks rather than days. Both ship with one canonical historical scenario surrounded by some variants.
Where the two diverge is in how the KURSK chassis was specialized to fit the campaign. B&P represents units at brigade/division for the Allies, division/brigade/kampfgruppe for the Germans, on a map covering roughly 325 by 235 miles of north-western Europe. Turning Point represents units at corps for the Soviets and division for the Axis on a map covering 390 by 350 miles of the Don/Volga sector. The unit-scale asymmetry within each game (Allied brigade versus German division in B&P; Soviet corps versus German division in Turning Point) is intentional and reflects the actual order-of-battle structures and theory of the historical forces with the Soviet corps of 1942 was roughly the combat equivalent of a German division, and the design implements that by giving them the same counter footprint. The supply rules, the optional rules, the CRT, the usual SPI air-power abstraction are the places where each design says “this is what this campaign specifically requires.”
A compact comparison of design characteristics, the kind Joe gives at the end of each blog post, illustrates the architectural overlap and divergence:
|
Specification |
Breakout & Pursuit |
Turning Point: Stalingrad |
|
Designer / Publisher |
Jim Dunnigan, SPI 1971; KURSK Game System family |
Dunnigan & Young, SPI 1972; KURSK Game System refined |
|
Scale |
Operational; brigade & division |
Operational; division (Axis) & corps (Soviet) |
|
Time |
One game turn = roughly a week of campaign |
One game turn = roughly a week of campaign |
|
Map |
22″ × 34″ two-colour folio; ~325 × 235 miles of N.W. Europe |
22″ × 28″ two-colour folio; ~390 × 350 miles of southern Russia |
|
Turns (historical) |
9 (25 July – 20 August 1944) |
7 (19 November – ~12 December 1942) |
|
Scenarios |
11 total (3 historical, 8 hypothetical/variant) |
16 total (incl. Nov, Dec, January phases + campaign + variants) |
|
Supply (Allies) |
Allies: 4 hex supplied / 5–8 unsupplied / isolated beyond. Mulberry naval supply on coast for British/Canadian. Truck units shuttle. |
Soviets: 8 hex to rail trace or 4 to east edge. Two mobile depot units extend supply forward. |
|
Supply (Axis) |
Germans: trace to east edge through clear ZOC path; Fortresses always supplied; never isolated only by trace failure to map edge |
Germans: 12 hex from rail; never isolated; Fortified Zones always supplied |
|
CRT |
1d6, odds-ratio, bloodless; D-elim possible 5:1+, AD risk at all odds |
1d6, odds-ratio, quasi-bloodless; D-elim possible 6:1+, Half-Exchange risk even at 9:1 |
|
Special / variant |
Allied Air Strike turn 1; German Delay marker units; coastal Fortresses (Paris-worth VP); Mulberry; airborne mission cycle |
Hitler Insanity rule; mobile Soviet depots; air units (5 Axis, 6 Soviet); column-shift bonus turn 1 for Soviets vs Axis Allied units |
|
ZOC |
Onerous, may NOT be traced through; lower ZOC movement cost than other KURSK titles |
Onerous; restricts retreat & movement |
|
Victory |
VP for unit destruction, terrain capture (cities + Fortresses), Allied airdrop cycle costs VP; instant Allied win if supplied units breach Rhine |
VP for unit destruction, terrain, depth of Soviet western advance, gaps maintained in Axis north-south line |
|
Counters |
American (white on olive), British/Canadian (olive on olive), Wehrmacht (field grey), Waffen SS (white on black) |
Soviet (rust), German (blue-grey), Axis Allied/Romanian/Italian (lighter blue-grey) |
I used AI here to summarise and format into a table
The table makes the architectural commonality plain. What it does not capture is what those small specialization differences feel like across nine to seven turns of play — which is what we will dig into next.
5. Game design contrast
5.1 What each game is trying to capture
Breakout & Pursuit captures the pursuit phase of a successful breakthrough, once made of the campaign window during which an outnumbered, increasingly broken enemy must either be destroyed in place or allowed to extract itself across a major river line. The 25 July Cobra setup is given to the player as a fait accompli; the bombing has already happened, Panzer Lehr is already hammered, the Allied Air Strike on turn one is the cleanup of what the heavy bombers started. The question the design asks the Allied player is not “can you break through” but “can you turn breakthrough into annihilation before Kluge withdraws?” The German question is the mirror: “can you preserve enough combat power to defend the German frontier in October?”
Turning Point captures the encirclement phase of a hastily premptively launched offensive in the campaign window during which a thinly screened cordon either solidifies into a pocket or fractures under counter-attack. The 19 November setup gives the Soviet player the moment Zhukov chose to launch. The design’s question to the Soviet is not “can you break the Axis flank” , opening CRT bonus’s all but ensure that. That and the brittle Romanian and Italian defenders make that nearly automatic. TP asks “can you complete and hold the encirclement before Manstein arrives, and can you tear the line further?” The German question, made specifically by the Hitler Insanity Rule, is whether the relief mechanism Hitler did not permit (a breakout co-ordinated with an external relief) could in principle have worked under different command assumptions.
Both titles, then, work the same operational moment in a campaign but from opposite ends. B&P starts after the decisive breakthrough and asks about the pursuit. Turning Point starts before the encirclement is complete and asks about the closure and the counter-relief. They are bookends to the same operational arc.
5.2 Combat resolution
Both games use the family CRT, 1d6 on an attack-to-defence odds ratio, [B&P has 7 results, while TP has 10 results ] with results weighted toward retreats and exchanges and away from clean eliminations. The bloodless tendency is a KURSK family signature and reflects a designer-level argument that operational warfare in the mechanized era was attritional at the margin and decisive by manoeuvre. Clean eliminations should require either great combat odds (5:1+ in B&P, 6:1+ in Turning Point), but you will carry the risk of exchanges all the way upto 8:1 in B&P and even a ½ EX at 9:1 in TP.
Joe’s review of both titles names the same key tactic: the way to actually destroy units is to surround them, cut their supply, and then attack. Frontal combat at 3:1 produces an exchange of casualties; surrounded, and thus isolated combat produces dead units with lower risk 1 in 7 and 2 in 10 respectively. 
Breakout & Pursuit 7 results on a 1d6
The two games tune that family CRT differently. Breakout & Pursuit is more forgiving to the attacker at high odds — its 9:1 column all but guarantees a D-elim, with only about one-third (28.6%) risk of an Attacker Disrupted (the AD result that immobilizes and halves attackers for a full turn). Turning Point at 9:1 still carries a twenty percent risk of Half-Exchange risk, requiring air support to mitigate. The difference matters because of what each design is incentivizing: B&P wants the Allied player to take risks on big concentrated attacks to break the German line; Turning Point wants the Soviet player to think hard before committing armour, because even a successful high-odds attack can cost armoured corps that the offensive cannot replace.
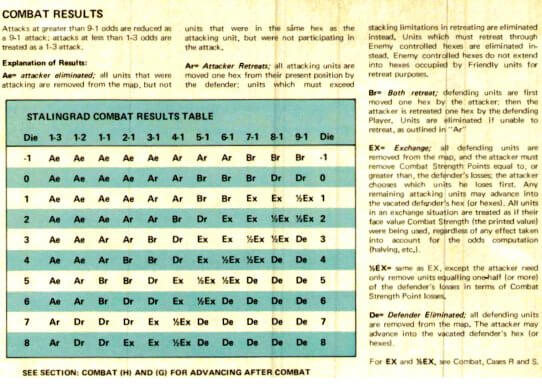
Turning Point CRT 10 results on a 1d6
The retreat rules also diverge in a way that bears on doctrine. Punish no clear ZOC retreat paths. Turning Point’s retreat rules give the displacing player control over the retreat route, which Joe identifies as a critical tactical lever for both sides: the Soviet can retreat a German unit into a hex he intends to attack next, stripping it of defence; the German can retreat a Soviet armoured corps onto a weak unit so that the next attack potentially eliminates both or at least opens the pocket. The two rules are subtle design hand-tuning, almost invisible at first read, that materially affect the texture of play.
5.3 Supply and movement
This is the design space where the KURSK chassis bends hardest to fit each campaign, and where the comparison is most worth a look at. I would never have thought about these items if not for Joseph two great articles I read back-to-back. Instructive.
Breakout & Pursuit models the Western Front 1944 supply problem with a hex-counted trace from a constrained set of sources; Cherbourg, Bayeux, Supply Pipelines, the expendable supply units that represent the historical fuel and ammunition shuttles, and the Mulberry naval supply (British/Canadian only) clinging to the coast. A limited number of supply truck units (5) carry the entire forward movement of supply across France. The German side traces to the east map edge; coastal Fortresses are always supplied.
The operational consequence, reflected in the play pattern Joe describes, is that the British and Canadians push east along the coast to stay close to the Mulberry while the Americans drive inland and watch their supply lengthening. The Red Ball Express, in design terms, becomes a vulnerability , Joe notes that German mechanized units “will constantly be lurking on the fringes of the Allied advance,” hunting trucks. The historical Red Ball Express in fact ran 23 August through 16 November 1944 along the Cherbourg-to-Chartres corridor with around 5,000 trucks at peak; the game’s five Truck units are a deliberate abstraction of that constant logistical thread.
Turning Point models the Eastern Front 1942 supply problem with an asymmetric system that is harder on the Soviets than on the Germans. Soviet units trace 8 hexes to a rail line or 4 to the east edge; beyond that, they are isolated. Two mobile depot units extend supply forward for four hexes. MSU’s are an easy fix to build a dynamic supply chain, that is an accurate model of the Soviet practice of motorized supply battalions following the spearheads. Yet those depots themselves must be defended, which couples the supply problem to the manoeuvre problem. German units trace 12 hexes to a rail line and are never isolated, only unsupplied. The asymmetry is a doctrinal statement effect, in 1942 the Germans had the better-developed operational supply system at the army level, but the Soviets were beginning to experiment with the mobile supply battalions that would eventually mature into the operational manoeuvre group concept (Glantz on Deep Operations, Bagration paper). The game gives the Soviet the new tool early and asks whether it can be used effectively.
Movement in both games is unspectacular and roughly equivalent: hex movement points, infantry slow, armour fast, terrain mostly negligible except where it isn’t. The interesting movement rule in both games is what happens at the end of supply. B&P’s isolated unit may not attack and is reduced to one hex of movement (non-mechanized) or half movement (mechanized); Turning Point’s isolated Soviet unit is halved in movement and may not attack at all but retains full defence strength a small asymmetry that matters because of the encirclement dynamic: trapped 6th Army mechanized units inside the Stalingrad pocket are, in the game, weakened attackers but still capable defenders. The historical 6th Army’s combat-effective core, even starving, held the pocket through January.
5.4 Time scale and what a turn represents
Both games run roughly week-long turns at the operational scale. Nine turns in B&P cover Cobra through the Falaise closure (25 July to 20 August); seven turns in Turning Point cover Uranus through the early Winter Storm period (19 November to roughly 12 December). The chosen time grain is what the operational decisions needed: not whether 2nd Armored or 23rd Tank Corps did this or that on a specific afternoon, but which formation went where this week and what it was in supply to do.
The KURSK chassis’s time granularity implicitly says: operational warfare in the mechanized era reads as a sequence of week-long decisions about concentration, supply, and risk, regardless of theatre. Whether the army is Bradley’s First chasing Kluge across France or Vatutin’s Southwestern Front closing the pincer at Kalach, the question of “what do we attempt this week” is the right question to put to the player. The contrast with Series No. 1’s 12-hour Bulge turns and 1-hour Borodino turns is sharp: those games argue that battle and operational scale are different problems requiring different time grains. KURSK argues that operational warfare in 1942 and 1944 was the same problem in two theatres.
5.5 Scenarios, replayability, and the player’s relationship to history
Both games are scenario-rich relative to Attack in the Ardennes’ single 22-turn campaign. B&P offers eleven scenarios; three historical, eight hypothetical and Turning Point offers sixteen! Six November variants, a campaign game, four December and five January-period variants. The hypothetical scenarios are where each design engages with the operational historiography most directly.
B&P’s hypothetical scenarios permit free Allied and German deployments, alternative reinforcement schedules, and (per Joe’s review) experimentation with the orders of battle. The player seeking “what if Mortain had succeeded” or “what if the Canadians had closed Falaise sooner” can construct those situations from the variant scenarios. The Sunday Punch in Normandy (Tactical use of Heavy Bombardment in Normandy (New Imprint by the Center for Air Force History Washington, D. C. 1992)) and Falaise 1944 Osprey #144 explores these questions; the design lets the player play them.
Turning Point’s variants are organized around the four campaign phases, first the November Uranus, then December Winter Storm and Little Saturn, the January Ring, the fourth the campaign game spanning all of it. The December scenarios assume the encirclement is complete and ask the question that Manstein’s planning had to ask given the situation with weather, size of relief force and the enemy can the corridor be opened?
Replayability in both games is reasonably high in the practical sense Joe identifies. The branching of variant setups, managing supply problems etc. Pproduces real variation in play. Both games sit in the SPI tradition that values the historical experiment over the polished tournament experience — the rules-set is the argument, the variants are the alternative arguments. I love variants if the add some color and options. Being able to do so in such a tiny package is excellent.
5.6 Optional / variant rules and the historiographical question
Each game’s signature optional rule is a compressed historiographical claim, such that 90% of all of these mass-produced SPI titles tried to have to do two things. First invoke the ‘historicity’ cleanly and efficently. Secondly to give what would potentially be same rules, similar counters different map generic vibe a splash of real color without an extra counter sheet and 2 pages of special rules. It really is remarkable.
B&P’s mostly-ambient mechanisms such as the always-supplied coastal Fortresses worth Paris-level VP, the airborne mission cycle that costs VP to initiate but pays only if the operation actually executes within the three-turn window, the German Delay marker units that drop into any hex of the front present an encoded operational situation that Bradley and Montgomery actually faced. Fortresses were a Hitler-imposed strategic millstone the Allies could not ignore. Airborne operations through August 1944 were planned, cancelled, replanned (the Allies cycled through Operation Transfigure, Linnet, Linnet II, Boxer, and seven other plotted but unexecuted drops before Market Garden in September) — the game’s VP-cost cycle is a direct model of that political-operational frustration. The Delay markers represent the historical German practice of throwing scratch battle-groups into critical hexes the Kampfgruppen named after their commanders, often built from divisional schools, training units, and rear-area Flak all to stall Allied advances long enough for the mechanized rump to escape.
Turning Point’s signature rule is Hitler Insanity. With it enabled, the Wehrmacht loses turn one entirely inside the German fortified hexes around Stalingrad. Without it, Paulus’s army can react immediately to Uranus and the encirclement becomes much harder for the Soviet to complete. Joe recommends the rule for two reasons: it makes the November scenario play historically, and it surfaces in the player’s experience the actual operational pathology of the campaign. Hitler’s command interventions cost 6th Army the chance to either break out or be rescued; the game says, in effect, that the operation could not be modelled honestly without representing that intervention as a rule.
The contrast with Breakout & Pursuit is illuminating: B&P assumes no equivalent Hitler-paralysis rule for Kluge, because the Western Front situation was not constrained the same way. Kluge had operational autonomy to organize the withdrawal; his choices were poor in the actual campaign, but they were his choices to make. Hitler’s interventions in the West (the Mortain attack, the No Retreat orders later) were imposed but did not paralyze the campaign command in the way the Stalingrad hold-order paralyzed 6th Army. The design captures that command-culture difference by what it does and does not make a rule.
Both games illustrate the same SPI design principle: optional rules are not balance tweaks but historical arguments. The Imperial Guard and Moscow Militia rules in Borodino, the Hitler Insanity rule in Turning Point, the Delay marker mechanism in B&P — these are the design’s way of putting the operational debates of the campaign into the player’s hands as choices. The argument the design is making is that the outcomes of these campaigns hinged on specific contingent decisions that real commanders made or were forbidden from making. The game lets the player make the other choice and see.
— Part 1 ends here. Part 2 will cover the commanders on both sides of both campaigns — Bradley, Patton, Montgomery, Kluge and Model in the West; Zhukov, Vatutin, Rokossovsky, Paulus, Manstein in the East — and how each design encodes or fails to encode the leadership cultures that decided the campaigns. Synthesis and reference-library pointers follow in Part 2.
Sources: mapandcounters-blog posts on SPI Breakout & Pursuit and SPI Turning Point (2009) · the SPI rulebooks and folio components for both titles (Lib_gamescans/Games/Breakout & Pursuit (SPI).pdf and the Turning Point folio) · Eastern Front depth from Stalingrad — Victory on the Volga, Osprey Campaign 184 (Stalingrad 1942), Hitler’s Nemesis: The Red Army 1930–1945, Glantz on Operation Kursk and Bagration, the Defence and Evacuation of the Kuban paper · Western Front depth from Osprey Campaign 149 (Falaise 1944), The Normandy Campaign — 60 years on, The Panzers and the Battle of Normandy, Sunday Punch in Normandy, MacDonald’s Company Commander · operational-art framing from Rob Leonhard on Time, Dupuy, OPART OF WAR, Zhukov and the Resurrection of Deep Operations, From Mars to Minerva on Clausewitz and Liddell · Wiki/periods/ww2.md · Wiki/games/.