This playthrough of the Operation Exporter scenario from Mare Nostrum (MN) is designed as a step-by-step introduction to TSWW for new players, with an emphasis on logistics and combined (air-land-sea) operations. Players following along should grab the most recent rules and charts from Day of Infamy (DOI). The Political & Economic (P&E) Rules from MN, as well as certain MN charts (Rail Cap; CEVs; SMAs) will also be needed. Damien B’s chart compilation, available in the File Section of the Yahoo List, is recommended. Because play is designed to illustrate the system to new players, moves and choices are not optimized.
Situation
Axis
Commonwealth (CW) forces are poised to invade the Vichy Levant. The Axis are on the defensive. They must prevent surrender (elimination of all Vichy forces and occupation of main cities and ports) from June I – July II 1941. Per special rules (in the MN P&E Rules), Vichy forces always are in general supply, and can pick one turn to be in Offensive Supply without spending GSPs or LPs. In addition, Vichy has a Supply Terminal, and 2 LPs, in Tripoli. The German forces in Rhodes are in supply via ferries from Turkey using the continental system (see Balkan Fury special rules).
Vichy forces, supported by Axis air from Rhodes, must deploy in separate groups within 4 hexes of the border. The initial considerations are to protect the key cities and ports. The northern group protects Aleppo and is prepared to heard south:
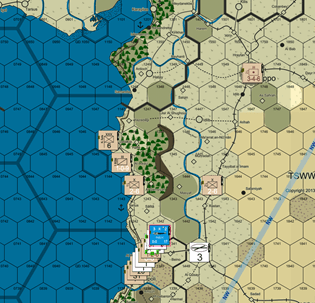

Along the Southern Front, Damascus is strongly held, and other forces range along the Litani river and Bekaa Valley to prevent a breakthrough to Beirut (set-up restricts to 2 SPs/hex). Beirut and Tripoli are held with 2 defense strength points to prevent overrun in the Pursuit Phase, weakening the front line. The slender Vichy air force, save recon planes, is deployed in Damascus. Vichy forces are considered to be resisting in this scenario (see MN P&E rules; so forces are not halved).

Allies
The Commonwealth forces are similarly slender. Three brigades of Australians/Indians, reinforced by Free French and Czechs, under Australian Corps Command, in Palestine.

Substantial forces start in Iraq. Hab force East of Ar Rutbah, two Indian Brigades and 21st Corps HQ on the Euphrates, and two further Indian brigades on the border east of Mosul:


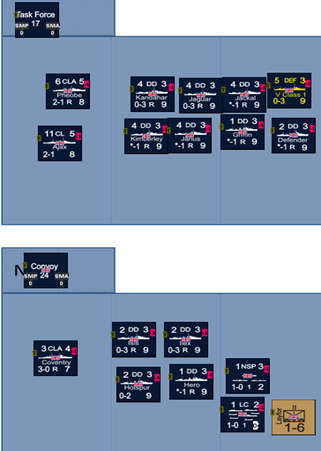
The Royal Air Force (RAF) and Fleet Air Arm (FAA) maintain a forward force in Haifa, with other forces in El Arish and the Delta. The Royal Navy (RN) boasts two task forces: one of which starts with Layforce embarked on an LC (Layforce is 0.5 SPs, the capacity of an LC for amphibious assaults generally, but an LC can carry 1 SP of amphibious forces). Layforce is considered planned for a Raid (9.K.1.c).
Allied Logistics
As ever, logistics dominate planning in the Middle East. Iraq and Palestine both are on the Overseas System for the CW, not the Continental System. In the Overseas System, LPs/GSPs must be distributed to, and spent for, everything (General Supply/Offensive Supply). Initially, the Allies have 1 LP in each of Palestine and Egypt. Initially, the Allies will receive an addition ⅓ an LP per turn. The Allied reinforcement rate is 1 LP per turn; but 2/3ds an LP is devoted to Egypt and the Western Desert Force. On the Overseas system, ⅓ an LP is typically spent each turn providing generally supply to ground units and an additional ⅓ an LP for air units (15.D.1.b/d); hence the 2/3ds an LP required for other forces in the theatre.
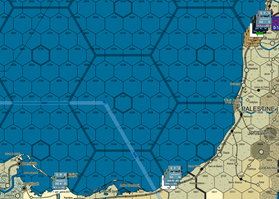
This meager supply would not go very far on its own, but fortunately the Palestine force can tap into other resources. In particular, the Allies can establish an Rail Supply Route (RSR; see 15.A.24) in Egypt. Establishing this method of distributing supplies in the Overseas System requires foregoing use of the Egyptian/Palestinian rail cap for other purposes (15.F). The benefit is that the Allied ground and air forces in Palestine can take advantage of the notional 2/3ds an LP spent at an Egyptian Supply Terminal each turn to provide general supply to ground and air forces respectively. The RSR, which can be up to 40 high volume rail hexes (15.E.1), runs from either Alexandria or Suez (take your pick of Supply Terminals) to the emplaced Mobile Quartermaster (QM) unit stationed in Haifa. From there, daisy chained to the RSR (15.M), the QM can distribute supply within its 20-hex QMSR (see 15.L.5). The upshot is that the Allies can use the 1 LP that starts in Palestine solely to provide Offensive Supply; General Supply is taken care of.
Logistics in Iraq are another matter. 1 LP (which can be broken into 20 GSPs, each of which can supply 1 SP of ground units and, depending on type, 1 or 0.5 wing of air units, will not go very far in supplying the 12 SP of units and several air units that begin in the Theatre). With a Supply Terminal in Basra and two QM units, the Allies really have two choices:
-
Daisy Chain without RSR. One option is to place one of the two QMs with the Supply Terminal (ST) in Basra. This allows the QM to project any LPs spent at Basra for supply forward, including to the second QM daisy-chained 20 road hexes from Basra (See 15.L.2.i). The upside of this approach is that it preserves Iraqi rail capacity to distribute GSPs, including any broken down from LPs shipped into Basra. The downside is that the QMs cannot project supply far enough to reach the 2 brigades that start around Mosul. Either GSPs will need to start with them (4 to provide general supply), or they will go ‘E1’ (Extended, out of supply) in the scenario’s first Initial Phase.
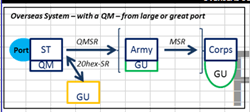
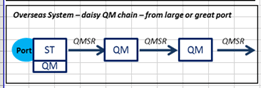
In the handy supply in pictures, diagram, the supply chain looks like this (substitute a QM where the Army HQ is shown, using the diagram on the right as guidance for that):
 or
or

-
Daisy Chain with RSR. A second option is to use RSR (under 15.E) to rail supply from the ST in Basra 20 low-volume hexes to a QM, which then daisy chains to the second QM (pursuant to 15.M). This method of daisy-chaining allows the Allies to project supply further when GSPs or LPs are spent in Basra, because neither scarce QM must stack in Basra; both can form part of the chain. The downside is that the small (3 SP) Iraqi rail net will not be available to rail supply forward.
Supply in pictures again helps. Substitute Two QMs chained together where the Army HQ is shown:

In this game, the Allies go with option 2. The Allies want to put all ground forces in Iraq in Offensive Supply Turn 1. They will probably fly some of the air out to reduce logistics demands in the area. Thus, the ST is positioned at Basra (with LPs), one QM 20 low volume hexes up the railroad, and the other in the Euphrates valley toward the Syrian border. As will be shown later, this placement allows supplying all forces in Iraq.
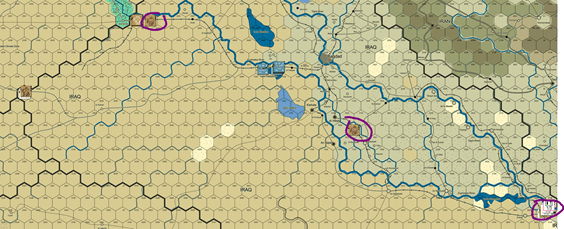
In the above, the Supply Terminal in Basra is circled, as well as the position of the 2 mobile QMs, each emplaced so each can provide a 20-hex QMSR (mobile QMs may also be on mobile side and carry supplies).
On to the game! [NB: Usually Axis has initiative in mid-’41, but the Allies have it in this Scenario].