June II 1941 — Allies
Weather: The weather rolls are 3 and 6. This means it is Hot, but in the NW Zone (including the remaining area of operations) poor weather. This will impact movement, as well as air and naval operations, to the Allies’ detriment. The loss of the Arab Legion last turn in principle generates combat replacements; but the loss is too small to make a difference (¼ of the motorized infantry II, which would be in proportion to the components of a motorized armored XX). The 16th and 23d Motorized Infantry Brigades arrive in Haifa (badly needed with the loss of the Indian X). The Allies receive ⅓ LP, which is placed in Basra. There are no other reinforcements.
Supply:
-
As before, all forces within range of the Haifa QM are in general supply, via RSR from the notional expenditure of ⅓ an LP in Egypt for each air and ground forces. ⅓ LP in Haifa is expended to put the 1st Australian XXX in Offensive Supply.
-
In Iraq, only 2 brigades and the HQ at Palmyra are in range (20 hexes) of the QM at the end of the Iraq supply network (the two brigades in Aleppo are not). Thus, ⅓ LP breaks down in Basra to provide general supply to the 2 brigades and Corps HQ that are in range (this takes 5 GSPs, leaving 1.667 in Basra). ⅓ an LP, also at Basra, is expended to provide Offensive Supply to the Indian HQ.
-
At Aleppo, there are 3 GSPs and 4 SPs worth of units. 2 GSPs are spent to place one brigade in General Supply. The other brigade goes E-1 (as it is not isolated; it can trace by land back to the Supply Terminal in Basra). 1 GSP remains.
-
The transports at Habbaniyah also are put in supply using a GSP in Basra (distributed by the RSR/QM).
⅓ of an LP remain at each Basra and Haifa.
The same forces as last player turn are put on naval-coop missions, including the naval spotters. The FAA Fulmars in Haifa are assigned to naval gunnery.
Movement Phase
Airbase Attacks
The Allies move to take the Vichy fighters off the board. Hurricanes escort the Maryland and Hart bombers to Beirut. The Vichy fighters rise to intercept and elect to fight the escorts:
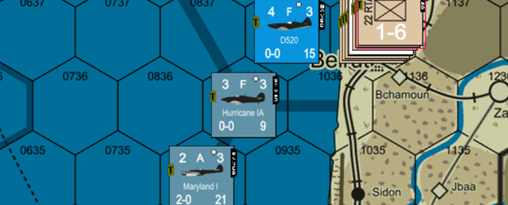
Both sides roll at 4. The Vichy fire is on the +1 table, -1 for ACEV difference. R is meaningless. The British fire is on the 0 table @ +1. Same outcome. The Maryland and Hart bombers proceed to Beirut and brave 2 points of flak (1 for city; 1 for AA unit). An R is achieved on a 10 (+1 for NTM) on the Harts, which reduces the bombing factor from 1 to 0.75. 2.75 OBFs (when 3 are needed), reduced 10% by weather (poor), yields a 82% chance of an airbase hit. A 63 is rolled, and Beirut takes a hit; the Vichy fighters, however, are aloft and not considered hit on the ground. But they are expended for the turn. There are no Axis airbase attacks.
Naval Spotters
The same 2 Axis units spot from base.
Naval Movement
TF17 — 6 DDs and the damaged Ajax, heads toward Beirut (2 SMA/2 SMP). Coastwatchers attempt to spot (+1 DRM for them, but -1 for weather), and fail with a 3 (8 needed). The two Axis air units also attempt to spot. The Germans get a +2 for ACEV (-1 weather) but fall just by rolling a 5. Last, the French roll a 9 (modified to 8 with weather) and spot the British Bombardment force. This unleashes the Luftware from Rhodes:
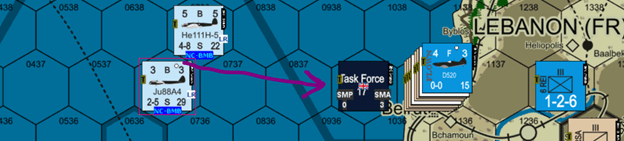
Axis fortune changes, and the Heinkel group finds the TF (rolls at 7; other failed on a 3). Air cover, however, has been provided by the El Arish based Beauforts (roll of 10), and they intercept:

Range only affects the ATAC combat strength of fighters, so the Heinkel will fight full strength (8.B.5.c). British get a +1 for fighter superiority. Both sides roll a 5. The British are firing on the -1 column, and ACEVs are identical. That results in an “R.” The Germans fire on +2 column, with same result. The “R” result means only 0.25 of the bombers are dropped, before AA fire. Which occurs next. The TF has an AA strength of only 5. But DRM is +2 for NTM; +1 for NEM; and +1 for type B. A modified 7 misses. With range factored in, the Heinkels only can bring 4 x 0.25 x 0.25 factors to bear (.25), which is reduced 10% by weather. The 22% of a strike fails on a 63. Because they were not shot down, the British Beaufighters remain on air cover. TF17 will help with the assault on Beirut in the Combat Phase with NGS.
Ground Movement
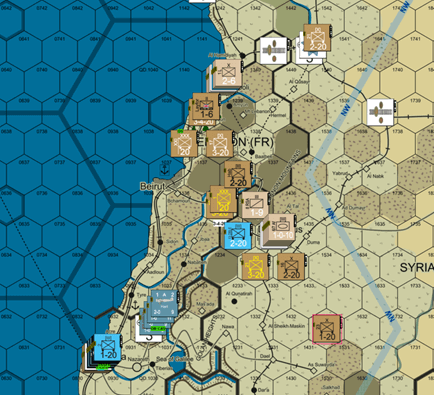
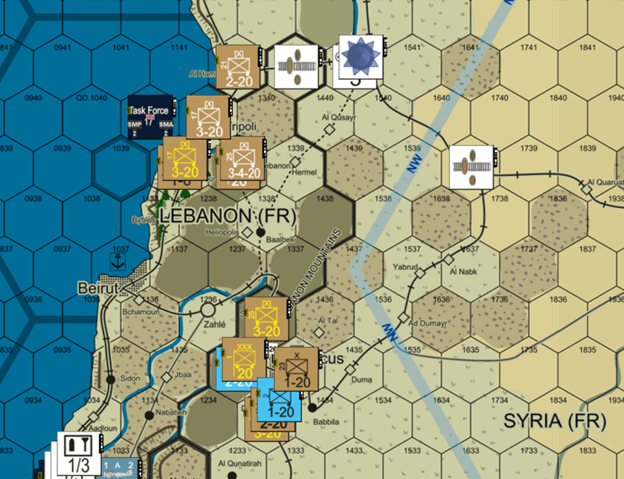
The Allied plan for this Turn is to take Homs and Beirut, leaving Tripoli and Damascus for the end game. The Indian forces in the north converge on Homs. Poor weather West of the weather line shown below impedes movement a bit (see chart for increased costs), but roads help greatly. Roads in the Levand at Metal (see MN rules), and thus 1 MP even in poor weather. Because it is E-1, the 20th X is 50% movement, but can still get into position to attack (less than 10 MPs); the unit in Iraq could use operational movement (x1.5) to join it if needed, but exactly 20 MPs even in the poor weather once the weather line is crossed. The Allies will sacrifice offensive supply for one Brigade, which started in Palmyra to surround Homs with ZOIs (Offensive supply requires being adjacent to the Corps HQ, as previously explained):
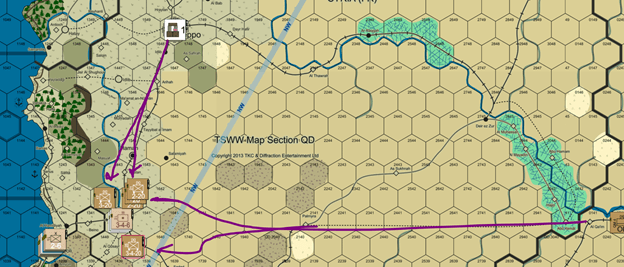
On the Southern front, forces close on Beirut and the Foreign Legion force holding the mountains north of Zhale. Operational movement is used to enter the mountains flanking both positions for some units, especially given weather; but all units stay adjacent to the Corps HQ, which can provide Offensive Supply to its stack and 3 adjacent stacks (15.P.2.c):
Other air missions: Axis save their planes for CAS (no good strategic bombing missions; hitting Haifa’s port or rail marshalling yard won’t have a significant impact). Allies fly a GSP to Hamah (north of Homs) from Habbaniya.
Combat Phase
Allies declare attacks at Homs, Beirut, and 1237.
Allies fly CAS to anticipated battles:
1. Extended range Tomahawks, as well as Blenheims (1 wing) and Audax (0.5 wings) fly to Homs.
2. Hart and Vincent (1.5 wings total) fly to Beirut, where the FAA Fulmars on Gunnery spotting also can either escort or intercept..
Not able to affect the DRM at either battle, the Axis fly the Heinkel HBs in Rhodes to 1237 (long range).
Homs. 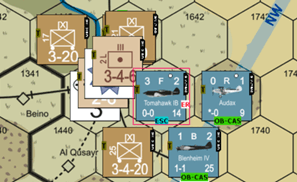
Vichy strength is 6 (6 x 1 CEV). Allied strength is:
-
20th: 2 X (0.5) (E-1) a x 1.25 (terrain) = 1.25
-
25th X. 3 x 0.75 (no offensive supply) x 1.25 (terrain) = 2.81
-
17th & 21st X: 5 x 1.3 (CEV) x 1.25 (terrain) = 4.875
-
Air: 1.5/4*.9 = 0.3375.
Total Allied strength = 9.3. Odds are 1:55/1, and Allies get the roll to make it 2:1. DRMs are: -1 (small city); +1 (concentric); +3 (all 3 air modifiers), for 2:1 +3. Roll is 5, becomes modified 8: HX. The 2 SPs of Vichy units are eliminated, and so is the 20th Indian X. Allies take Homs.
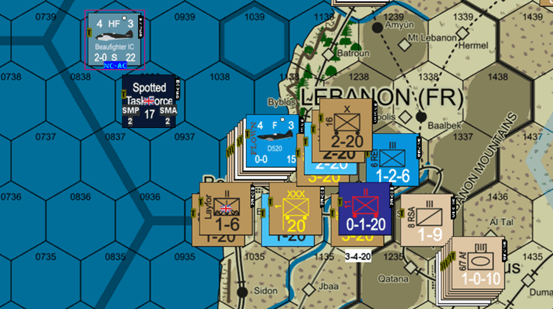
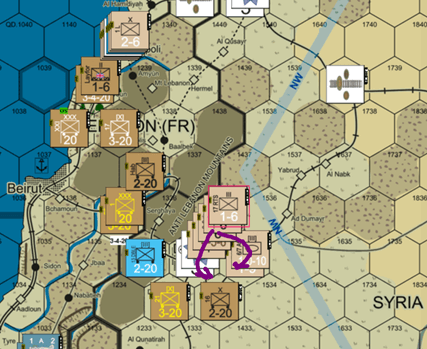
3. 1237: 25th Australian, 21st Australian, Czech II0 and Hab force attack. Defense strength is 2.1765 (the fraction from air). Attack strength is 0.5 (Mountain in poor; note motorized infantry and artillery can use the ‘other’ column rather than motorized if better, and it is here) x 1.3 (CEV) x 7 (printed strength) = 4.55. DRMs are -2 (mountain), -1 (bombers), +1 (air superiority). Roll for river to have an effect failed. So 2:1 -1. Result is QR. The French foreign legion and Czech II are eliminated. Allies take the hex. Hab force advances.
4. Beirut. Rest of the Allies attack Beirut. Defense is 3.25 (AA unit contributes 0.25; see 5.A.3.f). Allied strength is:(a)1 for Layforce (1×1); and (b) 5 x 1.25 (all motorized units attacking in Steppe, poor weather), all x CEV of 1.3 and x.75 (major city). This amounts to 7.07. The ships off shore, guided by gunnery spotting provide 27 gunnery points, divided by 4 for 6.75. Air adds another 0.6 after an R result against a Hart; so Allied total is 14.4. Odds are 4.43:1 which become 5:1 with fortunate percentile dice. DRMs are -2 (city) +1 (concerted) +3 air -1 (fort). Commandos also roll for surprise, but fail. So final odds are 5:1 +1. A modified 7 is a DH, and survivors eliminated in retreat through ZOI. Beirut falls. Vichy fighters also destroyed on the ground when overrun in the advance.
Reaction
Only the units in Tripoli could react, and they stay put.
Pursuit.
Allied ships return to port, to replenish during Axis player turn. Axis lack planes for air strikes. Allies now consider how to ensure supply their player turn. Allies leave a brigade in Homs, which first makes sure to move to the Coast and break rails and occupy the key port before returning, and otherwise unit their forces. End of turn:
June II 1941 – Axis Turn
Initial Phase
Axis lack reinforcements or replacements. Per special rule, all units are in General Supply. Vichy spends ⅓ an LP in Tripoli for Offensive Supply for its 3 HQs, distributed by the QM there (can reach Damascus within 20 hexes, some steppe and stony hills, which cost more than 1). None is spent for air (just the recon planes are left). Usual forces put on naval patrol (including the now E-1 Vichy planes).
Movement Phase
There are no air base attack or naval movement. Same Axis planes spot from land as before. Axis consider an attack on the exposed Allied 16th X, and maneuver as they can in the weather to set it up. Weather means that Vichy cannot quite get a concentric attack. The Tripoli garrison stays put. The Allies fly a GSP to Hama from Habbinaya.
The Allies fly uncontested CAS amounting to 1.25*.9 points, which is added to 2 x1.3 for 3.725 defense. The Vichy attack is 7.5 (Cav effects) and they get a +1 for tanks. With the Allies having total air superiority, through, the attack becomes 2:1 -2. Vichy lucks out with a 10, modified to an 8 (HX). The British Brigade is eliminated and so are the Vichy tanks (the latter yielding combat replacements). The Cavalry joins the Damascus Garrison in Pursuit, after Allied Reaction.
End of June II Turn:

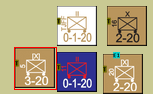
Dead Piles:
July I 1941 — Allied Turn
Weather: Rolls of ⅔ make it Hot/Good everywhere.
Initial Phase
Allies now receive 1.3 LPs, all of which go to Haifa. No reinforcements (or sufficient losses for combat replacements). The 17th Australian X arrives in Haifa.
All units now are within 20-hex range of the QM in Haifa, including the brigade in Homs (if needed, it could trace 3 hexes to the 2 GSPs in Hama; see 15.E.1.b.iv). 1/3 LP spent for air, as always; ⅓ on Offensive Supply for the two Corps HQs.
Same units assigned to naval coop and gunnery spotting.
Movement Phase
No Airbase attacks. Same Axis aircraft (POs in Tripoli; JUs in Rhodes) naval spot from base.
Naval Movement
The Allied short-bombardment force, replenished last turn, moves to position off Tripoli. They are for once not spotted (coastal spotters whiff on 1 (+1), French spotters on a 5 (+1), German spotters miss on a 2 (+2)).
Ground Movement
Allies set up final attacks on Damascus and Tripoli.

Axis fly their NB air support to Damascus (where it will add 0.187). The Allies fly sufficient air to both battles (1.5 squadrons of bombers at least in each and fighters) to ensure they attain a +3 for air. And, as before, the Allies have the off-shore ships with gunnery spotting. Final battles:
1. Tripoli: 9 [all motorized guys except 21st x] x 1.3 (CEV) x 1.5 (terrain) + [21st x] 0.75 (Base CEV) x 2 (for unit not in offensive supply) +1.3 (Layforce) +0.5 (air) = 20.4. And 6.75 of ships = 30. Defense is 4. DRM is -1 City, +1 Concerted and +3 air. Commando surprise fails. The result of the high odds attack is a modified 9 and a DE. Tripoli falls.
2. Damascus. 11 for forces except the 23d X x 1.3 (CEV) x 1.5 (terrain) x .75 (major city) = 16 + (0.75 x 2 x 0.75 for 23d X, not in Offensive Supply) + minor air = 17.75. Defense is 7. Odds are 2.53:1 which on a 75 round down to 2:1. DRM is -2 for major city, +3 air, and +1 concerted. So 2:1 +2. A fortunate 9 beocmes 11 and another DE result.
That completes the elimination of all Vichy units and capture of all strategic points (city, airfields, ports) in the Levant.
According to the Victory Conditions, the Allies get 3 points for eliminating all Axis forces in the Levant, but none for control, as they lost 4 SPs or more (in this scenario, see above, 7 SPs). The Axis have no VPs, as they control nothing. So it is a minor Allied Victory — with a moral victory to the Axis for causing significant Allied losses. The two aggressive counter-attacks, which eliminated 4 SPs, were key.
*****