part five of six of an in depth look at the tsww system. parts one, two, three and four are found in bold links.
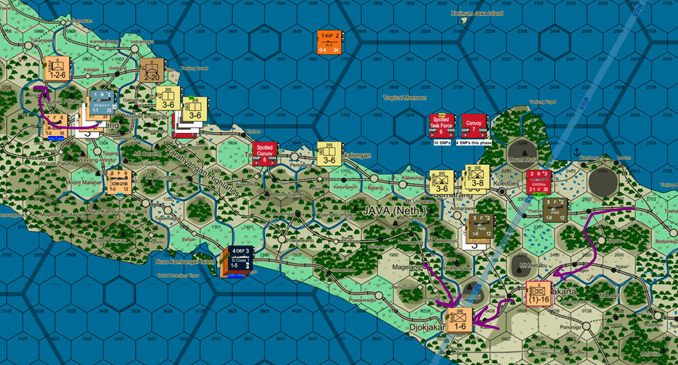
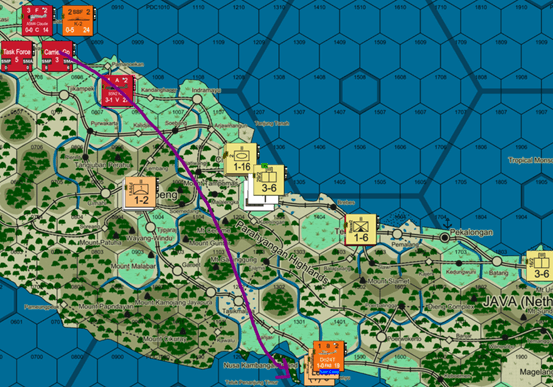
Reaction Phase. Units at least 3 and no more than 7 hexes from enemy units (and 3 hexes from the hex attacked) can react with ½ movement. Dutch Engineers and AA scamper from Bandong toward Batavia. Dutch units move toward Djokjakarta to make a stand. Mechanized reserve moves to Soerakarta.
Pursuit Phase
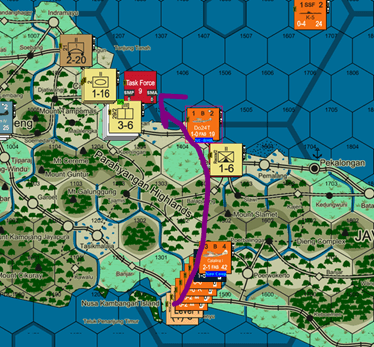
Japanese NMS. Units/cargo that previously did not land formed part of a Floating Reserve. These now can transfer from NSPs to LCs and land and move the pursuit phase, as there is ample LC capacity (see 9.K.4.e.6). Japan lands motorized units and supplies next to Cirebon. Transshipping and landing take 4 MPs; but that means the Japanese tanks still have 12 for movement. The tank II races to a Dutch airfield hosting a fighter wing, which surrenders as the Dutch have no escape capability. The tanks return to the main Japanese force. A mountain II lands at Tegal, and can move no farther. Supplies, a mountain regiment, the all-important Corp HQ, and motorized AA land near Semarang. The Mountain III has used all its MPs landing. The flak IIs, operating together, clear the rail lines between Cirebon and Semarang and then disperse. Japan does this so it can run an RSR next turn (see15.E).
Naval forces that landed troops/supplies and provided AGS must now depart. LCs roll for damage (see 9.K.5); damage occurs on a 1-3. 5 LCs are damaged (and unavailable in context of this scenario). The Japanese carriers both move to Bandjermasin to replenish, and Japanese NSPs/LCs move there as well (closest major port). LCs/NSPs can get there in 6 SZs, even landing forces in the pursuit phase, well within the 14 SMP limit. No one – even the LCs with only 11 SMA left – was in danger of running out of fuel.
The ships that provided AGS or fired torpedos/gunnery move (11 SMA/SMP) to the naval base at Balikpapan, a large port that can base 23 ships and has a fuel capacity of 400. The ships that provided AGS declare their mission complete (they are too far from the assault zone to spend ⅓ of SMP at port and return, as required to continue on AGS). They will need to spend next two turns at Balikpapan per Rule 13.Q.1.b.10.b to refit (until April I 1942). The short, intense bombardment, however, was well worth it — Japan is ashore without loss.
Some other ships move to Bandjermasin (a large port, which can base 23 ships and 200 refueling points) to replenish; other stay on station. Fuel will not be an issue the rest of this scenario; each major port can refuel the whole Japanese force (though munitions are only available at Balikpapan, a naval base). Japanese ships remaining at sea (except those that were reinforcements this turn) have spent 3 segments there, so will be on extended status if they stay on station the next NMS.
Allied NMS. Ships replenish; none sail. Soerabaja is a large port with a base and has ample capacity to fuel the entire Allied fleet; they also can load up on shells there, as it is a Naval Base. The minor naval force that moved to the South Coast, too, can fuel there.
Forces that previously landed now move (1/2 , as all unmotorized) in the Pursuit Phase. Japan overruns the P-40 base at Salatiga with 3 mountain regiments at 15:1 odds without loss (see rule 7.E.1.a – ground unit there had a strength of (1)). Each P-40 squadron escapes on a roll of 5 or higher (+1 DRM); 1 makes it to Soerabaja.
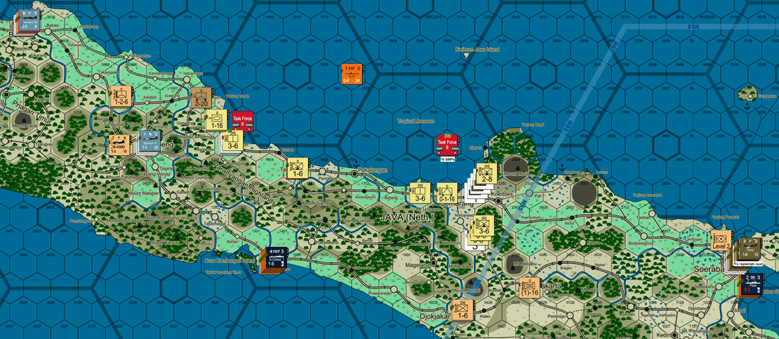
So ends the Player Turn, with the Japanese safely ashore:
March I 1942 – Allied Turn
Initial Phase
Supply: The Allies are considered on the Continental System. There are STs in Batavia and Soerabaja. Because the National Supply Source is not specified, Rule 15.Q applies. The Dutch currently control 5 Major Cities, all connected to each other by rail. Thus, each is a supply source and the LOC can be traced from an of them to the STs along rail lines. All Allied units are within a 6 hex MSR of such rail lines, and thus in supply. All Japanese can trace to the newly-captured ports, and thus are not isolated. The Allies do not expend LPs for Offensive Supply. LPs are saved for when supply is cut.
R&R: Allies receive no reinforcements and no losses as of yet generate combat replacements.
NIM spotting. Allies succeed on a 9 (becomes 10 with Ultra). Entitles spotting of 2 Convoys, 1 TF. Allies decide to spot the TF off Semarang and puts markers (if Convoys depart) in Balikpapan and Bandjermasin
Naval Coop. Japan assigns Petes and some Bettys to Naval Coop. Same Allied units as previous turns. Claudes are assigned to CAP, though carrier won’t leave port until Allied Pursuit Phase.
Movement Phase
Airbase Attacks: Allies send B-17s and Dutch bombers to attack IJA airfield in Sumatra, escorted by Hurricanes. The missions is extended and long range. This draws the Japanese fighters, as the Allies intend.
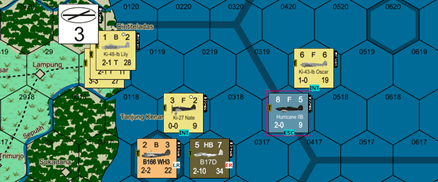
The fighter duel (no DRMs) sees Japan down a Hurricane step (roll of 9) and the Nates Dutch Bombers (modified 9 with +1 for ACEV). The Allies miss. The 1.25 bombing strength (range reduced) does produce one hit (27 on percentile dice, needing 42 (1.25/3)). The Sally wing is reduced.
Japan bombs Soerabaja airfield. IJA and IJN planes escorted by Zeros; all at extended range; it, too, draws the available Allied fighters (note the Code D Zeros have a -1 DRM attacking at extended range, but no 25% reduction in strength (Drop Tanks)):
In the duel with the Zeros (no DRM), Dutch roll a 5 (miss) and the Japanese a 9 (flip) Japan is -1 for range; but still a 1 result on the +1 column]. The P40s achieve an “R” against the Lillys with a 3.
AA is 4 for facilities (shipyard, dockyard, city, port), 1 for CD, and 4 for AA-equipped units (9, all heavy). The ships cannot fire (rule states that only land-based AA fires at operational bombing missions, though ships can fire if targeted in ports). Dutch dominate, so DRM is +1 for NTM and +1 for type Bs. Rolls are modified 4 (miss), 5 (miss), and 7 (R* – dispersing 25% of the Lilly’s load). The factors that get through are 0.5 from Sallys, 1.5 from Bettys, and 1.125 from Lillys, which with percentile dice achieves 1 hit. The B-17s take the step loss. Last, Ptes, PBYs, and Catalinas placed on naval spotting.
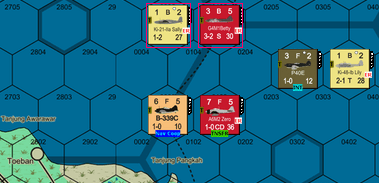
Allied Naval Movement. With much of the Japanese fleet refueling, the Allies sense an opportunity (perhaps their last) for their light forces. PBYs detect TF9 off Cirebon (on a 9), and Dorniers try to find the Japanese force, succeeding on a 10:
AA for the Japanese force is 5 (note 4xDDs with zero rating = 1 under revised rules). Japan rolls a 3, modified +1 for Type B and +1 for NEM. A 5 result is no effect. The Dutch target Haguro. The DRM for the anti-shipping squadron is +1 (code S) and -2 (NEM difference – Dutch planes use NEM as naval). A 6 misses. The US A-24s — bane of the Japanese and missed in the last airfield raid — also find the Japanese. AA against them is more effective: a 9 (mod 10) is an R result. This leaves the US 3 shots at Haguro, each at +3 (+1 for net NEM/ACEV; +2 for Code D). Rolls of 3, 8, and 1 produce a hit on Haguro. The Allies plan to move other air assets; none left for further attacks.
That is the job of the ABDA naval force, particularly with the Japanese carrier far away in Bandjermasin (though the Kates still available to attack). Dragon,
De Ruyeter and 10 destroyers set sail from Soerabaja joined by 2 further Dutch DDs. A search by Petes fails (on a 2), and does a search by TF 9 off Cirebon, where the Allies declare battle (!)
Battle of Cirebon Gulf
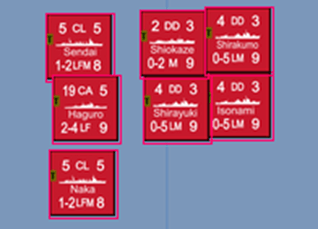
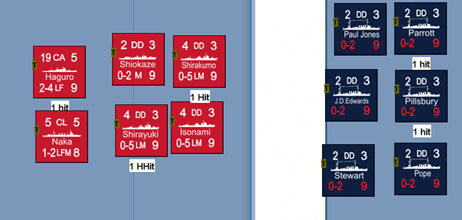
The action takes place during day (roll of 4). The opposing fleets:
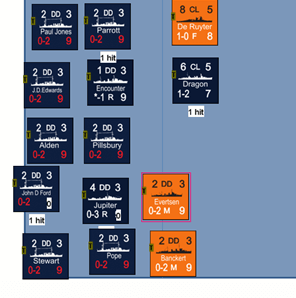
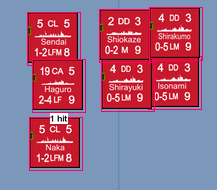
Japan does not evade. Tora Tora Tora. Division are cruisers/destroyers for Japan; for the Allies CLs, Western DDs, and Dutch DDs.
Next is long-range gunnery. Dragon fires on Hugaro (1-2 column) and Reuyter on Sendai (1-2 column -1; auto-miss). Dragon misses. Hugaro fires at Ruyter (19*.7*.67 – 5 = 3 column) with a +3 (+2 NEM; +1 for Floatplanes), which misses. Sendai fires at Dragon (1-2 column), which also misses. Nakia at a destroyer (same). Combat proceeds to second round. Neither side wants to disengage; both want to close to short range, and do.
At short range, the Japanese can fire long-lances. Although Haguro fired before, it can do so one more time. All the Japanese DDs were uninvolved in the prior battle. But first gunnery.
Haguro fires at Ruyter. 19*.67 (damage) – 5 = 7 (+3). A 9 hits.
The two CLs fire at Dragon. 4 column (-1 for multiple ships). 1 misses.
DDs individually fire at Allie DDs (double gunnery). 3 on 5 column and 1 on 1 column (last at Dutch @ +2). Hit on Alden and Evertsen.
Return gunnery by Allies:
Dragon at Hugaro: 1-2 column: 1 misses.
Ruyter at Isonami. 5 (-1). Miss (H*) on a 6.
DD fire: 2 DDs fire at Shir. (@ 12-3 (-1)). Hit on 10.
3 DDs fire at other DDs (9 (-2) in each case, one enhanced by radar) Hit on 8; miss on 3.
Other fire cannot hit.
Now the long-lances go to work. Haguro and Sendari fire at Dragon (4) [6 hits, sunk]; Naka and Isomani at Ruyter (4) [3 hits, sunk]. Other DD allocations: Jupiter (2); Stewart (2); Encounter (2); Pillsbury (2); Alden (1). All miss.
At the end of the round, Japan faces a dilemma. The Allied CLs – used at bait – are gone; but the DDs still have their torpedos, and Japan only has those left on CLs and 1 DD. Japan accordingly stays at short range, hoping to disengage round 3. The Allies want to close to torpedo range, and must roll for it. The Allies make it with a 9 (W Allies dominate and both divisions making same change; so using W Allied NEM). The Allied DDs move to torpedo range.
In round 3, gunnery goes first. Hugaro aims at Jupiter (13-3 +1). A 3 hits, sinking her. CLs and DDs aim at other DDs. 3 hits are achieved (1 on each of various DDs). 9 Allied DDs survive to fire torpedoes: The US/CW: 4 at Haguro; 3 at Sendai; 3 at Naka; 1 at Shirakumo. The Dutch: 3 at Isonami (these are -2 for NEM). The results (recall US hits are divided by 2 for defective torpedoes): Sendai
sunk with 2 critical hits; all other miss (several hits negated by defective US fish). The Japanese CLs can fire torpedoes again: HMS Encounter explodes (critical hit).
Having taken their shot, and drawn some blood, the Allies now want to get away, and thus seek to extend the range back to short range. The Dutch DDs will stay and cover the withdrawal. As Japan is essentially out of torpedos, and stays at short range, this is uncontested. And the range for round 4 will be short, save for the 2 Dutch DDs at torpedo range.
Start of Round 4: the 6 remaining US DDs seek to withdrawn. Speed is the same (8); and cover from the Dutch DDs provides a +3. A 5 is modified to an 8, and the US make it . . . . In the ensuing short-range action, the Dutch DDs are sunk (and cannot hurt the Japanese: max fire for Dutch is 6-3 (3 column) -3). The US DDs have enough movement to make it back to Soerabaja, having nicked up the Japanese force (though now spotted, the adjacent Japanese force fails intercept; and the Kates and Betties cannot find the US DDs). Remaining ships (4 Allied DDs and 2 CLs sunk to 1 CL for Japan – the long lances are lethal):
Thus far, at sea, Japan has lost 2xCA, CL, and DD (though htis on numerous others); ABDA has lost CA, 5xCL, 9xDD.
Tora Tora Tora. The Allies’ best asset is the elite American A-24 aero-naval squadron.
Japanese NMS: Petes search for and find CL Hobart in Soerabaja harbor. Betties attack at extended range.
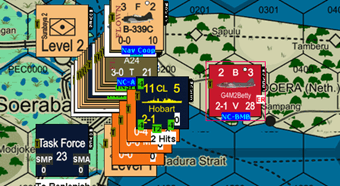
There are no Allied fighters available. Flak is the 9 for the land-based forces; Hobart (with two hits) has zero, as do other ships in port. A 5 (+2) becomes an R*, which has no effect. The ER Betty Squadron has 0.9 attack (normally 2; ER reduces 50% and weather); percentile dice give 1 strike; the DRM is +3 for ships at anchor. A 6 (mod 9) sinks Hobart, the last heavy Allied fleet unit.
TF9 – which fought the ill-considered Allied attack last phase – withdraws to Balikpapan to rearm. US A-24s cannot find them this time. Japanese ships in port replenish (and those that provided AGS begin their two-turn recovery period). Only TF6 — with 2 Cruisers and 5 destroyers, which joined last turn and are in the 3d NMS at sea — remain at station off Semarang. They of course are more than a match for the entire might of the remaining ABDA naval force.
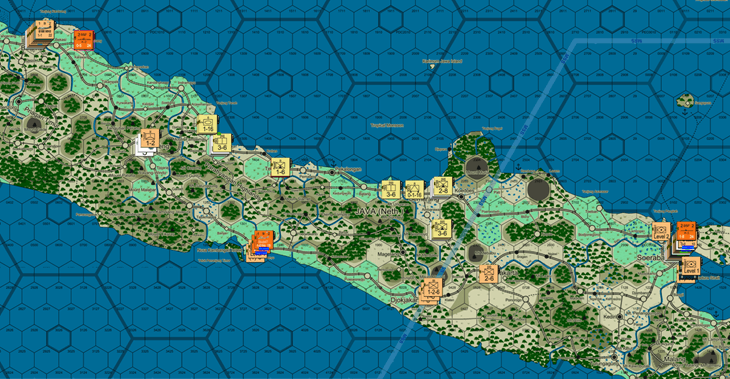
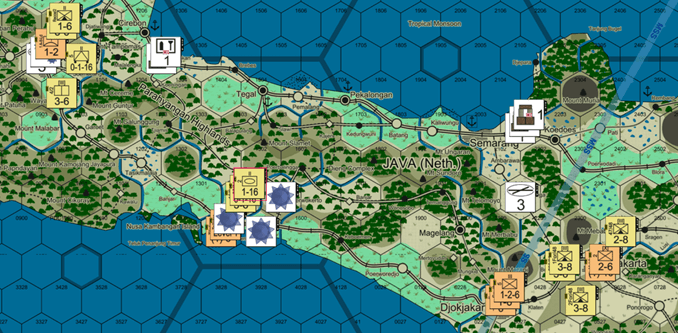
Allied Movement Phase (other). Japan has to take the 6 major cities on Java to force its surrender; the Allies decide to make stands at Batavia, Soerabaja, Djokjakarta and Soerakarta. In West Java, all units move to Batavia, save AA in Bandoeng; air units based around Bandoeng also move to Batavia. In East Java, a blocking force assembles West of Soerabaja to try to try to slow the Japanese down, while 3 SPs garrison Djokjakarta. There is no reaction.
Pursuit Phase
Allied NMS. The DD force replenishes at Soerabaja; subs return their to consolidate. The light force at Tjilatjap sails there.
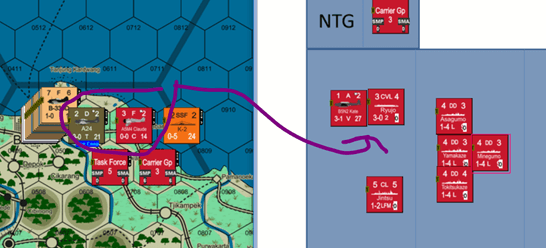
Japanese NMS. The force off Semarang retires to refuel at Bandjermasin. TF9 rearms/refuels at Balikpapan. Ships reorganize to sail next turn. Forces available to sail next NMS include the CVL TF (Ryujo and 6xDDs), CL TF [5] (2xCL;10xDD), and a CA TF [6] (CA, CL, 6xDD). End of Turn:
March II 1942 – AXIS
Weather rolls are 8 and 6. Hot, Poor, Rough in both weather zones.
Supply: Although not specified in scenario, I’m playing 2/3 LP on I turns available in Borneo (as in main OB). It will load on NSPs later. By capturing Semarang (major city) and Cirebon (small city), the Japanese gained 2.5 SPs of rail capacity and 2 RMYs [The Dutch network loses this from its 15 SP capacity]. This allows running an RSR supply distribution network (see 15.E.1.a, also explained below). GSPs can be spent for General Supply on units on or adjacent to them, via controlled rails (the RSR) or within 3 hexes. Here, all Japanese units can draw from the landed supply dumps via one or multiple methods, and 9 GSPs are expended for general supply.
Offensive Supply on the Overseas System without a Supply Terminal, with the assets available here, requires either being adjacent/located with GSPs or being placed in supply by a Corps HQ. The Corps HQ is with the Mountain regiments inland, and per 15.E.1.a.i can use the RSR for Offensive Supply 5 GSPs are spent to place units around Cirebon and Semarang on supply directly from stores, and more are spent on the Corps HQ via RSR (3) in anticipation of later offensive operations by the force with it. In short, all forces can be placed in Offenive Supply.
R&R: None.
NIM spotting. Japan rolls a 9 for NIM spotting. 2 Convoys/1 TF – basically, if the Allies leave port, they will bge spotted.
Naval Coop. For the Allies, the A-24, accompanying fighters, Dorniers, and PBY. For Japan, the 1 Code V Betty units, Petes, and the carrier-based fighters (only).
Movement Phase
Airbase Attacks. Japan returns to Soerabaja, 2 Zero squadrons escorting Betties. Allies elect *not* to intercept the raid (Allies figure they will lose more air fighting). AA is ineffective (rolls of 3 and 1 @ +2). The extended range missions provide 2.9 OBFs (given weather), which percentile dice make a 1 hit. Dutch fighters are destroyed on the ground. Allies save air power.
Search. PBYs and Petes are placed on naval search.
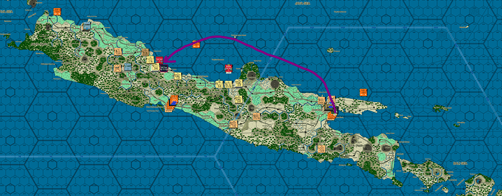
Japanese NMS. Best use of the fleet this turn is to bombard Allied air bases on the coast. To this end, the carrier TF (with CAP) makes a rendezvous with a cruiser TF joining it from Balikpapan, and proceed to Batavia’s SZ (12 hexes). PBYs fail to spot either (1 or 2). When the force enters Batavia’s SZ, subs and Coast Watchers can also spot. Subs spot nothing (7s -3 (Dutch NEM, Weather, SSF); and the Coast Watchers fail too (rolls of 5, no net DRM). (NIM spotting available to Allies is for Convoys.) Whilst undetected, the Ryujo‘s Kates fly to Tjilatjap. Note: Carrier Air can fly at any time, including airbase bombing missions. The Allies fly the Catalinas to Soerabaja before the raid is declared; but the Dorniers are on naval coop, hoping to find Japanese ships. The Kates are out of interception range of any fighters there (Dutch intercept at ½ range; they are not “Western Allies” (see 17.B.1.a).
The AA of 3 (+1) misses with a 2. 2.9 OBFs hits the airbase (percentile dice make 3) and eliminates the Dorniers. The Japanese will bombard in the Combat Phase (per 13.Q). The TF has 2xCA, CL, 12xDD – enough to deter the Allies from trying to sail and intercept it.
6xDDs and an NSP with an LP load for a voyage from Bandjermasin for Semarang.
Allied NMS. Subs set to sea around Soerabaja. PBYs/CoastWatchers try to find the Japanese fleet off Batavia, and find the Carrier TF (roll of 10). The A24s go after the CVL at extended range, though its intended escort has been eliminated . . . . .
First, ATAC occurs. The Japanese have a +2 for Fighter advantage but ACEV is one in US favor; so Japan fires @ +1 on the 1 column. The R result will reduce the A-24 attack by an additional 25% (dispersion). The US achieve an R, which will return the CAP (8.K.4.e). AA fire is limited per special rule to the CVL, one CL and one DD. That, as you see above, is on the 5 column. The only mod is a +1 for NEM. A modified 6 misses. The A-24 is at extended range, so its 3 x 1.5 factors (Code T) are reduced by 50% and then again by 25% for the tangle with the Claudes and 10% for weather. The 1.518 factors becomes a single strike. Weather, ACEV, and +2 for Type D. A 3 misses. The Allies think about sending remaining DDs to go after the Japanese carrier; but the remaining air and massive cruiser force is a deterrent.
Movement (other). Japan plans to attack Bandoeng and Soerakarta this turn. Forces in the West surround the force, and forces in the East the latter. Some units use operational movement, once the hex contains 1 SP (in the case of the Dutch EZOI that is part of the Sorekara garrison). Japanese light infantry ability gives them just enough movement to surround Sorekara. Weather slow the Japanese advance. A light infantry regiment clears the rails Japan will need for supply and, along with an AA II that digs up rails the Allies might use, sets up to attack Tjilatjap. The HQ [not shown below] is stacked with the 3-8 Mountain regiments to provide Offensive Supply to them (Corps HQ can provide to own hex and limited number of adjacent hexes). Offensive supply previously was distributed to other forces in the Initial Phase.
Immediately before the Combat Phase (see 13.Q.1.a, this matters), the Japanese bombard Batavia airfield. First, they must brave the CD Fire (which the ships will not waste time suppressing). The CD level is 2, so fire is double that (4). So the CD only attack is on the 1-2 column, but weather and NEM make it a -2. No hit is possible (hence the Japanese ignore it). Japan have 65 gunnery factors, reduce by weather to 58.5. Two Japanese units, moreover, have floatplanes. When the dust settles on the math (8 units can use float planes and divide by 6 rather than 8), Japan has a bombardment strength of 12. This inflicts 3 hits on Batavia airfield (13.Q.1.a.III). Hurricanes, Dutch fighters, and Dutch bombers are shelled on the field.
CAS is next. Japan flies Sonias (long range) to Tjilatjap and extended range Lilly and Sally (with long-range Oscar escort) to Soerakarta – so 2 squadrons at each location. Allies decline to intercept. They fly their own CAS to Soerakarta — 3 bomber and 2 fighter squadrons (some long-range escort) – the escorts are to engage Japanese fighter advantage DRM. Hurricanes fly to Tjilatjap. Combats go as follows (all AA ineffective)
1 Bandoeng. Dutch defense is 1.25. Japanese attack is 7 x 2(CEV)x(.75)(City) = 10.5; becomes 8:1 (-2 for City). Modified 8 +1 (Japan has taken theatre fighter superiority with latest attacks – 6 to 3 squadrons). Result is a DE; Japanese advance.
2. Tjilatjap. Dutch defense is 1.25 (including organic AA) + 0.2 for air (but with fort effects from the CD). Japan is 3 x 2 (CEV) x 1 (Terrain) = 6 + 1.4 for air + 0.75 (for unit only in GS). DRM is -1 (Paddy); -1 (Fort). ASE is 0.75 x.5, so the Japanese tank II won’t have an effect (percentile dice fail). Odds round with percentile dice to 7:1. -1 (-2 for terrain/forts; +1 theatre air superiority; other air cancel out). Modified 7 is a DE. Japan advances.
3. Soerakarta. Japan has 11 x 2 (CEV) x 0.75 (terrain) = 16.5. Air adds another 3 for 19.5. Dutch defense is 3.95. 4:1 odds (bad percentile roll for Japan). DRMs are -2 (City); +1 (theatre superiority) -1 (Allies have more bombers) +1 concentric attack. So 4:1 (-1). An 9 becomes a 8. DH. The Dutch X is eliminated and mech II retreats, as Japan lacks ZOIs with its regiments, unless stacked. Japan advances.
There is no reaction movement.
Pursuit:
Japanese naval movement: Japanese bombardment TF heads back to Balikpapan and the carrier TF toward Semarang. The Japanese Convoy with supplies sets sail and is auto-detected by NIM; it joins a cruiser force sent to escort it, which is not detected. Allies send the A-24s (can attack twice) after the Convoy, but fail to find it on a 3. Convoy docks at Semarang with Cruiser force protecting it and ½ unloads its LP (7 SMPs spent; 7 spent unloading of 14 required). Japanese fighters (Nates) transfer to Semarang. There is no Allied naval movement.
Japan moves various forces to forestall Allied raids on supply lines. End of player turn:
