Play area for Scenario: A Bridge Too Far for TCS – Screaming Eagles in Holland.
Screaming Eagles in Holland is an examination of the battles of the 101st against the counterattacking KG Huber German forces during Operation Market Garden, with support from some isolated UK tankers from XXX Corps.
In this scenario we look at just Map A and the simple objective of the Germans capturing or destroying two bridges that cross the critical Zuid- Willems Canal.
TCS from The Gamers has been lauded as a fine platoon scale system and it is indeed one of my favourite systems to play. I have a tendency to ‘rush’ to contact. Usually to my detriment. In this case we have just 10 twenty minute turns to make an impact as the Germans or hold the bridges as the 101st.
This title is often also lauded for its clean Lines of Sight. Why? Well Holland is flat right? So it should be easy, and TCS has a couple of increasingly complex LOS systems to choose from, so folk lean in on this one.
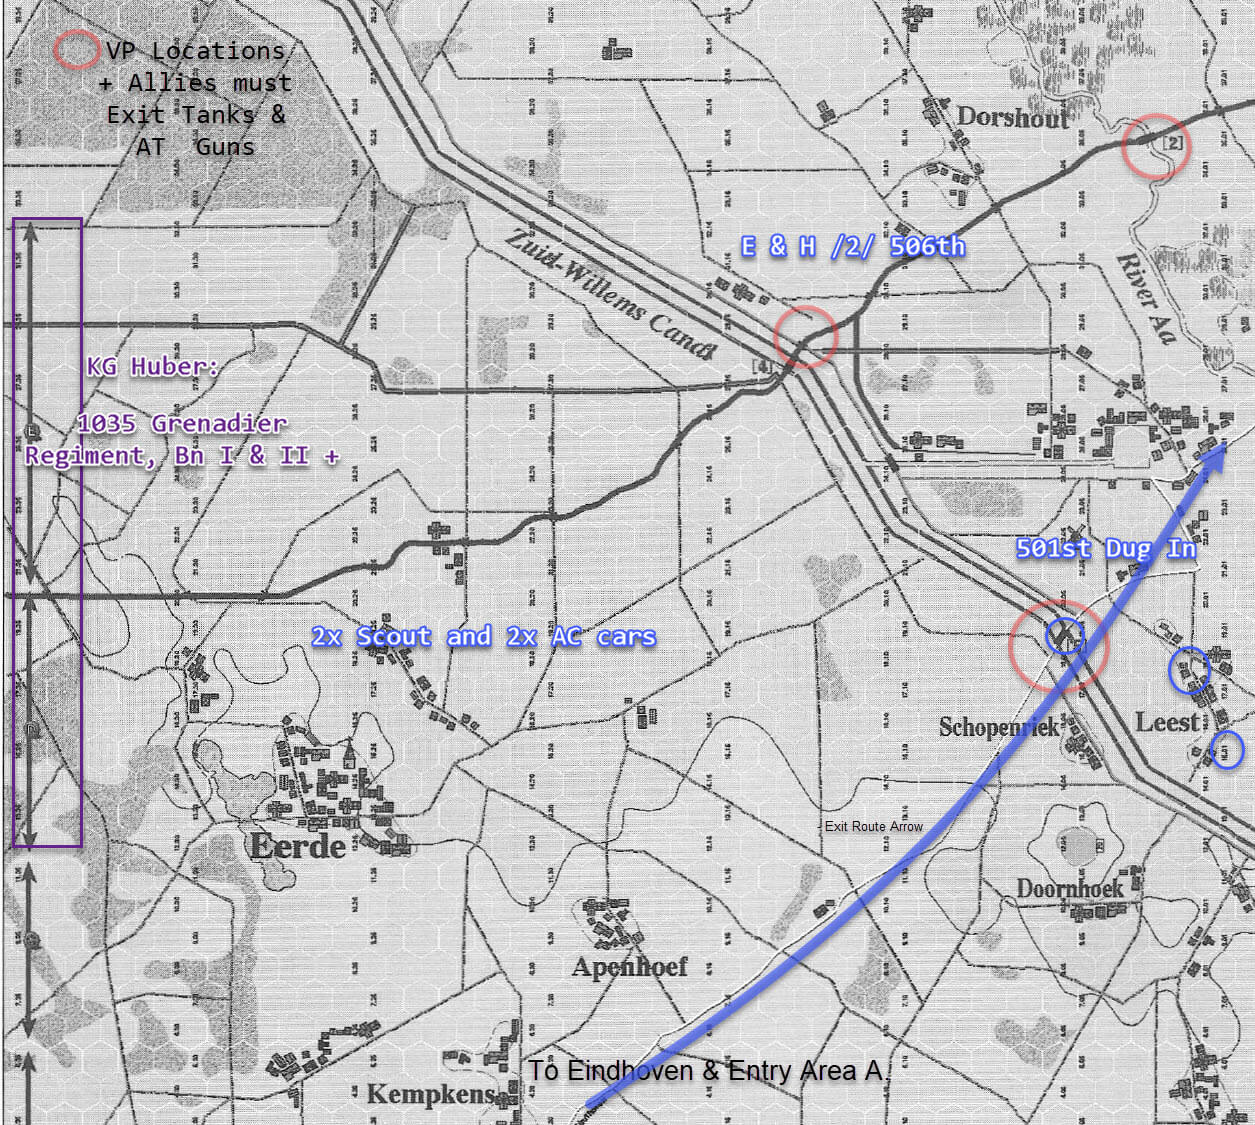
Initial positions:
Company F & G from 501st setup with Bofors and 37mm AT gun on hex 19.06, 17.02 and 15.01 [Blue circles].
Co. F,G and H have a mortar park at 24.02 or within a few hexes. Company E/2 of the 506th is in Hasty Defence vs Prepared defense like the rest of the units.
The 501st elements that are NOT at or near the bridge will lose their dug in status if they move to support, as they are technically ‘guarding’ exits to Veghel. Elements of reinforcement may well have to be the ones who counter attack to reclaim the bridges if lost then?
At Entry Area A: Company K,L,M from the 327th Glider Bn arrive as well as 4 Fireflies and assorted AT guns and Mgs by 1140. Then 12 more Shermans and Fireflies over the course of the scenario to 1400. When on the last turn F/2 arrives from the 506th with more Fireflies.

Close up of 101st setup location on the Northern part of the canal.
So easy LOS right? – HOWEVER!!
Look at the above image. The Green line bounding a brown line is a dike and the darker green with the rail line is a raised rail line embankment. All ostensibly 10m off the ground. From my reading of the rules being in the hex, means you are ON the embankments. Which will place you in ‘billiard table’ terrain – think highly exposed and a ‘bad thing’ [+4 columns on the fire resolution table, which is the biggest mod I think you can achieve or close to it]. This means two things:
- Access & approach to the VP locations is easy as the forces on the Eastern side of the canal cannot see across and vice versa.
- The VP location it self is in highly exposed terrain, bad for both sides, who are trying to either set charges for four turns or stop charges from being placed or the bridge being captured.
The other issue for the 101st is defending locations in cover. Way too many hexes place them in exposed terrain. similar to the above. So they will have to potentially opt for open terrain, vs billiard if they want clean LOS to the bridge hex.
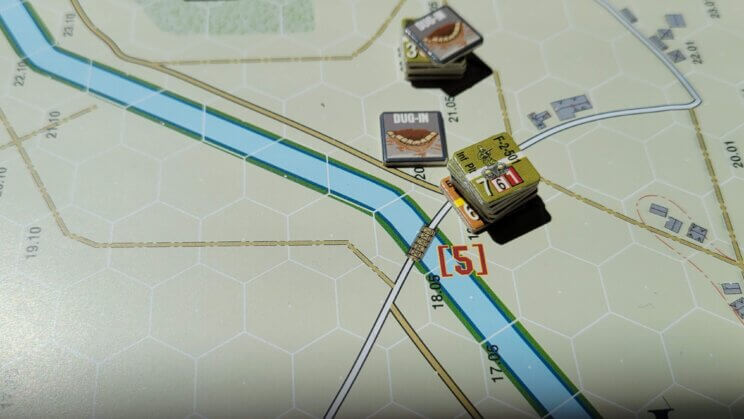
The elements of 501st start Dug In on the bridge above, which appears to be a trestle style bridge. While the primary road crossing the hex 19.06 is not bounded by embankment, it is on the canal embankment so Im going to assume that the billiard table will apply, as will the 20.1d bottleneck which invokes double overwatch fires. Yikes.
So while the enemy Germans can advance in or under cover, the challenge will be taking bridges in very exposed terrain, AND defend same with decent fields of fire and cover.
Next thing to consider. US Reinforcement is coming from the South see map above. Which means that any direct approach will have to guard the rear also and be prepared to defend against a lot of tanks, and infantry.
This makes the idea of massing force important, and avoiding LOS from the US arrivals important.
Victory Conditions
Before we go too much further into Op Sheets lets look at VC’s. Not only as stated above do the Germans wish to capture/blow bridges, but the Allies MUST exit tanks and AT guns or face a shift of VP level in favour of the Germans. NOT good. 1/2 the tanks and nearly all of the AT guns need to vamoose to Veghel for the defence there by 1300! One full hour before the scenario ends.
What goes that look like? So arrive at South edge, move to or through enemies forces, and exit half of your force. Its less than [nine MP] a 20 minute drive [one turn] to get to the Southern most bridge above from Arrival Area A. The Germans will have two full turns to set up either ambushes, or attempt to block the primary road and slow the forces down.

Germans
This would mean that the Germans, should likely allocated all the JgdPz V’s and some AT units as well as some IG’s to slow down the allied tanks and Glider troops arriving 1140? The question is do they take the remaining force of two Infantry Bns as well as the AA guns and attack the Northern most bridge? Then press South to the from the Eastern side to capture the Schopenreik trestle bridge? Or use one full battalion supported by AT & AFVs to close the approach to the trestle bridge from the Western side? That would leave just one Battalion to secure the Bridge in the North and the secondary 2 VP bridge further east [Dorshout]. If we could block the Road across the trestle bridge for the 44th Royal Tank Regiment that would provide a Minor Victory, boosted to a major if the US cannot exit units even if we do not capture the Trestle bridge per se.
Allies
The US quandry is different. Do they elect to scramble for the bridge? Or do they take the 327th Glider Infantry and Fireflies and counter attack into the Germans possibly at Eerde? The dug in 501st who are in part out of position can abandon the prepared defences and move to support the defence of the trestle bridge potentially? The 506th really has its work cut out no matter what. With no dug in positions, and difficult sight pictures they maybe hard pressed to hold!
The balance of Northern 1/4 of the map is in play but effectively not as it has no crossing points. So our focus is pretty tight for both sides.
More on proposed Opsheets in the next post, for on Map and arriving units.