Written by Andrew C over at BGG, where he goes by the name of @Cleitus the Black
Black Swan follows in the footsteps of several other notable World War Two European Theater of Operations (ETO) block wargames such as GMT’s Europe Engulfed, and Columbia’s Victory in Europe, and East Front/West Front/Euro Front games. Black Swan, though, differentiates itself with several new and interesting mechanics, and sets a new standard for streamlined and playable, yet historically plausible, ETO wargames. The naval game in particular, breaks new ground. The designer, Emanuele Santandrea, found a way to make the necessary logistical puzzle of supporting campaigns in far flung places, even in the face of constant U-boat attacks, simple to understand and implement, but nuanced and complex from a strategic perspective. The Strategic Air War, too deserves special note, for its simplicity but narrative and historic creditability. The ground combat system too contains unique elements (within the context of standard block game paradigms,) particularly how the victor in combat is determined, and therefore, critically, who holds the ground after battle.
In short, Black Swan does an excellent job of borrowing the best elements of predecessor games, streamlines them, and adds in a mixture of new and interesting game mechanics that make it a bit of a “goldilocks” game for me. Whether it’s a game for you depends on your appetite for abstraction for the sake of making a playable game. Allow me to provide some detail on key game elements to help you make that determination. This got quite lengthy so I added headers to break it up, in case there are specific areas of interest for the reader.
Note also, my solo gamer status has been reinforced during COVID so this is a solo-only perspective.
 Naval Game
As I noted, the naval game is the star of the show, so let me start there. First a couple of basics to set the stage for what is unique:
 Naval units types: there are four types of naval units, carriers (CV), heavy capital ships (HS), light surface ships (LS) and submarines. They use usual “rotate to designate strength” and “roll dice equal to strength” mechanics typical of so many block games. Stacking is limited to four max per side per space – so a well-rounded fleet is one CV, HS, LS, and Sub each.
 Firing order is determined by class, with CV’s firing first followed by HS, then LS, and last Subs. Effectively, Black Swan uses Columbia’s classic A fires before B mechanic, but all units of a class have the same value. Also, somewhat different is that each class fires simultaneously (attacker and defender CV’s fire, apply hits, then go to HS and do the same) rather than the defender firing all their ships first.
 Everything hits on a 5+ roll. Hits are applied to the same class of enemy unit, if present, otherwise to the highest strength enemy unit (in “pips” of strength.)
Unopposed bonus and targeting
Here’s where things get interesting and really make fleet composition something to consider. Any capital ship (CV or HS) firing with no enemy equivalent in the fleet gets a hit bonus and hits on 4+. An unopposed CV can target any unit, focusing fire until it is dead (rather than spreading hits around on the strongest units.) And subs always can focus fire (except against other subs) making them a danger to the CV’s and HS’s – – if they survive the early rounds of fighting!
The impact of these simple rules tweaks from the standard model leads to much more interesting naval construction, fleet composition, and station keeping than your typical ETO game where navies are often represented as abstract “points.” The discretionary targeting makes battles more interesting too.
Opposition Discs and supply
This is where it all comes together.
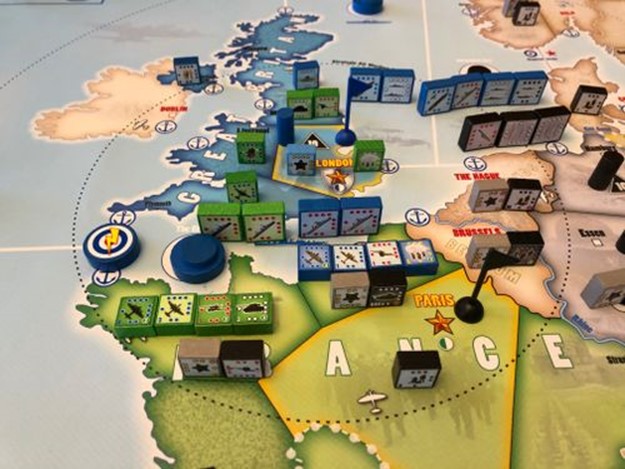
Each sea zone is either friendly controlled or contested. To maintain control, your side has to maintain double the number of enemy naval units PLUS opposition discs, in the area. Opposition discs are granted by owning nearby islands or bases, and represent land based air and nearby logistical support providing an advantage in naval operations. This is in my mind the single biggest advancement that Emanuele brings to the ETO genre. It feels almost Euro-like in its simplicity, but reflects the profound importance of controlling key strategic locations. Mechanically it is simple to execute because each sea zone lists right on the map which islands/forts impact that zone, so determining control is trivially easy.
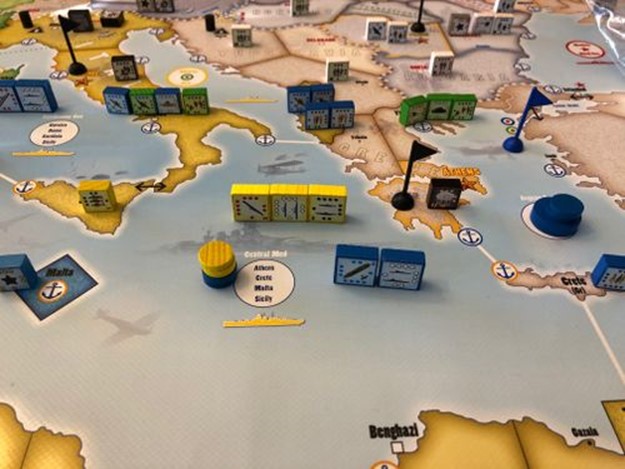
Example of Contested Sea Zone; 3 Italian ships + 2 Ops = 5, vs 2 UK ships + 2 Ops =4, so not double.
Compare to the following picture…
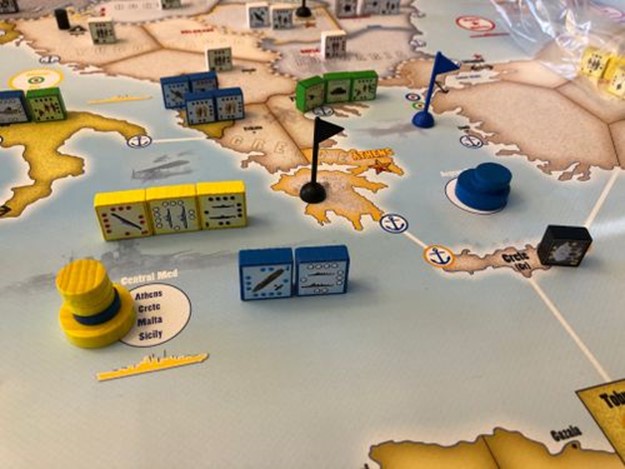
Example of Controlled Sea Zone. The German Airborne conquest of Crete flipped one Ops disc to yellow (Italy owns Ops discs in the Med) allowing for Axis Control: 3 ships + 3 Ops = 6 vs 2 + 1 = 3 for UK. (Note the blue Ops discs in the Aegean were not updated for this example and are incorrect.)
Supply can only be traced through friendly controlled or contested sea zones, and in the campaign game reinforcements (adding pips of strength to on map units) can only be delivered through friendly controlled areas. The implications of this are huge and become apparent once you get the game down on your table. Black Swan gets this much better than any other ETO game I’ve played…simple to understand and execute, with historical underpinnings and strategic gameplay puzzles to work out. Bravo!
 Physical Components
Generally, the physical components are good, and very good if you purchase some of the extra stuff like the Flags and Markers set and the larger vinyl map.
 The map is clear, easy to read, and with the low stacking limits (4 per space applies to land and navy units) the areas are large enough to hold everything easily. It’s a bit colorful, but doesn’t reach garish in my view. Lots of helpful hints are scattered around the board, but it is missing a few things like a place to track your production points as you spend then. I made my own tracker since you often spend 75+ points 1, 2, or 3 at a time.
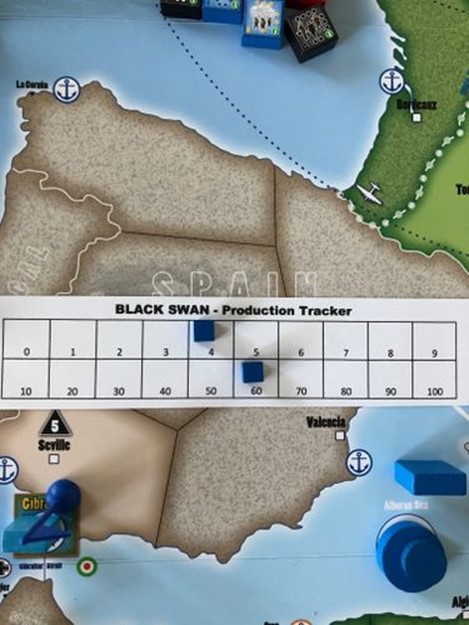
Homebrew Production Tracker
Turn sequence on the map. I added the wooden pieces to keep track of where each nation is in the sequence.
 The key resource producing and strategic areas are clearly marked, and well-spaced around the map to ensure areas like the artic/Finish front and North Africa see play. While there is no separate resource types (oil, steel, foodstuff etc) at this high level that is appropriate – and Baku and Ploesti are resource areas as expected.
 One glaring but minor omission is on the dice. In other Vento Nuovo games we were provided (at least in Kickstarter copies) with several sets of colored dice, for each side. Not so here, where only four white dice are provided. I think 16 dice, of 8 in each color, is minimum needed to speed play.
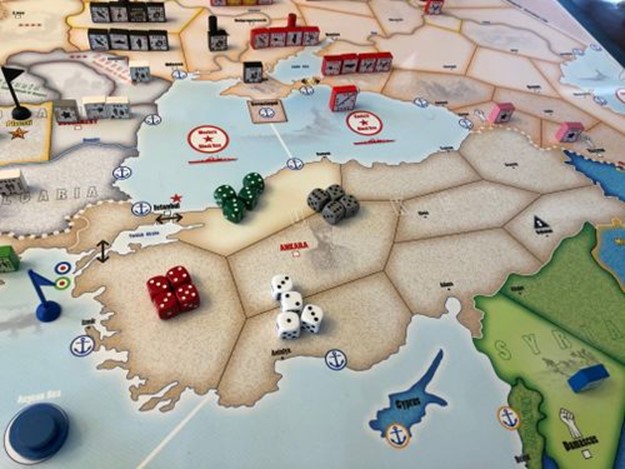
Bring some dice reinforcements! Turkey makes a great place to roll them.
In summary, I find the game visually appealing. It has strong three dimensionality to it, with the flags and resource cylinders (included in the extras) making the key areas to attack and defend very clear, and the game, like most block games, has a satisfying tactile element.
 Rules and Player Aids
Rules are also good, but not perfect (what set of wargame rules are?) It seems like Emanuele self imposed a limited number of pages. He writes very concisely, almost tersely, and while clear, it takes a bit of time to parse very dense paragraphs. Some repetition, more examples, and a more complete glossary would serve the rules well. Also, it can be a bit difficult to find things since the rules don’t follow typical case-based organization and are more narrative (i.e. paragraphs of text.) To take one example, only in the glossary (that I could find) is a rule that neutral major powers, except the US, conduct production each turn.
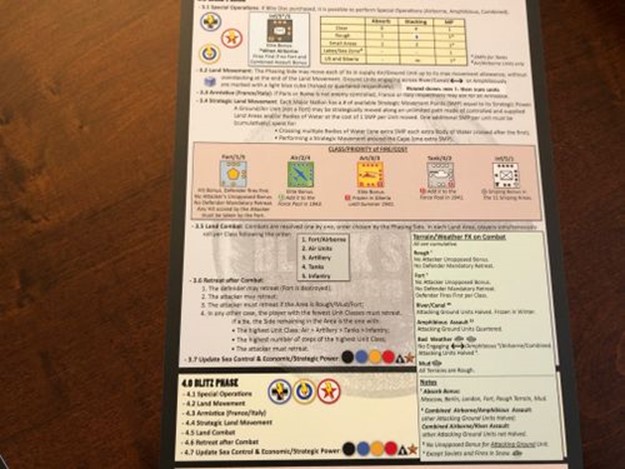
Player aid.
The player aids too, are a bit too densely packed for my liking so I tend to ignore them and go straight to the rules. That said, the game is straight forward and intuitive enough that you rarely need them.
To be fair, though, I’d call these rules better than average for a wargame, and if you take them literally, without reading anything into what is NOT said, you’ll be okay. Also, the game is pretty simple so they are mercifully short, without tons of exceptions to remember. Also, Emanuele is very supportive here on BGG and will answer any questions typically within 24 hours, if not sooner.
In summary, I was able to learn the game and leave behind the “Am I playing this right?” feeling within one long play session.
 Strategic Warfare
This is another element that is handled better than games that came before it. The Strategic Warfare systems are easy to understand and execute, historically plausible, and provides a neat puzzle for players to think about.
The air war in particular is really cool. There are two circles on the map, both centered on the UK. A smaller diameter one represents the range of Germany’s air efforts in the Battle of Britain, with mid-sized bomber and shorter ranged Me-109s. The larger circle, which reaches deep into Europe, represents the Allies longer range large bombers and P-51’s (and others.)
Image of Strategic Air Circles, courtesy of @Probe9
Each turn, during the production phase, the active country is attacked if the enemy has at least 8 factors of air in the appropriate circle. If they do, the active/defending nation adds up its air factors in the same circle and the Strategic CRT is consulted – with no die roll. Hits are inflicted on both attackers and defenders, as are production losses. (On the table show below, the three values are: attacker losses – production lost – defenders lost.)
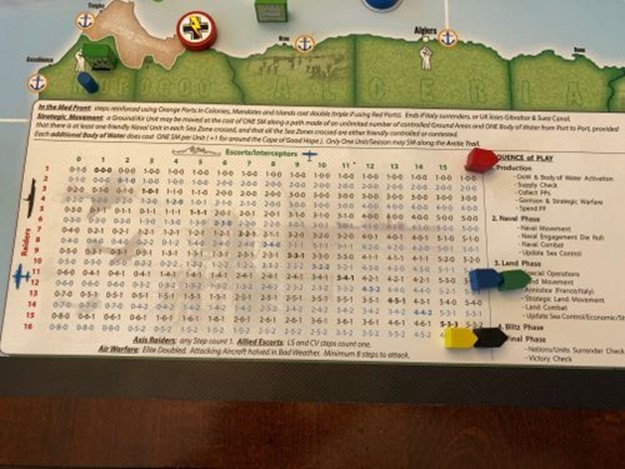
Strategic CRT
Great mechanic. Easy to implement, feels really historic. By late in the war in my games, the Allies were routinely hammering Germany for up to a quarter of her resources, and by 1945 it was half. As Germany, by 1942 I had to decide if bombing the UK was even worth the attrition, and often would pull units out of range to retain them for tactical use.
The U-boats too are a factor, and use the same table, but here it’s calculated sea area by sea area. In my first play through I was concerned that U-boats were overpowered, and started a thread on that, but a subsequent playthrough starting in 1943 made me question that assumption. In that latter playthrough, Germany was so hammered on all sides they gave up on U-boats entirely by mid 1943 (which coincides with Black May when heavy losses led Doenitz to order a temporary cessation of the wolf packs.)
 Blitz and Special Operations
The Special Operations mechanic is clearly derivative of a similar mechanic in Europe Engulfed , but in Black Swan it’s been streamlined and buffed to a high sheen. What in Europe Engulfed always led to a rules look up, due to the number of operations allowed, and their complexity, in Black Swan, the Blitz discs simply allow for a double land combat turn and amphibious and airborne operations.
D-Day!
The double land turn is huge, and allows for exploitation of breakthroughs. It neatly enables the amazing progress of German arms in France and during Barbarossa, and then flips the script in 1944 with the near complete collapse of the Wehrmacht in the East.
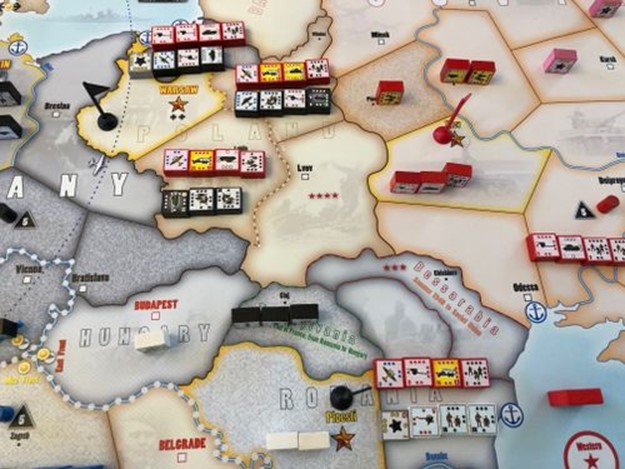
Operation Bagration, example of Blitz!
Airborne can drop alone onto islands (think Crete) or together as part of a combined operation to support other troops, typically to cancel the penalty for crossing a river. Likewise, amphibious landings are mechanically simple, but land units bring only a quarter their strength to the gun fight so strong supporting air and naval forces are recommended! I was able to pull off D-Day no problem, but only after planning and staging for many seasons.
 Ground Combat
Two thousand words into a review of a ETO wargame and no mention of ground combat? Yeah, probably should get to it.
Here too the designer leans heavily on what came before, which helps simplify learning (at least for experience block wargamers) but adds a few interesting twists to make it unique.
Combined Arms
Similar to naval units and combat, there are four types (plus forts) and they also have a hierarchical firing order: Air, then Artillery, then Armor, last Infantry. Forts are a bit of a special case, they fire first (before Air), but I’ll cover them in their own section. Ground (and air) units all hit on 5+, rolling a die for each strength point. Again, keep in mind max stacking of 4 per side per area.
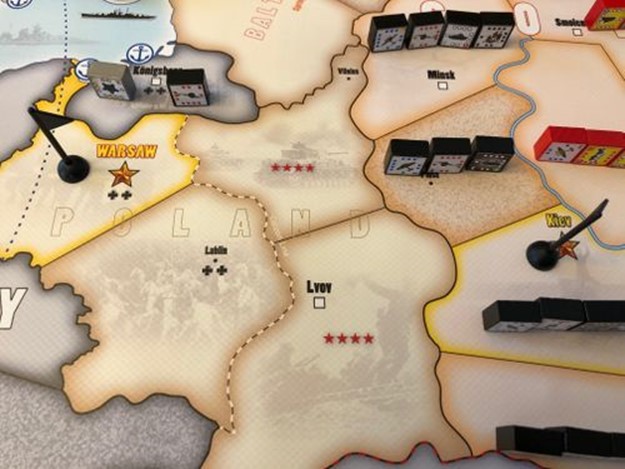
Combined army force defends Minsk
There are two things that make ground combat in Black Swan unique. The first is based on how victory is determined. When enemy units share a land area, they fight only a single round, which means there are often survivors from both side remaining. Unlike most block games, though, it’s not the case that if the defender survives, the attacker automatically retreats. Instead, the game encourages the use of combined arms by forcing the army with fewer unique unit types to retreat. For example, after combat if the attacker has three surviving units (one each of air, artillery, armor) and the defender has four infantry, the defender retreats, since they have fewer types.
The benefit of combined arms is obvious, and made more so by the Unopposed Unit combat rule. Similar to the advantage unopposed capital ships enjoy in naval battles, any ground or air unit that is unopposed with a similar class unit gains a bonus and hits on 4+ instead of 5+.
National characteristics
Another other element of ground combat that becomes apparent only with play is how each nations force pool drives a certain style of play. For example, the Russians have some beastly Elite Artillery units (the famous Siberian shock armies.) First thing to note is that Elite armies (which are have darker colored backgrounds, but share the same block as normal units) get an automatic hit bonus, so hit on 4+. If unopposed, they hit on 3+! Back to the Siberians…at first I couldn’t figure out why they were artillery armies (did artillery armies even exist?) but it’s really just an in game way of showing that, one, Russian’s did have awesome massed artillery, and two, they just get to fire first, before armor! Since unit classes hit their own class first, before “spilling over” to other units types, the German artillery soon learns to fear those Shock Armies.
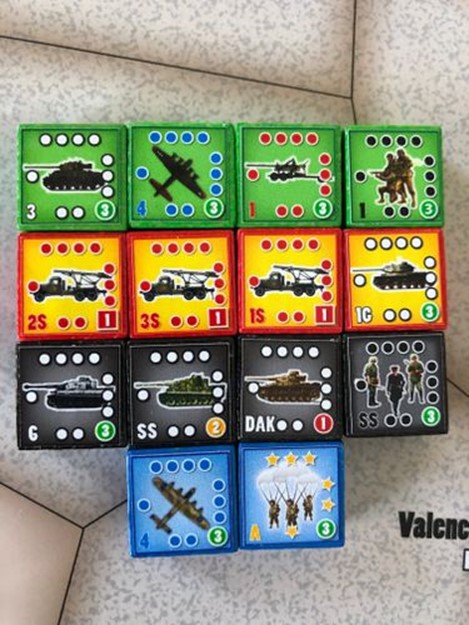
Some of the game’s Elite Units
The Germans, though, are not without their own advantages. Not only do they have more Elite Armor, but even their normal (non-Elite) Air units have a max of 4 strength, vs the Russian air’s max of 3. That sounds small, but like much else in BS its significance becomes clear with play. This is because the retreat “tie breaker” rules. As noted above, whoever has fewer unit types remaining must retreat, but often both sides have the same. So, next check who has the single “highest level” unit class (Air>Artillery>Armor>Infantry) and if both side have Air, then the side with the most Air strength pips wins the tie and the other side retreats. Another example of subtle game design here. No extra rules or chrome or exceptions to memorize – the dynamic of German air superiority over Russia just comes out organically.
On the Western Front, though, when it opens up….forget about it. The Allies have two or three times the Air strength of Germany, and by then the Luftwaffe is on fumes…
Quick comment on the US – they have a relatively small force pool rich with Elites. Sounds great – but – reinforcements to Elite units are limited by each Nation’s Strategic Power (SP) which is determined by how many of the 19 Strategic Locations that they control (the stars on the Map, or Flags if you have the Extra’s pack.) The US shares its SP with the UK, so between them they can only reinforce Elite 5-8 steps per turn. A nice reflection of the logistic challenges they faced.
 Forts (and a lengthy sidebar on Random Reinforcements)
Forts, Terrain, and Weather interact in a way to impact each nation’s strategic efforts and tend to drive historical play, without rules guardrails to guide or limit them.
Forts provide the defender with several advantages.
 First, they allow ALL defenders to fire first, regardless of class.
 Second they allow defender to never retreat, until the Fort is destroyed.
 Third, they cancel any attacker Unopposed Unit Bonus.
 And if that wasn’t enough they also provide an “absorb” bonus to cancel the first hit.
There are quite a few forts in Russian and German force pools, but this leads to one point that definitely might turn some folks off:
Random Draw Reinforcements
In Black Swan all available units are pulled randomly from the force pool when built. Need an air unit? Well, you can only build as many new units are your current Strategic Power (described above – basically how many strategic areas your nation controls) and if you pull four infantry when you want air, or a fort, well, too bad.
I’m torn on this mechanic. In truth Emanuele uses it a lot. In other games of his, like Moscow ’41 and Stalingrad: Inferno on the Volga, I really dislike it. In operational games of that scale, where units have actual historical designations and we know, basically, when they entered the theater of operations, I don’t think it makes any sense. In Black Swan, though, at this level and with much more generic units, which don’t have exact historical corollaries or identification, I don’t mind it nearly so much. And like other attributes I’ve mentioned, its impact isn’t clearly understood until you play the game. Obviously, you tend to need something (say, an air unit) because so many of been destroyed, which means there are lots in your force pool to draw. Also, except for times of extreme national distress (like Russia in 1941 and Germany in 1944/5) most nations have all or nearly all their force pool on the map. In short, I don’t think it impacts much and it doesn’t bother me. The one upside I see is that, given how strong Forts are, I like that you can’t just guarantee one whenever you want. And, since Forts are on a different color block, its easy to house rule, if you really want to, that forts are a sperate force pool (or just ditch the random pull rule altogether!) House Rules – one of the joys of board gaming!
 Terrain and Weather
Okay back now to terrain and weather. The easiest way to think of terrain and bad weather is like natural Forts. Rough terrain (which represents mountains, swamps, etc.) gives all the benefits of a fort, except the “defenders fire first” rule. As a result, in rough terrain you’ll find that just throwing Infantry into the meat grinder is nearly as good as a nice balanced combined arms force – remember as the attacker you cannot get the Unopposed bonus (the defender does though and will punish you) and you cannot make the defender retreat even with more unit types. Again, the subtleties come out with play even though they are not called out in the rules.
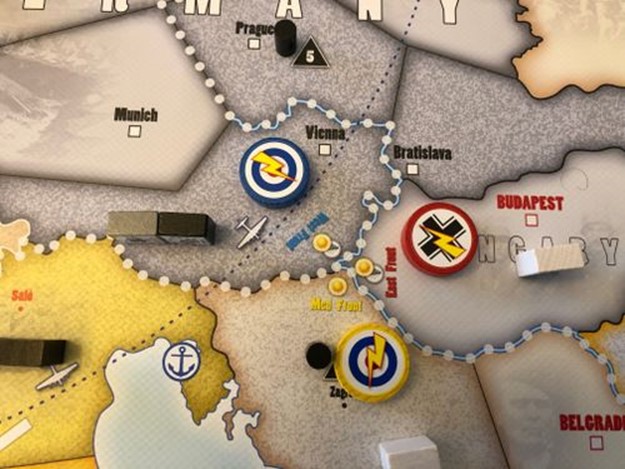
Closeup of map showing the three Fronts (East, West, Med) and their respective weather icons. Also shown are the Blitz discs.
Bad weather (mud in particular, which happens in the West and East Fronts in the Fall) converts EVERY space to Rough – AND – cuts attacking units strength in half. Do yourself your troops a favor and and in Fall’s mud give them a rest, and a cup of tea (or vodka/beer/wine/national beverage of choice.)
In Winter, clear terrain stays clear and rivers freeze (no half strength for attacking across a river in winter) – but – attacking units are still halved. Oh, except for Russians and Finns. So while Germany might need to hang back, get ready for the Red Horde.
 So, is the game any good?
At last, the end.
Well, I think it obvious that I wouldn’t take the time to write this if I didn’t really, really like this game. It does so much right, and simply feels like a well oiled machine. Most of what I like about Black Swan came out during play, and I sent a mental congratulations to the designer a dozen times for insights that emerged organically. He really found a way to invoke a wonderful narrative with little muss or fuss.

 Will you like this game?
A very different story, potentially. Died-in-the-wool-grognards? Not sure. The land units are pretty abstracted, and I miss the historical unit ID’s (with a few exceptions like the DAK armor unit.) As one BGGer pointed out, there are no railroad lines on the map, and no accounting for different gauges of track for Germans and Russians. This clearly just isn’t that kind of game. I feel it drives a strongly historical flow through the interactions of its systems, but it prioritizes gameplay over historical detail.
Also, unlike recent competitors like Columbia’s Victory in Europe and GMT’s Triumph and Tragedy, there is no “sandbox” mode here. Bulgaria will never be Allied. France will always fall (if it doesn’t by Fall of 1941 it’s an instant loss condition for Germany!) Turkey and Spain are not even playable – though the designer hints at an expansion for those. These elements could negatively impact repeat gameplay.
But I’ve a confession to make. I’ve already gotten my money’s worth. How many games do I own that I’ve punched, clipped, and played once, or set up and played a turn, and put away? (Too many is the correct answer.) I’ve already played this game probably 40 hours since Christmas. It’s been my full time job for a week. At one point, after finishing the 1943 scenario (playing it all the way through to the bitter end of fall 1945) I put Black Swan away, set up a different game, and then thought, “What am I doing? I’d rather play Black Swan.” Away the other game went, and I set up the 1939 campaign again. Even if I never play Black Swan again (unlikely) I feel my money was well spent.
I hope this review helps you make a decision about if your money will be well spent on Black Swan.
Thanks to the author for this. Good stuff! That feeling you describe of putting a game away but then wanting to immediately play again definitely resonates here. Maybe I’ll sell some stuff and make room for this one.
Nice review, but if you got your money’s worth out of one play, maybe you should reevaluate your priorities. This is not a cheap game.
Great review, it very much captures the best aspects of this game.