Developer’s Notes by Lionel Martinez
A Warning
Sacred Oil is a complex game. The procedures that constitute the game system are not overly difficult however. All air missions follow the same flowchart, each action is organised clearly, everything is as standardized as possible to make the game flows as smoothly as possible. But the three components of modern warfare – ground, air and sea – are present, as are the interactions among these components.
The level of detail required by the simulation’s intent – roughly what the design and development team wanted to see – makes the game complex. The player should plan and organise a series of different actions in order to succeed: you just can’t push your counters around and see what happens. You may need air superiority to be able to launch an efficient SEAD mission suppressing the enemy air defence that would enable a ground strike improving the chance of success of your assault. Helicopters could also join the party. And naval bombardment too if your vessel is not obliterated by a stand-off weapon before!
The player needs to know how to correctly use his forces. The standardized flowchart of each game procedure makes each action easy but orchestrating all necessary actions may seem complex. At least for a player new to the game.

Advice #1 – The Scenarios
Therefore, if you are new to the system, if you only played Under an Iron Sky, if you did not play Deadly Northern Lights in the last six months, do not begin with the Campaign. It has much appeal indeed but you may be simply overwhelmed, or play badly, or suffer from the too common command paralysis. The first advice is TAKE YOUR TIME. Set up one of the scenarios.
Scenario 1 – And It Became Blood
This one is perfect to learn the basics of sea and air interaction. It may seem one-sided given the ratio of forces but the victory conditions are crafted in a way that the US Coalition needs good success on its mission without suffering irreparable losses during the operation.
The Soviet should know that he will probably lose most of his forces: he must use them to make the US pay. His stand-off weapons and his submarines are the way to hit the enemy.
Scenario 2 – Behold a Great Red Dragon
This one is pretty straightforward: While you learn how to move your ground units, how you use your air squadrons, and how to combine both efficiently, it is also a good rehearsal of the invasion of northern Iran that would most probably happen in the Campaign.
Scenario 3 – And the Sea Gave up the Dead
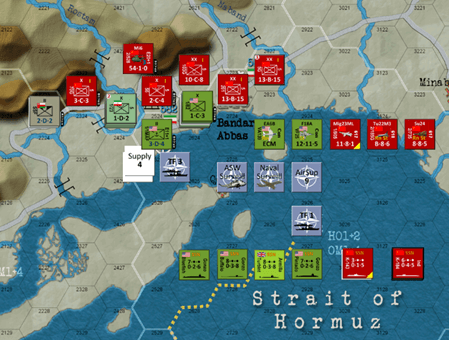
This scenario is probably the most difficult and the most interesting. The Soviet should run toward Bandar Abbas and mount some airborne operations while the US Coalition should prepare to disembark equipment, airlift personnel and transport airborne elements. The scenario could be a game of cat and mouse between the Soviet and the US forces while the Iranian forces get punched.
Look carefully at the Rules of Engagement (40.0) and the Casus Belli (50.9) rules, and pull the trigger at the right moment. This scenario is a training ground for the Campaign in the south and for what I now call ‘the Bandar Abbas gambit’. More on this later.
Scenario 4 – The Whore of Babylon
The last scenario explores the possibilities of actions on the Iran-Iraq front. As the scenario 2 it is fairly simple, but during war, even the simplest thing can become complicated, and even the most mundane thing can grow out of proportion. Training is therefore also required in this sector of the theatre of operations, at least to discover and explore the capabilities of the two opposing armies.
Some Tactical Tips
Now that you have played some or all Scenario, once or more, you are probably ready for the big show. Remember and don’t forget the basics.
 You need Air Superiority in some megahexes but you cannot afford to fight for it everywhere. The US have very powerful aircraft which associated with AEW could grant them Air Superiority even against high odds. But don’t forget that all A+ A and B rated air defence systems are able to shoot at aircraft during the Air Superiority Combat Sequence. It is a cunning way for weakening the US air assets. From the Soviet perspective, the air war is a war of attrition more than anything else: the Soviet player will lose many aircraft but has plenty of them, the US has few aircraft and hence can’t afford to lose many.
To sum it up, the US should gain Air Superiority to reduce Soviet ground support, the Soviet should use Air Superiority to wear down US air force. What is important is therefore the attrition rate. Iranian air units will probably not live long if they try to deal with the Soviets alone: Hide them and wait for the coming US forces to use them. And don’t forget to use your ECM squadrons: Choose wisely where and when to use them.
Another important point is the air defence network. A tight air defence is probably better than a loose one. Many air defence units mean many rolls of dice against each enemy air unit and only this could really raise the attrition rate. A true Area Denial strategy can be realized by concentrating AA defenses, up to the point of forcing the enemy to renounce to air missions in a specific area; Of course, the price to pay is a weaker air defense elsewhere. SEAD missions are used to suppress an air defence unit: strike the most potent one if you could not suppress all.
Helicopters are the combat system of choice for ground support. They can fly low (NOE) to avoid most of the air defence units except of course the units in the target hex. They are more brittle than air units: a Damaged result is instead a Step Loss. Remember that air units are readied only once per turn whereas helicopters could be used in each Action Phase.
Going too strong in one place usually means being too feeble in another. But some targets are so tough (US CVN for example) that you must commit a lot of resources to have a chance to inflict damage. On the ground it is often wise to heavily engage even a feeble enemy unit since ground support may greatly improve the defence. If you need to win the combat, invest enough resources to achieve this goal, i.e. raise your probability of success to a sufficient level. You must however know that bad luck often shows its ugly head at the worst moment.
 Good fortune could also turn a desperate attack into an amazing success. Don’t be too shy. As the Soviet, use your submarine to attack the Core sector of the enemy Task Force where the most valuable targets are. This means that you will be attacked by the ships in the Outer and Inner Sectors before being able to launch your torpedoes. It is a valuable risk. Attacking the escort before dealing with the Core Sector is also a good tactic if you have enough resources and time for that.
Organizing your Task Forces correctly could also make the difference. You will have to deal with different sort of threats, mostly submarines and missiles attacks. Remember that depending on the Detection Level attained the enemy will know the exact composition of each Sector, so don’t try something too foolish, such as a CGN in the Outer Sector, in the hope to lure an attack into a Core Sector devoid of a valuable target. Don’t forget to place your ASW and your Naval Surveillance markers. Don’t forget that ships On Patrol can try to intercept during the enemy Movement Phase.
If you have some experience with the game system, either with the preceding games in the series or with smaller scenarios, I recommend using the Detailed Supply rules for the Campaign. They add a new dimension to the game since you will have to manage your line of supply in more details. This of course increase the workload but enhance the simulation value greatly. And don’t forget the Interdiction mission and to destroy bridges: both may have interesting effect on the enemy lines of supply.
Remember that you need focus and resilience: don’t be lured into a trap, stay on the path you have chosen, suffer drawbacks and defeats with courage and stubbornness. Try again. And again. But if your tactics don’t work, adapt them a bit if you can. Don’t make foolish things in false hopes of huge successes. Bad luck is not the same thing as bad tactics. Be aware that the reverse is also true: bad tactics is not the same thing as bad luck. Try and learn. Know the capabilities of your armies and use them accordingly.
Sacred Oil even enables you to build the forces you will need for the mission you have. Here begins the Campaign.
Advice #2 – The Build-up
Sacred Oil use Event Cards to build up your forces. These cards are therefore very important. LOOK AT THEM CAREFULLY. Look at the forces they mobilise, look at the readiness of these forces, take note of how many turns they will need to mobilise and arrive where you need them on the operational map.
With the Cards you build the forces you will use on the operational map. It is an important and interesting addition to the 1985 series. This new feature wasn’t necessary in the previous volumes, since the player was just allowed to use some reinforcements earmarked for the Scandinavian area in Europe instead. Here, with the LOC chart becoming a LOC map of the entire world, the two belligerent factions must choose their allocation of forces on the different theatres depending on their ultimate objective. And hence you need a plan.
Advice #3 – The Tension Phase
HAVE A PLAN. Even a bad one is better than no plan at all. Stick to your plan: you will perhaps not be able to drastically alter an axis of advance.
The Soviet player is the driver of the game. As the aggressor he can take the decision to start the hostilities whenever he wants. But before that he has to choose between two options: a limited goal in the Persian Gulf, or a more ambitious one in Europe. This in turn would determine his allocation of forces and his play of Event Cards.
The US Coalition would be able to react by some of his own Event Cards depending on the current Tension Level. Depending on the ultimate goal of the Soviet player, the US Coalition player have to or shouldn’t raise his commitment in the region.
A very easy game mechanism captures the increased political tension and reaction. The victory conditions change depending on the ultimate goal of the Soviet player. The US Coalition player is in a thick fog of war until the end. The Event Cards, the new mechanisms of Commitment Level and Tension Level, and the whole world LOC Map put the game in a very different category than many others. The build-up and allocation of forces are very interesting and seldom seen in operational wargames. I have played different openings without really continuing on the operational map: positioning the forces, making the opening operational moves, and assessing the operational situation that resulted was enough to have fun. The Tension game will probably have a life on its own on many tables.
Some Strategic Tips
For the Soviet, the campaign starts by mobilizing the Military Districts in the south of the USSR. At GT+5 most units are ready to launch an invasion of Iran from the north. A second echelon is due to arrive at GT+8 and a third at GT+17. GT+9 could therefore be the starting date for OP BAIKAL.
I would perhaps even advise to start earlier than that to limit the Iran reinforcements and the state of readiness of the US forces in the theatre. Except of course if the aim of the operation is to draw US resources in Southwest Asia before starting the real thing in Europe. What is more difficult for the Soviet is the decision about and the starting date for OP LADOGA.
A cunning Soviet player, depending on his ultimate goal (BAIKAL rather than LADOGA), could play Cards in a way to prevent the rapid rising of the Tension Level. One of the most important Cards at the beginning for the US is probably the 7th MAB. The equipment of this unit is already in the theatre at Diego Garcia, and in three turns, it could be delivered in Bandar Abbas and manned by its airlifted personnel. But this Card required a Tension Level of 4, which roughly means four or more turns of card play.
 The Soviet could try to keep the Tension Level low in order to reach Bandar Abbas with its airborne troops from Afghanistan first. Moreover, the US Coalition could be prevented from debarking there by the Commitment Level of Iran.
The Soviet Invasion of Iran could of course raise the Commitment Level of Iran to the necessary level for cooperation between the two former enemies. Reaching Bandar Abbas before the Soviet, on GT+10, is therefore possible. It could be a close-run thing, or a failure by just one turn.
This Bandar Abbas Gambit is an interesting opening for the campaign. An even more cunning Soviet player could play softly at the beginning in order to lure the US Coalition player in a wrong assessment of the situation by deliberately differing the start of OP LADOGA. A very powerful and delayed beginning could be a trap for more US involvement in the region whereas the main goal is in Europe. Many different combinations are possible. Now, you can try some of them by yourself.
A Reward
Sacred Oil is a demanding game that requires dedicated players. It rewards them highly of course. How? By the insights it will give you due merely to the level of details required by the game. The game will give you back what you invested and a bit more.
That is enough but playing the game could also add the obvious satisfaction you feel when, as the Soviet player, you take Bandar Abbas on the third attempt after two utter failures, or when, as the US Coalition player, you secure the city just in front of the advancing Soviet host.
Some games give a strong narrative, some are good models, some others are a great challenge, a few are all these things together. Sacred Oil is one of the few: a demanding and detailed model of modern warfare that conveys an exciting and strong narrative.