Editor Note: The gang from Red River deliver another action packed AAR using the superb scenarios compiled from the LOF magazines in the Compendium.
The challenge here is the fellas have too many chits for the Soviets as they are using the formations from Op Garbo. This up ends the balance of the scenario. Don’t forget you can always look up what is in a formation by referencing the published OOB’s online or do as I often do and check the formations out in the VASSAL module, which I see they did to obtain correct FP and DF values!
The rest of what happens falls to tactics and engagement, but lets let them tell the story!
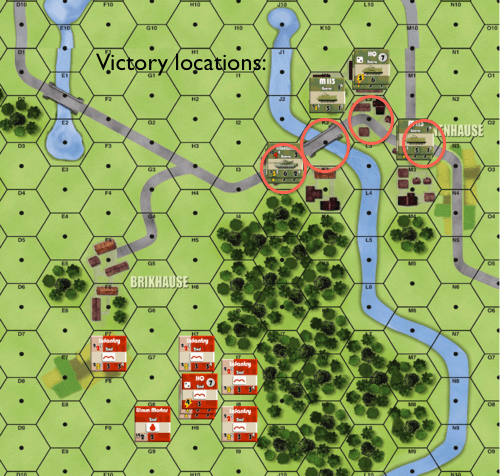
The scenario objectives are for specific hexes to be acquired. J2 k2 l2 and m2. The scenario lasts 7 turns. This is Day one of the invasion it will be critical for the Soviets to occupy the hex locations to secure the advance for 1st Tank. 2nd Airborne is on its way. Note these are the same units that occupied Tanenhause in Raid and Riposte from LOF 12, the new game from LNLP.
Red River Gamers playing Compendium: Death from the Sky – an American Commander realizes sometimes quality can lose out to quantity!
First my colleague & I drew counters to see which side to we were going to play – he drew the Soviets while I drew the Americans – first time playing the good guys in a while!
Then we had to decipher which way Boards 1 & 2 went since there wasn’t any description or image showing how they went. But after juggling the boards around, we figured that Board 1 went on top of Board 2, board numbers on the same side represented East.
Next we had to figure out what units to pull since neither of us had the Eisenbach Gap module for the Soviet’s 2nd Airborne Division & 1st Tank or the American’s Team Bravo & Delta Dogs. For the Soviets, we used Operation Garbo’s 76th Guards Airborne & 47th Tank. For the American’s, we used B/1-32 Armored Company from Blood and Bridges & 1/68 Armored Company from Death of the 1st Panzer.
Although our Americans didn’t have Abrams, ITV, & Dragons, we used Vassal to get the right values to simulate in our game.
Finally, since the scenario didn’t say how many formation markers to use, I remember Jeff Lewis’, comment from a post in the forum, use what came with that unit. Little did I know that statement would have a big impact on the game as you will see in our report.
Illustrations provided by Vassal’s program using the right formation counters.
So here’s our After Action Report…
Turn 1: The Airdrop; the American commander sets up his forces to defend the town of Tanenhause from an anticipate attack from the south. However, the Soviets pull of a near picture perfect airdrop in the American’s blind spot. One platoon drifts into a farm’s field without incurring any injuries.
Meanwhile the Soviets regroup and head for the shelter of the woods while the separated platoon head for shelter in the town of Brikhause.
Realizing that his threat is now coming from the opposite direction, the American commander shifts forces across the bridge to meet this challenge.
Instead of exposing themselves, the Americans wait for the Soviets to move closer for an Opportunity Fire.
Turn 2: Contact! As the Soviets rush from the woods in an attempt to Assault Combat, the Americans open fire and stop them in their tracks!
With troops disrupted and reduced, the Soviets rally and begin a slug match with the Americans.
The Turning Point! Not only does the Soviet get one chance at the Americans, they pull their second Formation maker before the Americans can get another shot at them! First, their mortars hit the Abrams causing it to be disrupted.
Then that separated platoon, in Brikhuase, open fires with their Sagger & inherent firepower causing further damage to the Abrams & infantry platoon.
Then Soviet Paras adjacent the town open fire and hammer away at the Americans causing further reduction in forces to include the HQ’s unit.
Although weaken, the Americans do put up a good fight.
But that only delays the inevitable…
Turn 3: Assault! Before the Americans can get a chance to regroup or get additional forces, the Soviets open fire again.
That separated platoon takes out the Abrams, two platoons conduct preliminary attacks on the remaining Americans, but they defended well.
Then the main Assault from the HQ stack of Paras forces the Americans out the buildings and to retreat across the bridge leaving the Soviets in command.
The Americans do get a chance to shift forces, but cannot bring to bear any firepower or any reinforcements…
Once more the Soviets Assault those on the bridge and taking out the Americans this time.
However, the exposed Soviets come under fire from those remaining American units.
Turn 4: The End; the Soviets get another chance to Assault pushing the Americans out of the town leaving them in command of most of their objectives.
With no hope insight, the Americans withdrawal to lick their wounds and get ready for another day…
Lessons Learned:
1) Americans were understrength, could use a few more units or some HE Fire Missions. May be give them the Airstrikes instead of the Soviets
2) Although the Soviets had to Airstrikes and didn’t use them, sheer numbers worked to their advantage
3) Since the Soviets had two Formation Markers instead of one, it gave them an extra activation at the critical moment in battle thus turning the tide in their favor – which could be said for any formation.
Related articles
- Into the Breach – scenario AAR – The Flood [p1/3 (meshtime.com)
- There are no Innocents: WaW by Red River Gamers (meshtime.com)
- Raid and Riposte [Line of Fire Magazine #12], (meshtime.com)


