Ground Movement
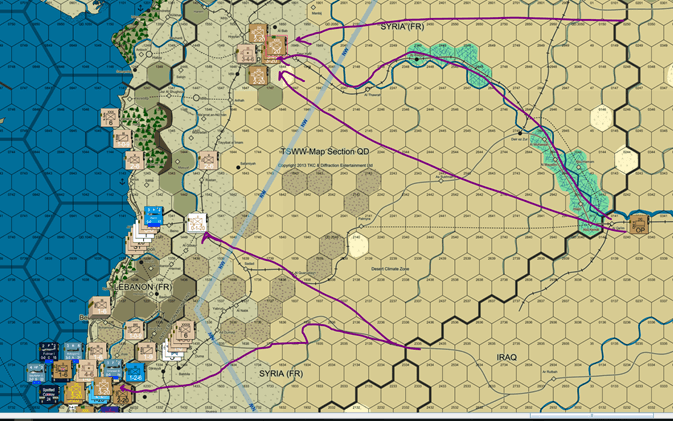
The Allied offensive then kicks off in earnest. Neither side has the air assets to fly BAI (battle air interdiction). So Allied movement comes next. The Allied forces can literally almost reach anywhere they want in the Levant (with 20 MP units), but supply and the need to guard against a Vichy counter-attack limits Allied ambition. On the Palestine front, the two Australian Brigades and Free French will attack cross the Litani River, aided by just-landed Layforce and a massive naval bombardment. The Free French and Indians will attack up the Bekaa Valley. The Czech battalion guards the flank against reaction movement. The Australian HQ is positioned to provide Offensive Supply to both attacks – must be adjacent to stacks to provide Offensive Supply (15.P.2.c).
On the desert flank, Hab force races all the way to join the Bekaa Valley assault. The Arab legion occupies the airbase at Homs, a key communication point, and then scurries north to participate in the assault on Aleppo. Indian forces mass at Aleppo. All forces use tactical movement (printed movement allowance), except the Arab legion, which uses Operational Movement (1.5 MPs; cannot enter ZOI unless 1 SP present). The Arab legion is too small to gain permanent control of the hexes through which it passes, as it is only a batallion (7.H.1.a.ii).
.
Other Air Missions (6.3.b.3.a). Before the combat phase, other air missions occur. For the Allies, this consists of flying Transfer missions for the aircraft currently at E-1 in Iraq. Range for a transfer mission is 6 x printed movement. From Habbaniya to the airbase in Palestine is 33 hexes. That is well within transfer rang of the motley collection of planes in Iraq. They can be more easily supplied from Palestine via the RSR:
Combat Phase.
In the combat phase, the phasing player declares combats and then flies Combat Air Support (CAS) (6.3.c). The Allies declare attacks at Aleppo, and the two previously-indicated hexes in Lebanon.
CAS is important not so much here because of the raw combat factors added (absent Code T, OBFs are divided by 4), but rather because flying more squadrons conducting CAS to a hex gives that side a +1 in the ground combat (5.B.6.c). The Allies know that German night bombers based on Rhodes remain to provide CAS to Vichy. But the Allies must send their missions first. They are flown as follows:
1. The Blenheim bombers and Valentia B/Ts based at Habbanyia fly an extended range CAS mission to Aleppo.
2. Blenheim Wing based at Haifa fly a short-range mission to the Litani front.
The Axis have no fighters, and cannot intercept these missions. For its CAS, the Axis send their wing of He111H-2 NBs to the Litani front. The Allies had sent 3 squadrons to Aleppo, and thus are guaranteed the +1 DRM for more CAS squadrons there. The Tomahawks flying gunnery spotting over the Bekaa Valley can double as interceptors (8.K.4.g.iv) but the NBs are operating at night. The Axis decide nonetheless to send the NBs over the Litani, countering the two Allied squadrons, the Axis can negate the bomber DRM benefit there.
For exposition, we will resolve AA with each combat:
-
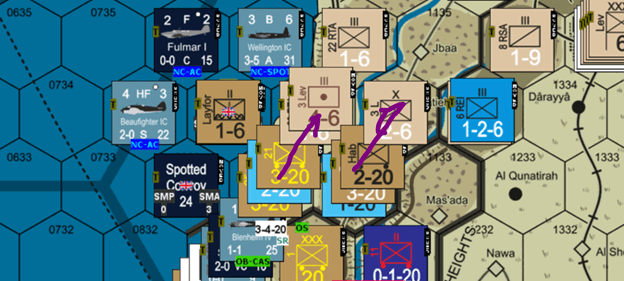
Bekaa Valley (1134).
In the Bekaa Valley, the Vichy 3L X has a printed defense of 2; that is multiplied by the CEV, which is 1. There are not other applicable modifiers (see 10.B.2). So the defense strength is 2.
The CW have 6 printed attack factors; the CW CEV of 1.3 applies to the Free French, as they are considered part of the CW contingent, and the force is in Offensive Supply from the adjacent 1st Australian Corps HQ [if not in Offensive Supply, CEV would be 0.75 instead of national level). That makes the attack strength 6 x 1.3 = 7.8 (The stony hills terrain is a modifier of 1). There are no hexside modifiers. The RN offshore provides NGS, with the fighters providing gunnery spotting. Only the Cruiser has range to reach the Bekaa Valley (13.Q.b.ii.4). With the assistance of the gunnery spotter, that yields 1.83 additional factors (11 x 2/3ds (damage to Cruiser) /4, the denominator for NGS with gunnery spotter). So total strength is 9.63.
8.33/2 yields 4.815. Percentile dice are rolled for the odds, and a roll of 92 rounds down the odds to 4:1. The DRMs are as follows: +1 for the Allies for Fighter Superiority in the Theatre (5.b.6.a). Another +1 for the Allies having more fighters in the hex (5.b.6.b). -1 for the Stony Hills terrain (see charts) for a net DRM of +1. The roll is a modified 8. DH, which eliminates the Vichy unit. Because the Allies take the hex, there are no combat replacements. Hab Force and the Indian X advance, which projects a reduced ZOI on the retreat route of the adjacent Vichy force; the 2d Free French regiment stays put.
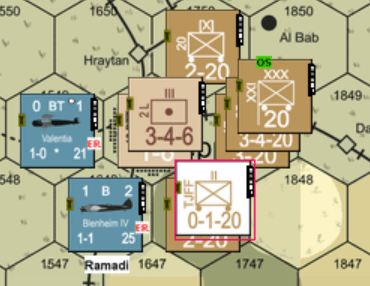
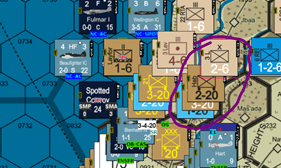
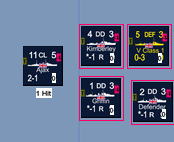
2.Aleppo.
The XXIst Indian XXX, which provides Offensive Supply to the three Allied stacks, assaults Aleppo. Vichy defense is 5 (CEV is x1 as explained). Allied printed attack strength is 10, which is multiplied by CEV (1.3), terrain (steppe, 1.5 because motorized; major city, .75) for 11.25.
Vichy AA (1 light factor) fires at the two British air units @ +2 (1 for Nat’l Technical Means; 1 for type B). The results are no effect (rolls of 6 and 4). The British bombers have 2 factors, quartered (not Code T) and halved again for extended range (.25). Total allied strength is 11.5. Odds thus are 11.5/5 = 2.3. Percentile dice of 18 make it 3:1.
DRMs are: +1 (concerted attack; 3 hexes); +1 for Theatre air superiority and +1 for more CAS factors; -2 for major city. So the attack is: 3:1 +1. Allies need to take risks somewhere, and Aleppo only gets tougher if Vichy can reinforce. The roll is a modified 5, resulting in a
QH. The Vichy Defenders lose the infantry regiment (half SPs eliminated), and the Allies lose the Arab Legion battalion. The possibility of this result (defender halved; attacker loses a quarter of defender’s SPs) is why the TJFF was included in the attack. Vichy had 2 SPs and the TJFF is 0.5 SPs. The Vichy artillery III retreats to 1549, and the Allied units advance.
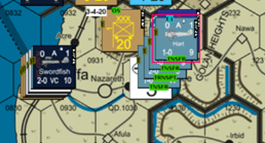
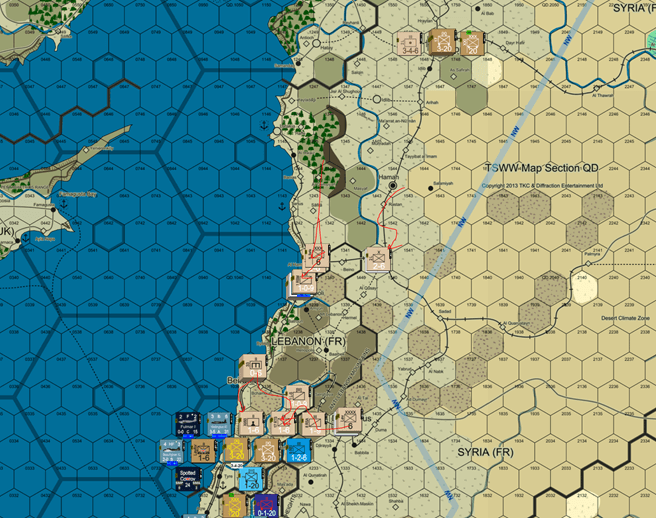
3. Litani River front. The final attack is the combined land-sea assault on the village of Aadloun, behind the Litani River.

The Vichy defenders are 5 printed (and modified). The Allies are 8 for the landward forces, which are multiplied by CEV (1.3) and terrain (1.5 for steppe; 1 river) for 15.6. Layforce adds 2 x CEV of 1.3 and 1 for terrain (2.6); commandos are doubled when conducting an amphibious assault (9.K.3.e.4). Allied ships are providing CGS, and total gunnery factors are divided by 8 (13.Q.1.b.ii.5 – maybe the gunnery spotter should have been here!). So the 36 gunnery factors add 4.5. The Allies thus can muster 24.65 in the attack. The French have no AA, so the Blenheims’ 1 OBF adds another .375 (1.5x for short range, quartered as not Code T), bringing the Allied total to 23.075. Although the offshore ships have AA, they don’t help the ground combat; so the Luftwaffe adds 3 x 0.25 (long range) x 0.25 of CAS, or .1875. Final odds are 4.44 to 1, which the percentile dice make 5:1. As can be seen, the Commando Raid helps here.
It does not end there, for Commandos can try for the +2 DRM for surprise without a detriment for failure (11.L.5.b; 11.M.1.a). An 8 is rolled, and the success table consulted. There is a +1 for ½ SP involved, and the modified 9 easily provides surprise. Allies also gain +1 for Theatre fighter superiority. However, there is -1 for the River (see 10.B.5). Final odds thus are 5:1 +2. The result is a DH; the infantry is eliminated, and the Vichy artillery retreats. However, the Indian X’s reduced ZOI causes the retreating unit to be eliminated (10.G.2). The Allies advance.
Reaction Phase
What is left of the Vichy forces, if at least 3 hexes from enemy ground units, and 3-7 hexes from hexes that were attacked, may move half their tactical movement rate in reaction (7.C.1.h). Vichy units move to secure key positions and prevent overruns in the upcoming Pursuit Phase:
1. The Brigade starting in Hamah (1544) moves to Homs. And the rest of the Vichy force along the northern coast moves toward Tripoli.
2. Forces in Beirut move south and infantry from Damascus reinforces them.
3. Engineers from Tripoli reinforce Beirut:
Situation after Reaction:
Pursuit Phase
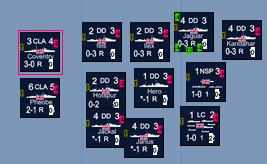
Naval Phase. Per Rule 9.K.4.iii.3, Layforce reimbarks on the LC that landed it. The LC returns to Haifa in a separate Convoy, having now spent 4 SMAs, half its limit before it ran out of fuel, and disembarks the commandos (who lack heavy equipment, and can be dropped off for 1 of the LC’s 14 SMPs . The Axis have no aircraft available to fly missions to interfere with the move (Type A and D may fly two naval cooperation missions per player turn, as long as in different segments; the Axis lack any). With the Vichy naval threat removed, TF 17 also returns to Haifa. The naval forces will replenish (16.X.6) at the Haifa naval base during the Axis player turn. Convoy 24 — now a TF (21), as no landing craft — remains at sea, less several DDs that returned to Haifi with TF 17, to provide NGS support if needed in the Axis player turn. Staying on station costs half of the ships’ SMA for the segment. In TF21 – composed of CLAs and DDs – the ships with the least range (lowest SMA) is 16 (DDs). Because SMA is per NMS, and a ship can stay at sea 4 NMSs under normal conditions, the SMA range of the TF is 4×16 = 64. 3 SMA were spent last NMS; 8 (half of 16) this NMS; so 11 total. As a practical matter, as noted, fuel is not the limiting factor on operations in this scenario. More important,the NTG marks its 2d NMS at sea. The Axis have no activities in their NMS.
Ground Movement. Because all Allied units were put in Offensive Supply, they may move full movement allowance (6.3.e). The Allied force in Palestine, could run wild around Damascus; however, that would expose it to defeat in detail from Vichy counter-attacks. So the Allies set up a defensive line, to hold their gains and protect their backfield. In the North, around Aleppo, the issue is planning ahead for supply the following turn. The QM around Al Qa’im in Iraq does not quite project a QMSR to Aleppo, and the Vichy might cut it in any event their turn. One Brigade return to Al Qa’im to protect the supply line. Two remain to hold Aleppo. A third, along with the Corps HQ, are positioned at Palmyra. Supply would be hard to cut to this force, given limited Vichy mobile assets.
Air Return Segment: Air units return to base — this means the precise base from which they originated. Positions at end of Allied Player Turn:
Better or worse than OCS RE? thoughts?
FYI, this is a repost from another player not me as noted in the first episode.