INTRODUCTION
Rewriting history
Market-Garden was indeed a bold plan by British General Bernard Law Montgomery, but numerous variables proved detrimental to the operation’s success. Thankfully, via HPS, we can experience what the actual field commanders had to deal with, and perhaps, improve upon what they could not. In games such as these hindsight is always the final arbiter.
Panzer Campaigns offer an extremely intuitive approach to fighting an operational war. Straightforwardness of the interface, commonsense rules, and very little micro-management makes all the Panzer Campaign games enjoyable as well as informative, and educational.
Keep your ambiguity in mind as we enter a real-time chronology of the fighting along Meuse l’Escaut Canal. The drive of XXX Corps, to the Rhine in Market Garden, required a massive initial drive to gain momentum. The crossing from Belgium into Holland at a dreadful pace is the task that now rests before us.
Below is the Starting Scenario for HPS’s Market-Garden, and a report follows after each of the 8 turns required to complete the mission.
For this scenario we will be using the Fog-of-War (FoW) feature, and no explicit supply. It’s a beginner’s scenario so we don’t need to confuse new players at the get-go.
Several of the units are in ‘fixed’ position to be released at a prescheduled time.
THE PLAN
My tent has that musty smell that reminds me of my basic training, oh so many decades ago. I look over the map that my aids had laid out on the wooden table the night prior, and I scan diligently at the main objectives. My staff stands encircled around the map table as well, waiting eagerly to hear the “go” signal.
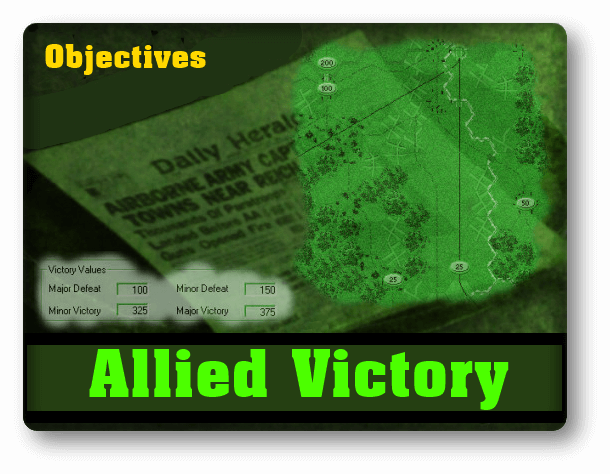
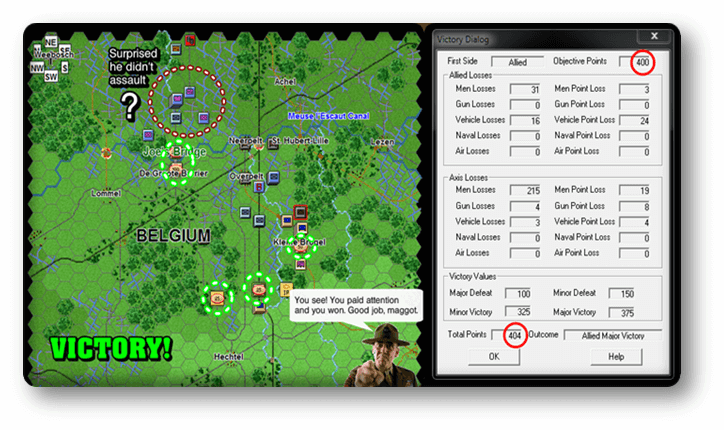
“375 points is all we need?” I ask while fixated on the map.
“Yes, sir,” my Chief of Staff replied. “And we’ve identified the objectives.”
The map clearly showed five blue-inked objectives for XXX Corps today. There were three smaller objectives circled in the central part of the map. These must be taken with expediency, I reminded my staff, and with minimal effort, as the bridge is the main prize.
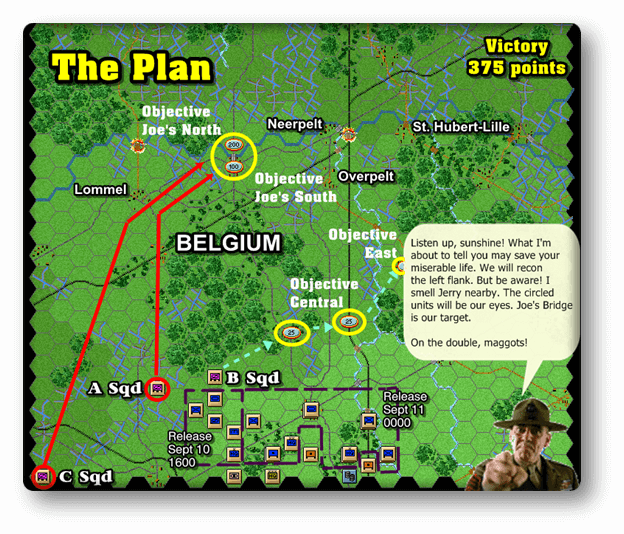
We spent the better part of last night planning how best to approach the task that lay before us. The objectives added up to 400 points, and I dare say we will most likely need to acquire everything we can get in order for this mission; this entire operation, to succeed.
I checked my watch, a gift from my wife back in Yorkshire. If this plan from General Montgomery succeeds, like he hopes it will, perhaps I will be able to watch my children open their Christmas gifts after all. If…
The plan was simple, really; recon the west flank, and get as far north to the bridge as possible. That will be the responsibility of squads A and C, while B squad will maneuver along an easterly direction, reconnoitering and capturing the three lesser, but by no means, insignificant objectives. This part of the operation is critical. Without those central objectives taken the rest of the group in standby will fall seriously behind schedule.
According to my Operations Officer, we have until Turn 8 to capture the main bridge; Joe’s bridge. It’s imperative we make haste and avoid any unnecessary contact with Jerry. “Always go for the objectives,” I reiterate to my men all the time. The victory requirements are your second bible; learn them well, and abide by them, and everything else will take care of itself.
It was already discussed in last night’s briefing that no reinforcements are scheduled via the Menu Bar.
“What of the accessibility of our on-map forces?” The Fixed Units Button reveals the dark blue of XXX Corps to be fixed and, therefore, beyond my initial control. “Consult the Release Dialog”, I instructed. Once again, an orderly produced a schedule of fixed unit releases via the Menu Bar. XXX Corps it was shown would be entrusted to my hands as two flanks – Left to be released on Turn 4, (1600 hours), and Right at midnight on Turn 6. With fog of war about the battlefield, none of these releases could be certain.
Just then, an orderly burst through the tent opening. “Sir, sorry to intrude, but word came down that a flight of Spitfires will be in the area to assist in the operation, sir.” Just the news I needed, and will keep that in my back pocket for now. “Very well, HQ expects old men on bicycles, but my instincts tell me otherwise. In any event, gentlemen, I want to minimize our losses while inflicting the opposite on Jerry. Understood?”
All were in agreement. They knew what had to be done, and how best to do it. I had the best staff this side of the Rhine, in my opinion. Some were veterans of Dunkirk, Sicily, and Caen. “Show no mercy if Jerry rears his ugly head, for he surely will return in kind. We kick off at 1600. God save the King.”
The delayed release of those valuable assets will surely hamper any attempt to correct a misstep should one occur. The recon units will bear the brunt of the initial fighting, should any occur, and it’s reasonably certain there will be. But my hands are tied, until they’re released on the 10th, and then the remaining force the following day.
The deferral in releasing the armor and infantry of XXX Corps certainly presented a tactical quandary. Recon serves to reconnoiter, gather intelligence, and above all, to avoid long-drawn-out contact with the enemy.
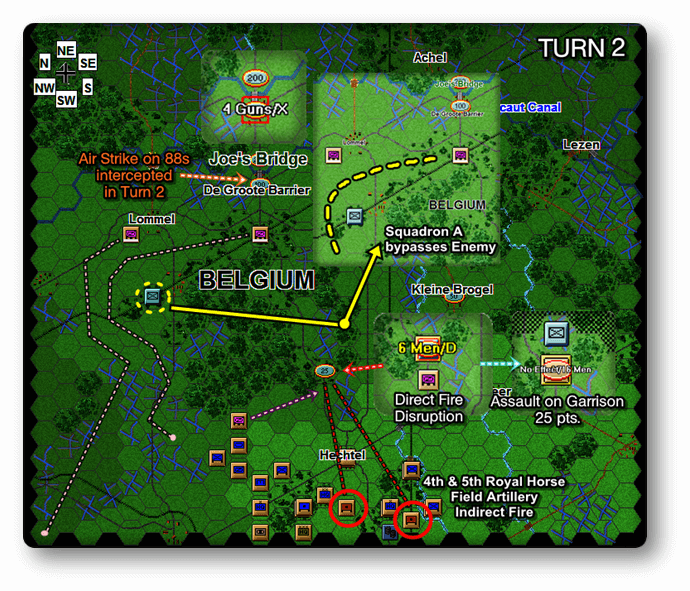
Today I would need these eyes and ears not just to scout terrain, but also to take it, and then deny it, until relieved. (Turn 1 & 2 combined diagram)
Turn 1 September 10, 1200 hours – Allies
I finally gave my staff the “Go” order, and within minutes the plan was put in motion. Now all I could do was read the intelligence as it presented itself.
My summation follows all field reports that come in from the battlefield. My superiors love reading battle reports.
Task 1 – ‘Recon of the left flank’: Squads C & A, using Travel Mode up the Lommel Highway, revealed very little despite a unit of Wehrmacht <100 men in forests just SE of the town. Opportunity Fire was a mere nuisance but in all, nothing to concern me. Lommel, surprisingly, was clear of Jerry. As a matter of fact, that whole left flank was pretty much clear. I feel something ominous is afoot.
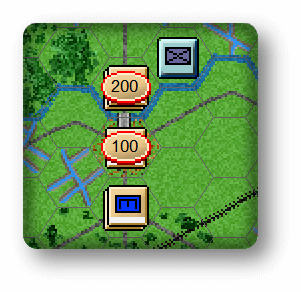
Task 2 – ‘Recon Objective Central’: B Squad, using Deployed Mode, moves hex by hex, adjacent to the central objective. It exposes a unit of Wehrmacht >100 garrisoning the town, in improved positions. With the ability to assault, I hold off until the Royal Horse Artillery sends their greeting cards to Jerry. In this manner, I will be able to mop up any resistance left over, since Jerry was Disrupted, and move on to my next 25 pt. objective. Two volleys surely did the trick, and as a result, Jerry retreated northward. I doubt I will garrison it myself since I have more pressing matters to attend to. However, my artillery will serve as a great deterrent to Jerry.
German response:
At Joe’s South, a unit of 88mm Anti-Tank guns <10 strong reveals itself through long-range direct fire at A Squadron, causing the loss of one vehicle. Still in Travel Mode, A Squadron otherwise survives the rude welcoming. Thankfully, long-range direct fire is not as potent as close range.
Personal Log:
I was surprised, and admittedly, relieved to hear the left flank was mostly spartan of Wehrmacht. Logically, since it was devoid of him there he surely was elsewhere, but where? My only summation is he has lodged himself in and around those objectives that are so critical to me. Never underestimate your enemy is a very good adage to follow. With the central objective disrupted and successfully assaulted, I feel this mission is moving at a good pace. Unless fate plays me a bad hand I should be able to reach the bridge long before my scheduled time (Turn 8) is up. I am disturbed of the report of 88s lined along the bridge itself. A recon vehicle versus AT guns is NOT what I call a fair fight. Luckily I have an Ace in my hand called the RAF. It’s time to put that to use.
Turn 2 September 10, 1400 hours – Allies
With artillery disrupting, and summarily, evicting Jerry in the central objective, the new tenants, the British, have officially moved in. Now it was time to send the RAF to do God’s, and my, work: take those 88mms out. Sometimes lady luck takes a walk, and comes back later. My airstrike was intercepted. Not good. “Okay, gents, let’s do it the hard way.”
(This is actually Turns 1 & 2 combined)
This seriously jeopardized my chances of staying on schedule. I would have to ask my recon units to do the unthinkable: assault the 88’s, and take the bridge, until I could divert armor their way. They understood, and then tightened their chin straps. It was about to get bloody.
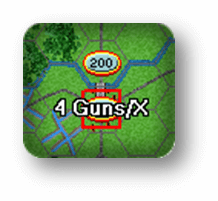
Task 1 – ‘Assault the Bridge’: Use the limited assets I have and take the bridge. Without the RAF help I so desperately needed, this will be a battle of attrition. But it has to be done. There’s no real battle plan for this except to rush the bridge in Movement Mode, because that’s the only way you can cross bridges, and take your licks, as well as dishing them out to your opponent …and let the last man standing claim the bridge as his own. C & A Squadron, both recon units, know what’s at stake if they fail. So the assault for the bridge will begin in Turn 2.
Task 2 – ‘Clear the Central Objectives’: B Squadron’s job is not done yet! The second part to their assignment is another 25 point object due east (figuratively speaking). Now this objective could be bypassed if the dual-side bridge objectives are taken, AND, Kleine-Brogel (50 pt.) objective, in my mind, a sure thing. But I never underestimate Jerry, and his propensity for spite. And also, if I am short on points do I risk confrontation just to gain the needed victory points? What if he inflicts more on me than I to him?
Not a proposition I am willing to take. No, the order is: take it, and hold it, until XXX Corps relieves you. This objective, in my opinion, is probably the most crucial for the reason I stated recently. All the eyes of HQ will be fixated on what B Squadron does in the coming turn.
 German response:
Jerry also understands the importance of what I am doing at the bridge, obviously, and yet, by sheer will and courage, my men of C & A squadron withstood the 88mm onslaught; low on ammo, and through opportunity fire, successfully eliminated all the barrels of death. But not without loss; C & A Squadron severely paid the price as they spearheaded the charge. In wake of that, Jerry pulled off the bridge and regrouped 2km away. I’m sure even he admired the courage, foolhardy as it was, in such gallantry.
Personal Log:
Seven vehicles lost against those four 88mms. Damn the RAF! But a good field commander has no time for grief or complaints in the midst of something as important as this. In conclusion though, what those recon boys did was nothing short of heroic. They alone, gave me the leverage I needed, and as soon as XXX Corps is released those boys up there will get the needed relief I promised. I blame myself for not adhering to the Supply rules.
Turn 3 September 10, 1600 hours – Allies
 Task 1 – ‘Secure the second 25pt objective’: The Royal Horse Artillery continues their harassment of Jerry. B Squadron subsequently assaults, and displaces Jerry. With the second 25pt objective secured, XXX Corps can now assign a unit to garrison it as B Squad is ordered to join with elements of XXX Corps’ right flank assault group against the village of Kleine-Brogel; a 50pt objective.
Task 2 – ‘Secure Joe’s Bridge’: With both sides occupied, and available movement points, each maintains Travel Mode, and waits for relief.
Task 3 – ‘Reinforce Joe’s Bridge’: The first release of XXX Corps occurs on schedule. Using Travel Mode, all units ‘drag and drop’, to their maximum reachable movement range, aiming to establish a defensive perimeter to the east, and south east, of Joe’s South. All units make the journey without contact, via the western flank of the map.
German response:
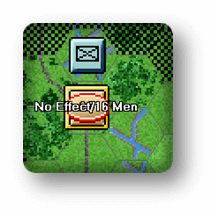
Indirect fire targets the heroic A Squadron at Joe’s Bridge, with no effect, while the beaten enemy at Joe’s North retreats further away. No additional enemy activity is observed anywhere on the map.
Personal Log:
The chance to strike at the heart of this battle was at hand and, within just three turns, both critical Joe’s Bridge objectives rest in XXX Corp’s hands. By the utilization, and fortune, of solid scouting, the probing fire of last turn, the lack of enemy vigilance, and the reduced morale of his troops, the method was set for yet another risk in sending A Squadron, now exposed, as our bridgehead over the Escaut Canal. So, it is with huge relief that I see the first gathering of XXX Corps released to my control, and taking position, (albeit an exposed one at that), around Joe’s South.
Turn 4 September 10, 1800 hours – Allies
Task 1 – ‘Defend Joe’s Bridge’: C Squadron, using Travel Mode in order to cross the river, joins A Squadron at Joe’s North. Both change into the tougher combat-ready Deployed Mode. XXX Corps positions its units to the east and south east of Joe’s South and the infantry of B Company switch to Travel Mode in readiness to join the Joe’s North bridgehead next turn.
Task 2 – ‘Prepare XXX Corps for right flank battle’: Most of this involves all the remaining XXX Corps’ units to be in Travel Mode, and make haste to the 50pt objective; the village of Kleine-Brogel. XXX HQ moves to the town of Hechtel, preparing for the final push westward.
German response:
At Joe’s North, the routed Wehrmacht, in an act of bravery, or foolhardiness, halts its recoil, charges Joe’s North, and is destroyed by the successive opportunity fire of C and A Squadrons; a fine waste of good infantry.
Personal Log:
In spite of this one episode of German belligerence, the landscape around Joe’s Bridge lays dormant. Yet, I know Jerry is out there. A Squadron radios a craving to probe to the north but, as enticing a scheme as that may be to a recon unit, in place all northern units must stay!
Turn 5 September 10, 2000 hours – Allies
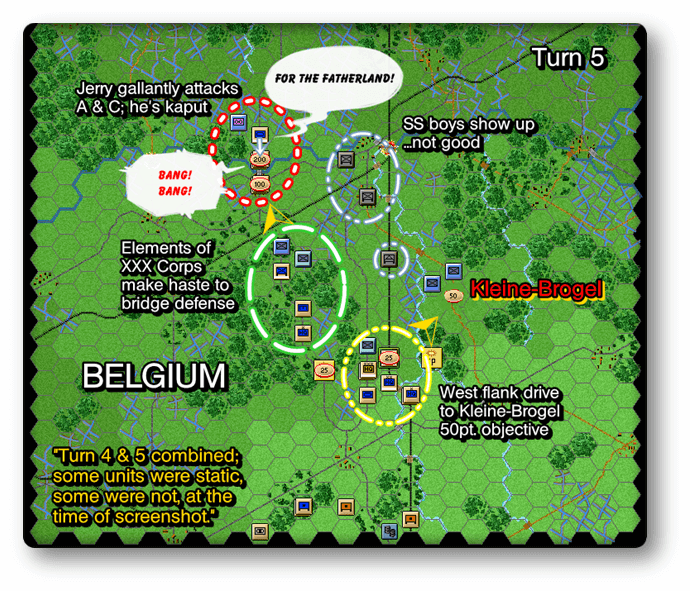
Task 1 – ‘Reach Bridge’: Remnants of XXX Corps will drive up the center of the map in hopes of reinforcing the bridge. They are ordered not engage the enemy; avoid at all cost – get to the bridge.
Task 2 – ‘Race to 50pt objective’: XXX Corps right flank needs to press onward toward the 50pt objective, Kleine-Brogel.
German response:
Elements of the II/SS Panzergrenadier and I/SS Artillery (500 men & 9 guns) arrive late to the party, and set up shop in and around the village of Neerpelt. Two regiments of Luftwaffe also appear and take position north of the 50pt objective. After a brief outburst from Jerry, Joe’s bridge remains quiet, for now.
Personal Log:
To be honest, I was wondering when Jerry’s elite (the SS) might show up, and where. It’s obvious he now knows what it is I need, and will most likely divert everything he can in my direction. XXX Corps’ central push towards the bridges reveals Jerry’s hand. I fear the greatest fighting of this operation is about to begin…
Turn 6 September 11, 0000 hours – Allies
Task 1 – Hold until relieved, at Joe’s bridge, despite Jerry’s saber-rattling.
Task 2 – Get to Kleine-Brogel as soon as possible. Time (turn) is critical.
German response:
All is quiet up north at the bridge, though a sprinkle of units chess piece their way in. I feel much better knowing I have available units to counter anything the Germans throw my way…at least that’s what I hope.
Personal Log:
Everything rides on what happens at the 50pt objective, though I have a gut feeling something ominous is looming as Jerry has been very covert about what he is doing, and justly so I suppose. This operation has been pretty smooth so far but that can change at no warning.
Turn 7 September 11, 0400 hours – Allies
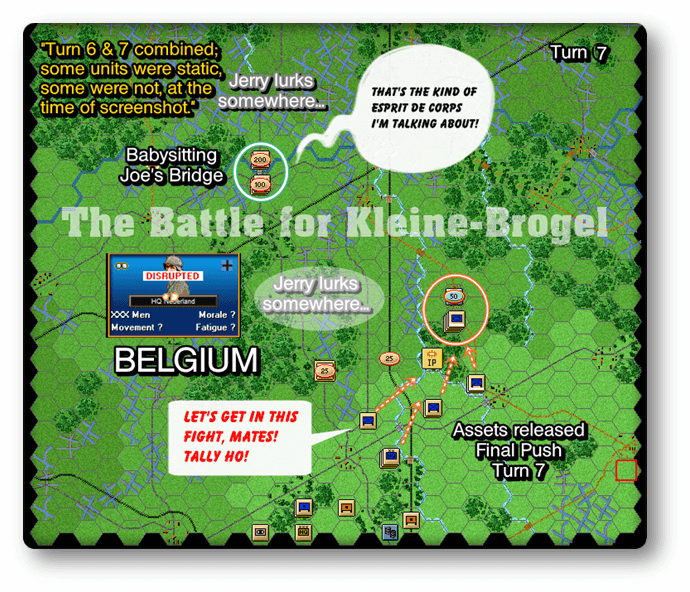
Task 1 – ‘Bolster the bridgehead’: As promised, Joe’s bridge was reinforced and secured. XXX Corps central now strengthens both sides of the bridge. Recon squads C & A will receive the highest decorations the British Army can bestow for their heroism in the face impossible odds.
Task 2 – “Get to last objective’: The remaining assets, now under my control, are driving northwest towards our final objective. There are numerous reports of enemy activity nearby, but haste is the word of the day, and all units reach their designated staging areas in good order.
German response:
Jerry has gone into hiding in the central map area, as well as up north.
Personal Log:
My men can feel it in the air that we are near the end of this operation, and success is just moments away. I hear the radio traffic, and hear the jubilation and enthusiasm to get the job done. I usually curtail such behavior at this but, in light of what we faced, I allowed some latitude. I was reminded that I have just two turns to keep on schedule. Two turns….anything can happen.
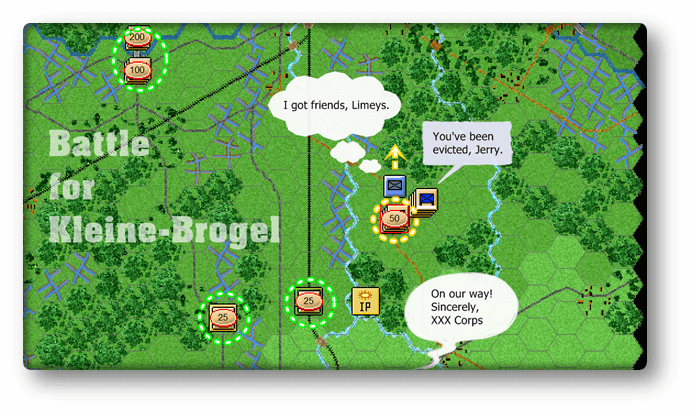
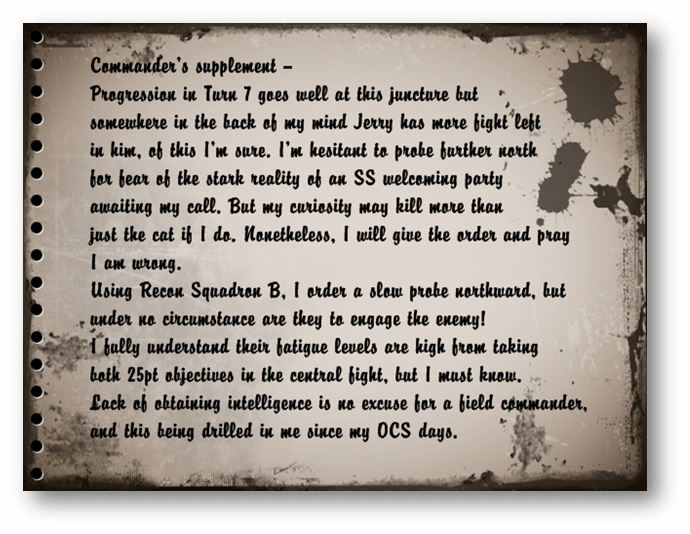
Task 3 – ‘Take the objective’: Use every available asset to capture the objective hex, and build a perimeter around it.
Task 4 – ‘Mop up’: Garrison the 25pt objectives in the central map area. Jerry is sure to try and throw a wrench in recapturing at least one of them, right? I would. But I’m reasonably sure my artillery batteries will show him the errors of his ways.
Task 1 – ‘Remain vigilant’: All quiet at the Northern Front: Joe’s bridge, for some unforeseen reason, remains inactive. Why? What are you up to Jerry? Did he miscalculate my ability to actually take the bridge and left it under-strengthened? Did I miscalculate the very premise? I still feel the coming Turn will prove whether or not either one of us was right or wrong.
Task 2 – ‘Create havoc’: My artillery boys felt they needed to be involved more so the order was to crater anything that wasn’t us. To see the esprit de corps in the front troops surely was infectious to them.
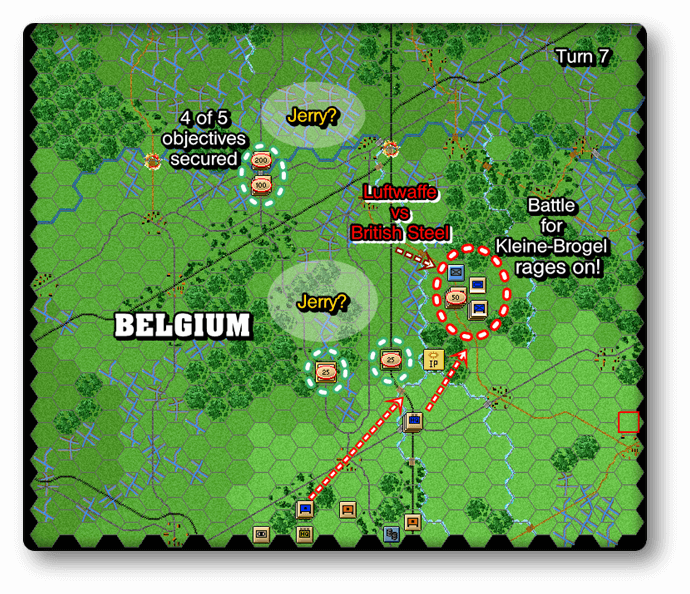
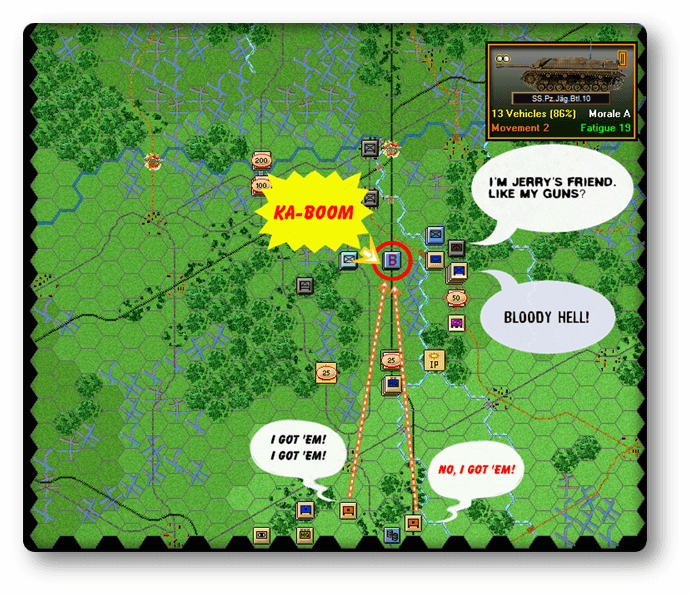
German response:
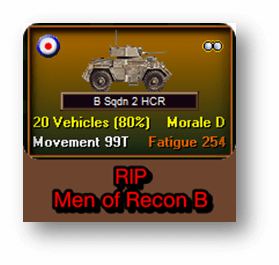
And so it comes! Never second-guess a gut feeling. Jerry has finally shown me his hand completely. Fifteen SS Jagdpanzer IVs, crushing anything in their path, storm through the gloomy forest 2kms north of the 50pt objective. Recon Squadron B will never see how this battle ends as they were the first to fall from these metal beasts, but not without a fight, and through combined XXX Corps elements, knocked two Panzers out of this battle.
Personal Log:
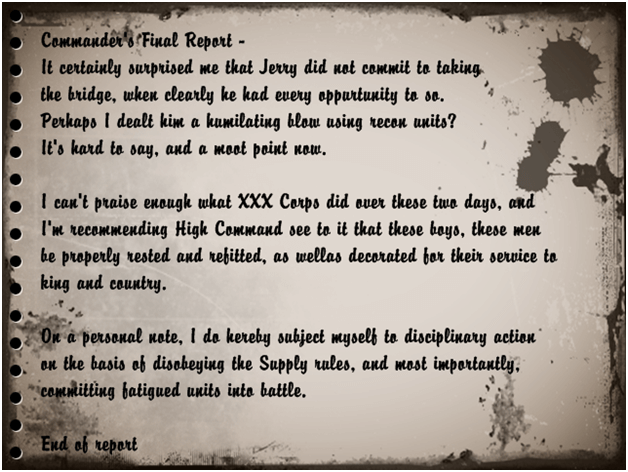
He would not go ‘quietly into the night’, so to speak. I’m sure the High Command will reprimand me for pushing a fatigued unit (Recon B) back into combat. But what else was I to do? In their own minds, the ends justify the means, I suppose. I should prepare myself for all those “Dear Ma’am” and “Sir” letters after this is over.
I will, however, make sure these chaps lives will NOT be in vain. Jerry has instilled in me a rage I’ve not felt since our evacuation at Dunkirk. ‘No, Jerry, this time you will pay, and pay dearly.’
Final Turn September 11, 0600 hours – Allies
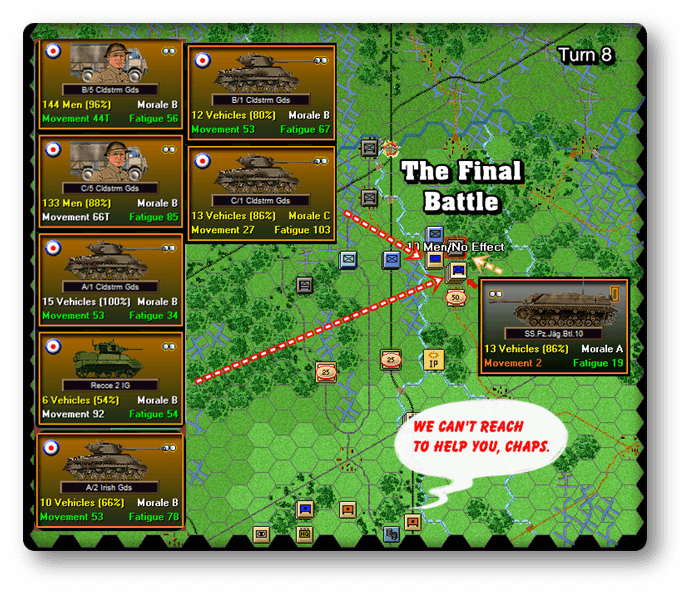
Task 1 – ‘Defend the village’: The Guards Armored Division, using Deploy Mode, buttons up and faces the Devil himself. This was a hybrid of the Sherman Vs and Stuart IIIs. All known tactics for/against tanks should be used to compel Jerry to think otherwise about assaulting the village. Those Panzers have a Hard Target rating of 24/2 compared to the Sherman’s 21/2 target rating.
Task 2 – HQ will position itself on one of the 25pt objectives to monitor the progress, and keep in-command.
German response:
It was a battle of attrition, and only due to the skill and bravery, did XXX Corps armor prevail. It seemed like we were shooting spitballs against those Panzers, but our tank commanders found a way to give us time to meet our victory conditions. The Luftwaffe infantry broke and ran as our tanks stood their ground and showed Jerry what the British Army can do. I suppose 25 tanks would make anyone run in face of elimination.
Okay, fixed boo boo.
just bought this game.i have been playing it never snows by mmp.
how is this game in pbem?
That I don’t know. I have never had the chance to do that. I played it solo.