this is part two of six of the training module for TSWW using the Singapore module
part one can be found here
February II 1942 – Overview
The game starts in the Allied Pursuit Phase of the Feb. II 1942 Turn. We will roll for weather. We will also assume naval-coded air units, some other air assets, and fighters are on or available for appropriate missions (e.g., recon planes available to spot from base under Rule 8.H; others pre-assigned to naval co-op missions.). The weather zones are Tropical Monsoon (to west) and Monsoon South (to east). Rolls for weather are 2 and 6. This means both zones are cool (+6 DRM the temperature) and weather poor (+0/-1 DRMs respectively). Seas are rough. These conditions affects various aspects of the system, including spotting, bombing, naval gunnery, and movement.
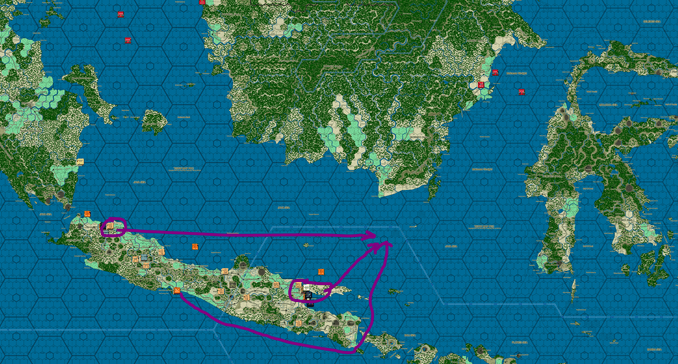
The scenario is designed to enable the Allies to re-fight the battle of the Java Seas (historically a disaster). Here, as we are demoing the system, nothing ventured, nothing gained. The Allied plan is to concentrate naval assets against one of the two separated Japanese forces. In particular, the Eastern force must pass between Borneo and Java on the way to any objective on the north Java coast. The Allies will sail to sea and hope to use the Naval Interception rule (13.S) to attack the Japanese landing forces. Interception is one attempt per Naval Task Group (NTG) per Naval Movement Step (NMS), so the Allies will seek a position in the Java Sea within range of some air cover yet where the Japanese must steam through. [NB: Allies could just sail up and try to engage the Eastern Japanese TF, but then would be in short-range strike range of Japanese anti-shipping Betties; a choice].
Feb. II 1942: Allied Pursuit Phase
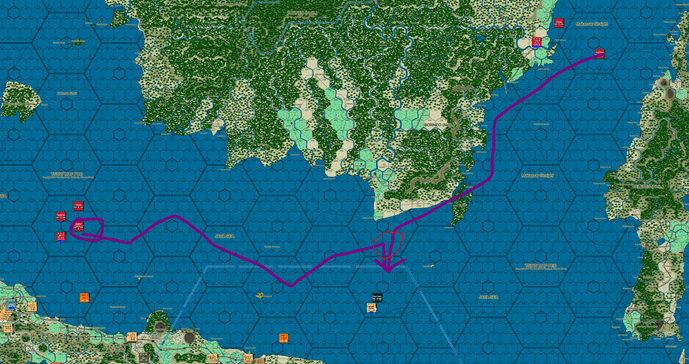
Allied NMS. Per the ABDA grand plan, the Allies sail to the rendezvous point in 3 separate NTGs, one from each of the major ports. The number of NTGs affects Japanese spotting attempts; the fewer NTGs, the fewer attempts. (Another reason to send fewer, larger NTGs is subs, as subs attack each NTG separately; in this scenario, Japanese subs are absent).
First, the Allied force from Tjilatjap sails. NTG 23 consists of the US DDs Patriot and Pillsbury. As Clemson class DDs, they have an SMA (essentially fuel) allowance of 8 per NMS (though it really means 32 over 4 NMSs as a practical matter) and with a tactical speed of 9 can expend 21 SMPs (21 is fast; 14 normal).
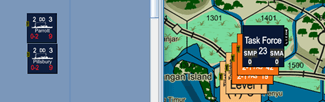
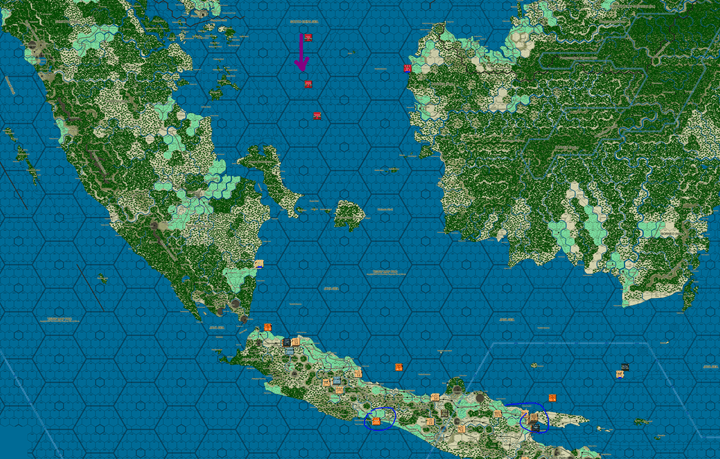
TF 23 expends 9 SMPs/9 SMAs to move to the rendezvous point in the above map. Although this is greater than the TF’s SMA allowance, that is fine as long as they get back to port within 4xSMA allowance in 4 naval movement steps (see 9.E). The only Japanese recon asset is a Pete floatplane squadron in Singkawang, top of the above map. (It would be inefficient to put excellent naval bombers, such as Lillys, Kates, and Betties on naval patrol, because they cannot bomb if they spot). The Petes, with only a range of 11, cannot spot the US force as it moves, as it is far out of even extended range (spotting from a base on land is to a Sea Zone within range -2; see Rule 8.K.4; and range can be extended). Nor does Japan have subs to spot. Thus, the US force moves unmolested.
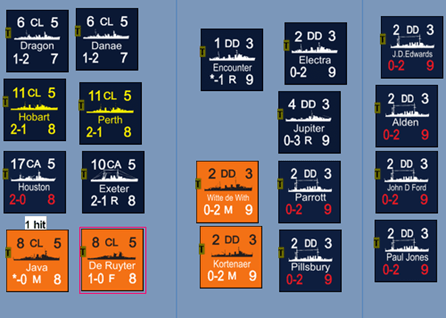
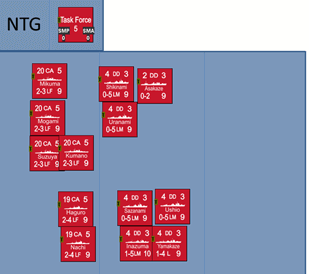
The same is true of the other major Allied naval forces from Batavia and Soerabaja. The Japanese have no ability to detect them as they move. By the time the force takes up station between Borneo and Java it consists of the following ships. Only minor force are left at Soerabaja and Batavia. The Allies cannot split their force, as that invites defeat in detail. To this end, the Allies are in a single NTG (which can split/recombine at any time). They will reply on air power to deal with the Western Japanese force:
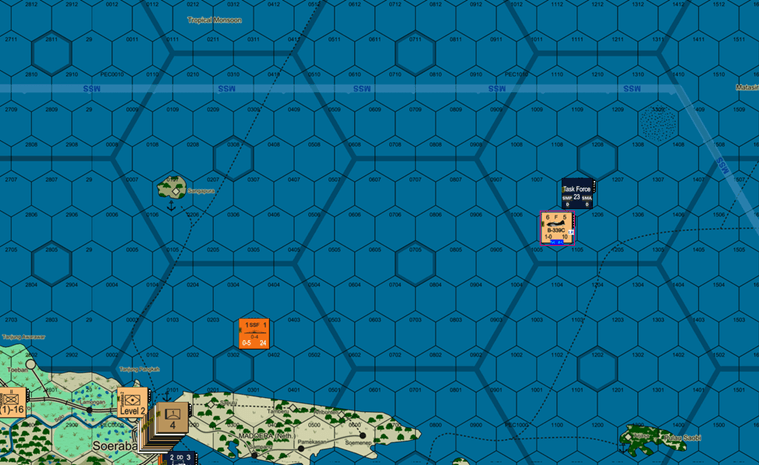
The Allies consider assigning Air Cover (8.K.f). Air Cover missions have advantages over interceptions, because they can stay on station until returned, destroyed, or ships move out of range, and because they can be long or extended range, unlike interception. There is a risk (1-3 on a D10) air cover fails; but then it can find another NTG if it does not. Unfortunately, the only fighters are quite short range. They would need to fly extended range (which lowers the air attack rating). The Allies judge that risk worth it, and on an 8, the Dutch B399Cs cover TF23 at long range (required because need 2 x movement (-2) to reach the applicable Sea Zone). The Allies could be under better Air Cover by positioning the fleet closer to Java. But, hey, who said these were optimal moves?
Japanese NMS. The Japanese naval forces then proceed to move. Although not specified in the scenario, we will assume all forces have spent 1 NMS at sea and burned, given distances, 1/8th of their fuel (e.g, ½ of SMA). This matters for some of the shorter-range vessels, such as LCs moving on their own (see Rule 9.K.2.a). Unlike the Japanese, the Allies have significant naval-recon assets, including PBYs, Dorniers, and Catalinas. These will spot from base, as the Japanese move, pursuant to Rule 8.K.4.c. With that in mind, the Japanese proceed cautiously. The Japanese fighter is considered on CAP in the Sea Zone with the carrier (8.K.4.e).
Note that all naval movement is considered simultaneous. Given the spacing between the Japanese NTGs, however, it makes sense that the Allies would perceive the moves as follows.
The Western Japanese naval group moves first. First order of business is for the Convoy to steam into the same SZ as the carrier, to benefit from the cover provided by Ryujo‘s CAP. As the Convoy expends one 1 SMA/1SMP for the move, Allied PBYs and Catalinas, in Soerabaja and Tjilatjap (in blue below), seek to spot it from base. Spotting from base is once per NTG per NMS; and the Allies make the attempt before the Convoy moves into the same SZ as the CAP (as CAP reduces the effectiveness of searching from base; see 8.K.4.c/e). The Sea Zone must be within long range of the air unit (-2). Here, the target SZ is 50 hexes from Tjilatjap. The Catalinas and PBYs, with normal range of 42 and thus long range of 84, easily have the Japanese within search range.
The modifiers to the spotting attempt from base are weather (-1 rough seas), ACEV or NEM, as applicable (+1 for USN; -1 for Dutch Naval Air – note the Naval planes use NEM and not ACEV), and +1 for each unit being a Wing. So PBYs spot on a 7 (need 8, net +1) and Dutch on a 9 (net -1). They both miss with 2s.
Having joined the convoy with the CAP-covered carrier, the Japanese continue to move the Western NTGs. The Heavy Cruiser TF (in the van) moves south, with the Carrier in Convoy following. All will rendezvous off the North Coast of Java. The force does not intent to end the NMS adjacent to Java, as that risks a further spotting attempt from Coastal Watchers (9.I.9).
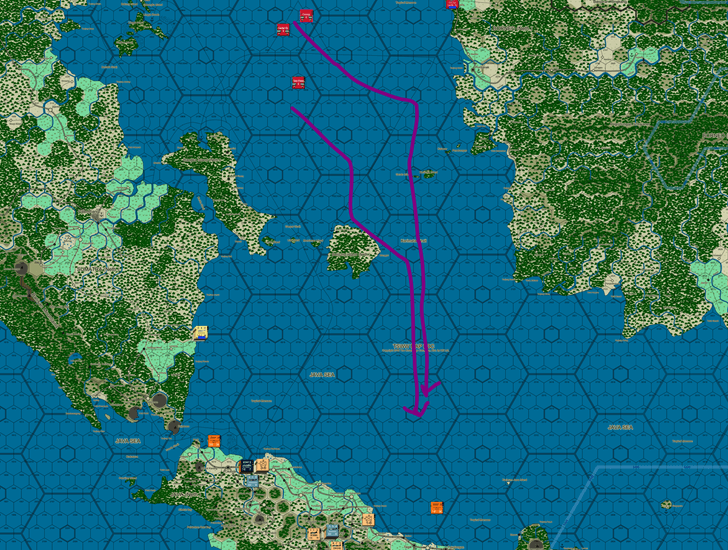
As the Heavy Cruiser TF moves, the PBYs and Catalinas can spot (same mods). Rolls are 1 and 9; the latter spots the Japanese CA force. The Allies also seek to spot the Carrier; the rolls here are -1 due to the CAP. Rolls of 6 and 1 fail. The Allies want to launch an air strike (naval co-op mission) against the spotted Cruiser TF when it is north of Belitung Island, before it can link up with the carrier and benefit from the CAP. Unfortunately, the British Vildebeast torpedo bombers, with a range of 11, cannot attack that far, even at long range. Do24Ts in Tjilatjap could attack but wait to see if the Japanese move closer.
As the Japanese TFs, having rendezvoused, enter the waters north of Java, they enter the patrol zone of the full-strength Dutch sub, which extends 1 SZ beyond its hex. The Dutch sub can first attempt to spot:
The spotting attempt is -1 (for a sub), -1 weather, and -1 for being an Allied minor (NEM), So it cannot succeed (modified 8 not possible). However, the sub can attack the previously spotted Japanese Heavy Cruiser TF. Before the sub attacks, however, the targeted NTG can attempt to detect the sub (See Rule 13.0.7.c) and, having moved into the sub’s patrol zone, so too can the other two Japanese NTGs (see Rule 9.I.5). When in the same SZ, the TFs reorganized slightly (they can reform at any time) with ASW in mind. Each Japanese DD is 0.5 ASW points, and a DEF 3 (6 ships @ 0.5 each). The Convoy has 8 ASW points, the carrier TF a total of 2, and the cruisers 1.5. So the Convoy, with 8 ASW points, gets a +1 to its spotting roll (see 9.I.5). Its spotting attempt is -1 (weather), +1 (ASW) points, +1 for Naval efficiency, so net +1. A roll of 3 misses. The other two NTGs have an unmodified roll (fewer than 8 ASW points). But the carrier TF finds the sub on a roll of 10, and thus the cruiser TF may engage in ASW against the now spotting sub before it completes it attack (13.0.7.c). Note the Convoy and Carrier NTGs will not attack the sub, as doing so automatically would lead to their detection (13.0.7.e).
The ASW combat, however, is poor odds for Japan. The attack is -2 for having only 1.5 ASW points (13.0.7.b), -1 for weather; however, relative naval efficiency is +1 v. -1, for a +2 modifier. So net is -1. A roll of 7 misses. The sub may now immediately counter-attack. The torpedo strength of 8 is reduced by a third (rounds to 5) as at normal Range (13.0.6). 3 strikes are allocated against Mogami and 2 against Mikuma. Each strike, however, is very long odds: -1 (weather); -2 (relative NEM). None can hit absent a critical hit. In short, in rough seas, the Dutch subs are good for absolutely nothing. The ASW combat costs the Cruiser TF 1 SMA. The subs fail to roll 10s and thus no critical hit.
The Japanese carrier-based planes can strike at any time (9.H.2). But the Vals will hold off for the moment. The Allies, however, decide it is now or never. British Vildebeats, escorted by Dutch B-339Ds, seek out the Dutch Cruiser force. If they find the ships at (see 8.L.2), they will need to tangle with the Japanese Claudes standing CAP over the Sea Zone:
But, the Allies must try to find the Japanese at sea . . . . They roll at 1 (which is not only a miss, but would hit any friendly NTG). The Japanese Heavy Cruiser TF then swings East. It maneuvers to a point north of the Allied Cruisers, and waits to join with the Eastern covering force:
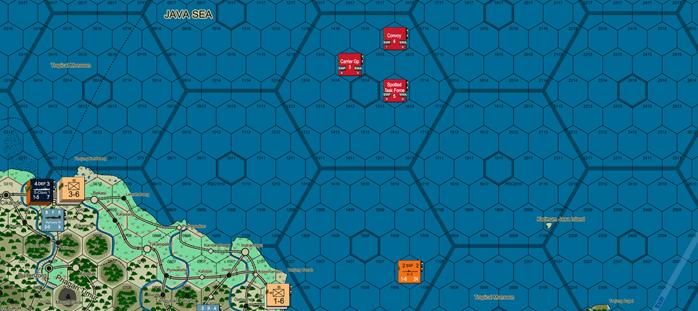
The whole Allied strategy turns on intercepting the smaller, Eastern Japanese Heavy Cruiser force (2xCAs) and defeat it in detail before dealing with the larger Western covering group. But that strategy turns on detecting the Eastern NTG and intercepting it before it joins with its Western counterpart. You cannot intercept what you have not spotted (see Rule 13.S). As the smaller, Eastern Japanese Heavy Cruiser TF moves, it, too, can be spotted by the Allied PBYs and Catalinas. Rolls of 2 and 3 (modified per above, +2 and +0), though, fail to spot the Japanese. So, the Allied strategy has failed for lack of sufficient recon assets! The Allied NTG could be deployed to detect forces in adjacent SZs (see “Extended Search,” Rule 9.I.4.a), but that wouldn’t help here, as the Japanese plan to join up in the adjacent waters, and it would lead to vulnerabilities in the event of combat.
The two Japanese TFs then, as planned, combine off Borneo into a new TF5. The TF also acquires air cover from Zeros — which have great range — based in Borneo.
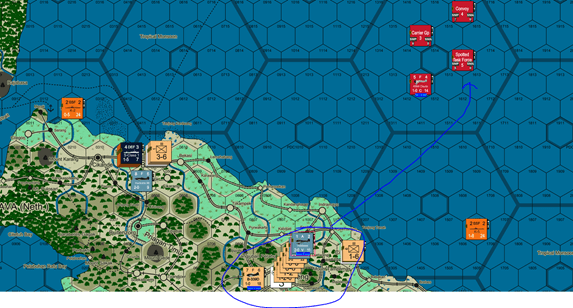
The newly augmented cruiser force then sails one SZ south to seek out the Allied fleet. Both Heavy Cruisers TFs are fast (Speeds > 6) and can move 21 SZs per NMS (SMP allowance). With all the maneuvering thus far, ships in the original Western TF have moved 12 (with 13 SMA expended), and the original Eastern TF 6 (6 SMA). We will come back to these expenditures in a bit. The Japanese are spotted [combining the two TFs took on the spotted status of the Western TF], but need to spot the Allies themselves to force transit naval combat
To aid their spotting, the Japanese enter “Search Mode.” (See Rule 9.I.2). The 7 Japanese DDs give a +2 to the spotting roll per that rule (costs more fuel, 2 more SMA). The search modifiers are, in addition, -1 for weather and +1 for NEM. In addition, the Japanese cruisers have float planes. 3 or more Code F ships give a +3 to spotting (see Rule 13.P.). So the Japanese who really want to find the Allied fleet, roll with a net +5. . . . The spotting roll is a 9, and the ABDA fleet is found.
Before the Japanese attack (technically before the successful spot), the Allies launch a desperate air raid. 3 USAAF wings — A24s, B17s, and LB30Bs operating out of Soerabaja — try to find the Japanese fleet.
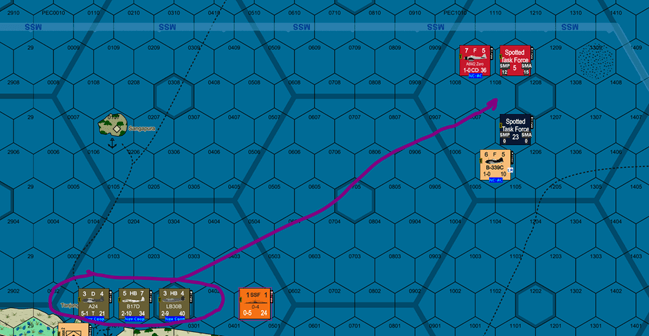
As before, the Allies must roll [6-10, no mods] to find the Japanese ships at sea. The A-24s and the LB30Bs find the TF. The Zeros on station (Air Cover) focus on the A-24s — much more deadly because Code T Dive Bombers.
So we move to ATAC. The intercepting zeros roll on the +3 column (7 attack v. 4 defense); the DRM is net +1. Japanese have fighter advantage as intercepting force (for +2; no allied escorts) but pilot quality gives back -1 (ACEV of 2 for the US; NEM for Japanese Naval Air of 1). A roll of 4 is modified to 5 for a “1” result. The A24 is reduced and continues with its mission. It returns fire on the -2 column with a DRM of +1 for ACEV/NEM (the fighter mod is inapplicable here; it only applies to intercepting force and only its fire). The modified 4 is no effect, and the Air Cover remains on station for Japan.
The remaining Allied units now brave the AA of the Japanese TF:
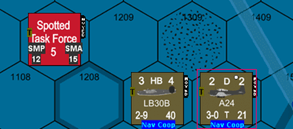
Total AA in the TF is 15 (4 DDs with 0 count as 1). It fires at each US air unit with the following modifiers: +1 for NEM, +0 for National Technical Means, +2 against the HB (only). The rolls are 8 (becomes 9) against the A24s and 5 (net 8) against the LB30Bs. This results in “R” results against both. This basically reduces the strike by 25% (dispersion result only applies to strategic bombing, inapplicable here). Allied bombers now make their run:
-
The A-24 targets Mogami with 2.25 factors (2 X 1.5 for being Code T (a key benefit; OBF x 1.5 for code T units), reduced 10% for weather and 25% for AA). A 75 on percentile dice make it only 2 factors. The code T dive bombers roll on the success table with a +1 for relative ACEV/NEM (2 v 1), -1 (weather), and +2 for being dive bombers (8.L.3.a); net +2. Rolls of 6 and 8 place 2 hits on Mogami.
Mogami’s tactical speed – an important consideration for the battle to come — is reduced a further point (now 7; originally 9).
-
The high latitude level bombers, by contrast, bomb with a -2 (-2 for level bombers without special naval training; -1 for weather; +1 relative quality). 1.8 factors (10% down from 2 for weather) becomes 2 tries on the success table. They need a 10, and miss with a 9 and 8. What a difference dive bombers make!
The Japanese, in turn, try to find the spotted Allied fleet with Borneo-based Betty bombers. But they fail with a 3. Army Lilly bombers based in Sumatra similarly fail. So too do the CVL/based Kates. We move on to transit combat (Rule 13.A), which the Japanese declare:
The Battle of the Java Seas.
Tune in next week for this battle.